Quantcast
Channel: Linux webhosting Archives | Unixmen
Viewing all 62 articles
Browse latest View live

Install GestioIP IP Address Management Tool on Ubuntu/Debian

$
0
0

GestióIP is an automated, web-based IPv4/IPv6 Address Management (IPAM) software. It features powerful network discovery functions and offers search and filter functions for both networks and host, permitting Internet Search Engine equivalent expressions. This lets you find the information that administrators frequently need easily and quickly. GestioIP also incorporates an automated VLAN management system.

Install GestioIP on Ubuntu/Debian

Install the following prerequisites first:

sk@server1:~$ sudo apt-get install libapache2-mod-perl2 apache2 mysql-server

Download the latest version of GestioIP from www.sourceforge.net:

sk@server1:~$ wget http://sourceforge.net/projects/gestioip/files/gestioip/gestioip_3.0.tar.gz

Extract the zip file:

sk@server1:~$ tar zxvf gestioip_3.0.tar.gz

Change to gestioip directory:

sk@server1:~$ cd gestioip_3.0/

Install it using the command:

sk@server1:~/gestioip_3.0$ sudo ./setup_gestioip.sh

This script will fetch all the required packages from the internet and install them automatically. During installation the installer will ask you couple of questions regarding Apache user, Apache configuration file and Perl modules etc., just press ENTER or type Y to continue with the installation.

After a couple of minutes the installer will stop at one stage and ask you to enter the following commands in new shell:

+++++++++++++++++++++++++++++++++++++++++++++++++++
Now open a new shell and execute the following two
commands LIKE ROOT to create the GestioIP apache users:
+++++++++++++++++++++++++++++++++++++++++++++++++++

sudo /usr/bin/htpasswd -c /etc/apache2/users-gestioip gipoper
sudo /usr/bin/htpasswd /etc/apache2/users-gestioip gipadmin

After this press ENTER

Open new terminal by pressing SHIFT+CTRL+T. Execute the above two commands:

sk@server1:~$ sudo /usr/bin/htpasswd -c /etc/apache2/users-gestioip gipoper
New password: 
Re-type new password: 
Adding password for user gipoper

sk@server1:~$ sudo /usr/bin/htpasswd /etc/apache2/users-gestioip gipadmin
New password:
Re-type new password: 
Adding password for user gipadmin

Now switch to installer terminal and press ENTER. Now, you will see an output like below.

Under which directory should GestioIP's script files be installed [/usr/share/gestioip]?
OK, using script base directory /usr/share/gestioip

+-------------------------------------------------------+
|                                                       |
|    Installation of GestioIP successfully finished!    |
|                                                       |
|   Please, review /etc/apache2/conf.d/gestioip.conf
|            to ensure all is good and                  |
|                                                       |
|              RESTART Apache daemon!                   |
|                                                       |
|            Then, point your browser to                |
|                                                       |
|           http://server/gestioip/install
|                                                       |
|          to configure the database server.            |
|         Access with user "gipadmin" and the
|        the password which you created before          |
|                                                       |
+-------------------------------------------------------+

Restart your Apache server now:

sk@server1:~/gestioip_3.0$ sudo /etc/init.d/apache2 restart

 Now navigate to http://ip-address/gestioip/install from your web browser and follow the on-screen instructions.

Enter the username as gipadmin and the password which you created earlier.

Mozilla Firefox_002Click Next to create and configure database for Gestioip.

installation GestióIP - Mozilla Firefox_003Fill up the database and user details. Click Send.

installation GestióIP - Mozilla Firefox_004This will create the necessary database and tables for GestioIP. Click Next page to continue. Enter the sites and category details. For example if you have managing your IT infrastructure on various location, enter the locations in the Sites box.

installation GestióIP - Mozilla Firefox_005This will create the sites and category. Click Next page to continue. Now GestioIP has been successfully installed.

installation GestióIP - Mozilla Firefox_007Enter the following command to delete the installation directory (/var/www/gestioip/install):

sk@server1:~/gestioip_3.0$ sudo rm -r /var/www/gestioip/install

Now navigate to http://ip-address/gestioip from your browser and start managing IP addresses.

GestióIP - Mozilla Firefox_008That’s it.

This tool will be quite useful for Network Administrators and System Administrators one who maintain large number of networks. From here you can create new networks, VLANS and manage networks and so forth. For more information about GestioIP usage and configuration please refer the GestioIP documentation page.

--------------------------------------------------------------------- Install GestioIP IP Address Management Tool on Ubuntu/Debian


How to Install Latest GIT on RHEL 6/CentOS 6

$
0
0

So you want to setup a GIT Repository for your developers on RHEL 6/CentOS 6, but notice Red Hat Enterprise Linux 6 contains 1.7.1 in the repositories, which is well behind the current 1.8.3 that is available for GIT at http://git-scm.com.

Well no need to worry, it is easy enough to download and install the latest on a typical RHEL/CentOS installation.

First let’s download all the files that are required for GIT installation:

$ wget http://git-core.googlecode.com/files/git-1.8.3.4.tar.gz
$ wget -O git-manpages-1.8.3.4.tar.gz http://code.google.com/p/git-core/downloads/detail?name=git-manpages-1.8.3.4.tar.gz&can=2&q=

Next, install all required libraries before building GIT:

$ sudo yum install zlib-devel perl-CPAN gettext

Now let’s untar and build and install GIT in the /usr directory:

$ tar xvfz git-1.8.3.4.tar.gz
$ cd git-1.8.3.4
$ ./configure
$ make
$ sudo make prefix=/usr install
$ git --version
git version 1.8.3.4

That’s all you need and now you are ready to configure your repository for access and start developing!

Now if you want to update GIT you can do that using GIT itself:

$ git clone git://git.kernel.org/pub/scm/git/git.git

--------------------------------------------------------------------- How to Install Latest GIT on RHEL 6/CentOS 6

Install PostgreSQL and phpPgAdmin on Debian 7 ‘Wheezy’

$
0
0

PostgreSQL is a powerful, open-source object-relational database system. It runs on all major operating systems, including Linux, UNIX (AIX, BSD, HP-UX, SGI IRIX, Mac OS, Solaris, Tru64), and Windows OS. In this handy tutorial, let us see how to install PostgreSQL on Debian 7 ‘Wheezy’.

Install PostgreSQL

Switch to root user using the command:

$ su

Install it with following command:

# apt-get install postgresql postgresql-client postgresql-contrib

Access PostgreSQL

The default database name and database user are called postgres. Switch to postgres user to perform postgresql related operations:

# su - postgres

To login to postgresql, enter the command:

$ psql 
psql (9.1.9)
Type "help" for help.
postgres=#

To exit from posgresql, type \q.

Set “postgres” password

Login to postgresql and set postgres password with following command:

postgres=# \password postgres 
Enter new password: 
Enter it again: 
postgres=# \q

To install PostgreSQL Adminpack, enter the command in postgresql prompt:

postgres=# CREATE EXTENSION adminpack;
CREATE EXTENSION

Create New User and Database

First create a regular system user from your Terminal. For example, here I create a new user called “kumar” with password “debian” and database called “mydb”.

First create a user called “kumar” as regular system user. To do this, enter the following command from your terminal:

# adduser kumar

Switch to postgres user with command:

# su - postgres

Enter the following commands to create user “kumar”:

$ createuser
Enter name of role to add: kumar
Shall the new role be a superuser? (y/n) y

Login to postresql command prompt:

$ psql 

Enter the following command to set password for user “kumar”:

postgres=# \password kumar 
Enter new password: 
Enter it again:

Exit form postgresql prompt and switch to the newly created user “kumar”:

$ su - kumar
Password:

Enter the command to create database called mydb:

$ createdb -O kumar mydb

Now the user “kumar” and database “mydb” are created.

Connect to newly created database “mydb” using the following command:

$ psql mydb 
psql (9.1.9)
Type "help" for help.
mydb=#

Delete Users and Databases

To delete the database, switch to postgres user:

# su - postgres

Enter command:

$ dropdb <database-name>

To delete a user, enter the following command:

$ dropuser <user-name>

Configure PostgreSQL-MD5 Authentication

By default, Posgresql uses ident authentication, so that the local system users can be granted access to databases own by them. If you want to set MD5 authentication to require users to enter passwords.

Open up the /etc/postgresql/9.1/main/pg_hba.conf file:

# nano /etc/postgresql/9.1/main/pg_hba.conf

Find the following line:

local   all             all                                     ident

Change to:

local   all             all                                     md5

Restart postgresql to apply the changes:

# /etc/init.d/postgresql restart

Now you will be asked password every time while connecting to databases.

Configure PostgreSQL-Configure TCP/IP

By default, TCP/IP connection is disabled, so that the users from another computers can’t access postgresql. To allow to connect users from another computers, open the file /etc/postgresql/9.1/main/postgresql.conf:

# nano /etc/postgresql/9.1/main/postgresql.conf

Find the line:

#listen_addresses = 'localhost'

Uncomment and set the IP address of your postgresql server as shown below:

listen_addresses = '192.168.1.200'

And find the line:

#password_encryption = on

Uncomment it by removing the # symbol to look like below:

password_encryption = on

Restart postgresql service to save changes:

# /etc/init.d/postgresql restart

Manage PostgreSQL with phpPgAdmin

phpPgAdmin is a web-based administration utility written in PHP for managing PosgreSQL.

To install phpPgAdmin, enter the following command:

# apt-get install phppgadmin

By default, you can access phppgadmin using http://localhost/phppgadmin from your local system only. To access remotely, do the following,

Open up the file /etc/apache2/conf.d/phppgadmin:

# nano /etc/apache2/conf.d/phppgadmin

Find the line:

#allow from all

Uncomment it by removing the # symbol and make it look like below:

allow from all

Restart Apache service:

# /etc/init.d/apache2 restart

Now open your browser and navigate to http://ip-address/phppgadmin. You will be pleased when you see the following screen.

phpPgAdmin - Mozilla Firefox_001Login with users that you’ve created earlier. You may get an error:

Login disallowed for security reasons.

phpPgAdmin - Mozilla Firefox_002To fix this error, open the file /usr/share/phppgadmin/conf/config.inc.php:

# nano /usr/share/phppgadmin/conf/config.inc.php

Find the following line:

$conf['servers'][0]['host'] = 'localhost';

And remove localhost to make it look like below:

$conf['servers'][0]['host'] = '';

And find the line:

$conf['extra_login_security'] = true;

Change the value to false:

$conf['extra_login_security'] = false;

Save and close the file. Restart postgresql service and Apache service:

# /etc/init.d/postgresql restart
# /etc/init.d/apache2 restart

Now you will be able to login to phpPgAdmin.

phpPgAdmin - Mozilla Firefox_003That’s it. Now you’ll able to perform create, delete and alter databases graphically.

--------------------------------------------------------------------- Install PostgreSQL and phpPgAdmin on Debian 7 ‘Wheezy’

Fork CMS: An Open Source Content Management System

$
0
0

There are numerous Open Source Content Management Systems available. Using CMS, an average Linux admin or Web-master can launch their Own websites or blogs in minutes. Mostly All CMS has a cool and pleasant web interface to ease the work of webmasters. Among popular CMS giants like WordPress, there are some other useful CMS exists. The one today we are going to test is Fork CMS.

Fork CMS is an Open Source content management system. It comes with an intuitive  and user friendly interface. It offers powerful apps and killer themes that helps to make your website more shine.

In this tutorial, I will show you how to install Fork CMS on Debian 7 ‘Wheezy’. Though it was tested on Debian 7, it will work on all Debian based systems.

Features

- An intuitive and user friendly interface.

- Packed with cool apps, extensions and killer themes.

- Easy to customize and modify themes.

- Open Source and Large community support.

- Easy to setup and configuration.

- Easy Email setup and blog support.

Prerequisites

We need to setup and configure LAMP server. If you haven’t installed LAMP server before just follow any one of the links to install it.

>>> Install LAMP Server in Debian 7

Make sure that you’ve installed the following PHP extensions.

- cURL,

- SimpleXML,

- SPL,

- PDO,

- mb_string,

- iconv,

- GD2 graphics library.

Create Database and User for Fork CMS

For instance, here i am going to create a database called “forkdb” and database user called “forkuser” with password “debian” for Fork CMS. You can define database and user as per your liking.

# mysql -u root -p
Enter password: 
Welcome to the MariaDB monitor.  Commands end with ; or \g.
Your MariaDB connection id is 3
Server version: 5.5.31-MariaDB MariaDB Server

Copyright (c) 2000, 2013, Oracle, Monty Program Ab and others.

Type 'help;' or '\h' for help. Type '\c' to clear the current input statement.

MariaDB [(none)]> create database forkdb;
Query OK, 1 row affected (0.02 sec)

MariaDB [(none)]> GRANT ALL ON forkdb.* TO forkuser@localhost IDENTIFIED BY 'debian';
Query OK, 0 rows affected (0.01 sec)

MariaDB [(none)]> flush privileges;
Query OK, 0 rows affected (0.00 sec)

MariaDB [(none)]> exit
Bye

Enable Apache Rewrite Mode

Run the following command in the Terminal to enable apache rewrite mode.

# a2enmod rewrite

Edit the file /etc/apache2/sites-available/default,

# nano /etc/apache2/sites-available/default

Find the lines,

<Directory /var/www/>
                Options Indexes FollowSymLinks MultiViews
                AllowOverride None
                Order allow,deny
                allow from all
        </Directory>

And change AllowOverride None to AllowOverride All.

<Directory /var/www/>
                Options Indexes FollowSymLinks MultiViews
                AllowOverride All
                Order allow,deny
                allow from all
        </Directory>

Restart apache2 service to take effect the changes.

# service apache2 restart

Getting Fork CMS

Download the latest version here. I downloaded and saved it in my current directory.

# wget http://www.fork-cms.com/frontend/files/releases/forkcms-3.6.4.tar.gz

Extract it with command:

# tar -zxvf forkcms-3.6.4.tar.gz

Now copy the contents of the forkcms folder to apache root folder. Please note that fork cms can’t be installed from sub directory.

# cp -R forkcms-forkcms-403d720/. /var/www/

Make sure that you have defined the proper permissions to the following folders.

# chmod -R 777 /var/www/backend/cache/.
# chmod -R 777 /var/www/frontend/cache/.
# chmod -R 777 /var/www/frontend/files/.
# chmod -R 777 /var/www/library/
# chmod -R 777 /var/www/install/cache/
# chmod -R 777 /var/www/app
# chmod -R 777 /var/www/app/cache/
# chmod -R 777 /var/www/app/logs/
# chmod -R 777 /var/www/app/config/

Begin Fork CMS Installation

Open up the browser and point it to http://domain-name/install or http://ip-address/install. If everything setup properly, the following screen should appear. Click Install to continue.

Installer - Fork CMS - Mozilla Firefox_001Select your desired language and click Next.

Installer - Fork CMS - Mozilla Firefox_002Select the modules you want to install and click Next. In my case, i selected all modules.

Installer - Fork CMS - Mozilla Firefox_003Enter database name, database user and password. Click Next to continue.

Installer - Fork CMS - Mozilla Firefox_004Enter the email id and password and click Finish installation. You can use this email and password as administrative login credentials.

Installer - Fork CMS - Mozilla Firefox_005 Now Fork CMS has been installed successfully.

Installer - Fork CMS - Mozilla Firefox_006Administrative Console

Click on the link Login to Fork CMS. Enter the email and password that you’ve entered previously during installation.

My website - Fork CMS - Mozilla Firefox_007This is how my Fork CMS Dashboard looks.

My website - Fork CMS - Mozilla Firefox_008That’s all about now. From the here, you can do various things such as add new pages, contents and customize your website as per your liking.

This is how my sample Fork CMS blog looks:

Blog - Unixmen - Mozilla Firefox_009Now your Fork CMS is ready to host your awesome blogs, websites. Cheers!

--------------------------------------------------------------------- Fork CMS: An Open Source Content Management System

Setup Local Mail Server Using Postfix, Dovecot And Squirrelmail On CentOS 6.5/6.4

$
0
0

Postfix is a free open source mail transfer agent (MTA). It is easy to administer, fast and as well as secure MTA. Its a alternative to Sendmail which is the default MTA for RHEL.

Well, let us see how to setup a basic local mail server using Postfix, Dovecot and Squirrelmail On CentOS 6.5, although it should work on RHEL, Scientific Linux 6.x series.

For this tutorial, i use CentOS 6.5 32 bit minimal installation, with SELinux disabled. My test box details are given below.

OS : CentOS 6.5 32 bit Minimal Installation (fresh installation)
IP Address : 192.168.1.101/24
Hostname: server.unixmen.local

Prerequisites

1. Remove default MTA sendmail first if it already installed. Sendmail will not be installed by default in minimal installation, so you can skip this step.

# yum remove sendmail

2. Setup DNS server and add the Mail server MX records in the forward and reverse zone files. To install and configure DNS server, navigate to this link. And you’ll need to contact your ISP to point your external static IP to your mail domain.

3. Add hostname entries in /etc/hosts file as shown below:

# vi /etc/hosts
127.0.0.1   localhost localhost.localdomain localhost4 localhost4.localdomain4
::1         localhost localhost.localdomain localhost6 localhost6.localdomain6
192.168.1.101   server.unixmen.local      server

4. I disabled SELinux to reduce complexity in postfix configuration.

If you want to keep SELinux on, enter the following command in Terminal:

# togglesebool httpd_can_network_connect

Note: I didn’t checked it and disabled SELinux completely. It was suggested by one of the unixmen regular reader Mr.Bob. I appreciate and thank him for the helpful tip.

5. Install EPEL Repository:

We will use Squirrelmail for webmail client. Squirrelmail will not be found on CentOS official repostories, so let us enable EPEL repository. Follow the below link to install and enable EPEL repository.

- Install EPEL Repository On CentOS / RHEL / Scientific Linux 6

6. Allow the Apache default port 80 through your firewall/router:

# vi /etc/sysconfig/iptables
[...]
-A INPUT -m state --state NEW -m tcp -p tcp --dport 80 -j ACCEPT
[...]

Install Postfix

Let us install postifx package using command:

# yum install postfix -y

Configuring Postfix

Edit /etc/postfix/main.cf,

# vi /etc/postfix/main.cf

find and edit the following lines:

## Line no 75 - Uncomment and set your mail server FQDN ##
myhostname = server.unixmen.local

## Line 83 - Uncomment and Set domain name ##
mydomain = unixmen.local

## Line 99 - Uncomment ##
myorigin = $mydomain

## Line 116 - Set ipv4 ##
inet_interfaces = all

## Line 119 - Change to all ##
inet_protocols = all

## Line 164 - Comment ##

#mydestination = $myhostname, localhost.$mydomain, localhost,

## Line 165 - Uncomment ##\
mydestination = $myhostname, localhost.$mydomain, localhost, $mydomain

## Line 264 - Uncomment and add IP range ##
mynetworks = 192.168.1.0/24, 127.0.0.0/8

## Line 419 - Uncomment ##
home_mailbox = Maildir/

Save and exit the file. Start/restart Postfix service now:

# service postfix restart
# chkconfig postfix on

Testing Postfix mail server

First create a testing user called “sk”.

# useradd sk
# passwd sk

Access the server via telnet and enter the commands manually shown in red coloured text.

# telnet localhost smtp
Trying ::1...
Connected to localhost.
Escape character is '^]'.
220 server.unixmen.local ESMTP Postfix
ehlo localhost     ## type this command ##
250-server.unixmen.local
250-PIPELINING
250-SIZE 10240000
250-VRFY
250-ETRN
250-ENHANCEDSTATUSCODES
250-8BITMIME
250 DSN
mail from:<sk>     ## Type this - mail sender address##
250 2.1.0 Ok
rcpt to:<sk>     ## Type this - mail receiver address ##
250 2.1.5 Ok
data     ## Type this to input email message ##
354 End data with <CR><LF>.<CR><LF>
welcome to unixmen mail server     ## Enter the boddy of the email ##
.     ## type dot (.) to complete message ##
250 2.0.0 Ok: queued as B822221522
quit     ## type this to quit from mail ##
221 2.0.0 Bye
Connection closed by foreign host.

Now navigate to the user “sk” mail directory and check for the new mail:

# ls /home/sk/Maildir/new/

Sample output:

1390215275.Vfd00Ie04f8M357080.server.unixmen.local

A new mail is received to the user “sk”. To read the mail enter the following command:

# cat /home/sk/Maildir/new/1390215275.Vfd00Ie04f8M357080.server.unixmen.local 

Sample output:

Return-Path: <sk@unixmen.local>
X-Original-To: sk
Delivered-To: sk@unixmen.local
Received: from localhost (localhost [IPv6:::1])
    by server.unixmen.local (Postfix) with ESMTP id B822221522
    for <sk>; Mon, 20 Jan 2014 16:23:54 +0530 (IST)
Message-Id: <20140120105404.B822221522@server.unixmen.local>
Date: Mon, 20 Jan 2014 16:23:54 +0530 (IST)
From: sk@unixmen.local
To: undisclosed-recipients:;

welcome to unixmen mail server

Installing Dovecot

Dovecote is an open source IMAP and POP3 mail server for Unix/Linux systems. To install:

# yum install dovecot

Configuring Dovecot

Edit the file /etc/dovecot/dovecot.conf file,

# vi /etc/dovecot/dovecot.conf

Uncomment the following line:

## Line 20 - umcomment ##
protocols = imap pop3 lmtp

Edit file /etc/dovecot/conf.d/10-mail.conf file

# vi /etc/dovecot/conf.d/10-mail.conf 

Make the changes as shown below:

## Line 24 - uncomment ##
mail_location = maildir:~/Maildir

Edit /etc/dovecot/conf.d/10-auth.conf

# vi /etc/dovecot/conf.d/10-auth.conf 

and make the changes as shown below:

## line 9 - uncomment##
disable_plaintext_auth = yes

## Line 97 - Add a letter "login" ##
auth_mechanisms = plain login

Edit file /etc/dovecot/conf.d/10-master.conf,

# vi /etc/dovecot/conf.d/10-master.conf 

Make changes as shown below:

## Line 83, 84 - Uncomment and add "postfix"
#mode = 0600
   user = postfix
   group = postfix

Start Dovecot service:

# service dovecot start
# chkconfig dovecot on

Testing Dovecot

It’s time to test Dovecot configuration. Enter the following command in Terminal:

# telnet localhost pop3

Enter the commands manually marked in red color:

Trying ::1...
Connected to localhost.
Escape character is '^]'.
+OK Dovecot ready.
user sk     ## log in as user sk ##
+OK
pass centos     ## input user password ##
+OK Logged in.
retr 1
+OK 439 octets
Return-Path: <sk@unixmen.local>
X-Original-To: sk
Delivered-To: sk@unixmen.local
Received: from localhost (localhost [IPv6:::1])
    by server.unixmen.local (Postfix) with ESMTP id B822221522
    for <sk>; Mon, 20 Jan 2014 16:23:54 +0530 (IST)
Message-Id: <20140120105404.B822221522@server.unixmen.local>
Date: Mon, 20 Jan 2014 16:23:54 +0530 (IST)
From: sk@unixmen.local
To: undisclosed-recipients:;

welcome to unixmen mail server
.
quit
+OK Logging out.
Connection closed by foreign host.

As you see in the above, Dovecot is working!

Working with mail in command modes little bit difficult to us. So we will install a webmail client called Squirrelmail to send/receive emails via web browser.

Installing Squirrelmail

Make sure that you’ve installed and enabled EPEL repository. Now install Squirrelmail using the following command:

# yum install squirrelmail -y

Configuring Squirrelmail

Navigate to /usr/share/squirrelmail/config/ directory and run the command conf.pl:

# cd /usr/share/squirrelmail/config/
# ./conf.pl

The following wizard will open. Enter choice “1″ to set your organization details:

SquirrelMail Configuration : Read: config.php (1.4.0)
---------------------------------------------------------
Main Menu --
1.  Organization Preferences
2.  Server Settings
3.  Folder Defaults
4.  General Options
5.  Themes
6.  Address Books
7.  Message of the Day (MOTD)
8.  Plugins
9.  Database
10. Languages

D.  Set pre-defined settings for specific IMAP servers

C   Turn color off
S   Save data
Q   Quit

Command >> 1

The following wizard will open. Enter “1″ again to modify your organization details:

SquirrelMail Configuration : Read: config.php (1.4.0)
---------------------------------------------------------
Organization Preferences
1.  Organization Name      : SquirrelMail
2.  Organization Logo      : ../images/sm_logo.png
3.  Org. Logo Width/Height : (308/111)
4.  Organization Title     : SquirrelMail $version
5.  Signout Page           : 
6.  Top Frame              : _top
7.  Provider link          : http://squirrelmail.org/
8.  Provider name          : SquirrelMail

R   Return to Main Menu
C   Turn color off
S   Save data
Q   Quit

Command >> 1

Set your Organization name and press Enter:

We have tried to make the name SquirrelMail as transparent as
possible.  If you set up an organization name, most places where
SquirrelMail would take credit will be credited to your organization.

If your Organization Name includes a '$', please precede it with a \. 
Other '$' will be considered the beginning of a variable that
must be defined before the $org_name is printed.
$version, for example, is included by default, and will print the
string representing the current SquirrelMail version.

[SquirrelMail]: Unixmen

By this way, setup all the details such as organization title, logo, provider name in the above wizard. Once you done, press “S” to save changes and press “R” to return back to your main menu:

SquirrelMail Configuration : Read: config.php (1.4.0)
---------------------------------------------------------
Organization Preferences
1.  Organization Name      : Unixmen
2.  Organization Logo      : ../images/sm_logo.png
3.  Org. Logo Width/Height : (308/111)
4.  Organization Title     : SquirrelMail $version
5.  Signout Page           : 
6.  Top Frame              : _top
7.  Provider link          : http://squirrelmail.org/
8.  Provider name          : Unixmen Mail

R   Return to Main Menu
C   Turn color off
S   Save data
Q   Quit

Command >> s

Now enter “2″ to setup mail Server settings such as domain name and mail agent etc.:

SquirrelMail Configuration : Read: config.php (1.4.0)
---------------------------------------------------------
Main Menu --
1.  Organization Preferences
2.  Server Settings
3.  Folder Defaults
4.  General Options
5.  Themes
6.  Address Books
7.  Message of the Day (MOTD)
8.  Plugins
9.  Database
10. Languages

D.  Set pre-defined settings for specific IMAP servers

C   Turn color off
S   Save data
Q   Quit

Command >> 2

Enter “1″, Enter you mail domain (ex.unixmen.local) and press Enter key.

SquirrelMail Configuration : Read: config.php (1.4.0)
---------------------------------------------------------
Server Settings

General
-------
1.  Domain                 : localhost
2.  Invert Time            : false
3.  Sendmail or SMTP       : Sendmail

A.  Update IMAP Settings   : localhost:143 (uw)
B.  Change Sendmail Config : /usr/sbin/sendmail

R   Return to Main Menu
C   Turn color off
S   Save data
Q   Quit

Command >> 1
The domain name is the suffix at the end of all email addresses.  If
for example, your email address is jdoe@example.com, then your domain
would be example.com.

[localhost]: unixmen.local

Enter “3″ and change from sendmail to Postfix MTA (i.e. smtp):

SquirrelMail Configuration : Read: config.php (1.4.0)
---------------------------------------------------------
Server Settings

General
-------
1.  Domain                 : unixmen.local
2.  Invert Time            : false
3.  Sendmail or SMTP       : Sendmail

A.  Update IMAP Settings   : localhost:143 (uw)
B.  Change Sendmail Config : /usr/sbin/sendmail

R   Return to Main Menu
C   Turn color off
S   Save data
Q   Quit

Command >> 3

Enter “2″ to swtich from sendmail MTA to postfix.

You now need to choose the method that you will use for sending
messages in SquirrelMail.  You can either connect to an SMTP server
or use sendmail directly.

  1.  Sendmail
  2.  SMTP
Your choice [1/2] [1]: 2

Now enter “S” followed by “Q” to save and exit Squirrelmail configuration.

Create a squirrelmail vhost in apache config file:

# vi /etc/httpd/conf/httpd.conf 

Add the following lines at the end:

Alias /squirrelmail /usr/share/squirrelmail
<Directory /usr/share/squirrelmail>
    Options Indexes FollowSymLinks
    RewriteEngine On
    AllowOverride All
    DirectoryIndex index.php
    Order allow,deny
    Allow from all
</Directory>

Restart Apache service:

# service httpd restart

Create users

Create some users for testing. In my case i create two users called “senthil” and “kumar” respectively.

# useradd senthil
# useradd kumar
# passwd senthil
# passwd kumar

Access Webmail

Now navigate to http://ip-address/webmail or http://domain-name/webmail from your browser. The following screen should appear. Enter the username and password of the user.

Unixmen-Login-Mozilla-Firefox_001

Now you’ll be able to access the user senthil mail box. Let us compose a test mail from user “senthil” to user “kumar”. Click on the Compose link on the top. Enter the recipient mail id (ex. kumar@unixmen.local), subject and body of the mail and click Send.

SquirrelMail 1.4.22-3.el6 - Mozilla Firefox_002


Now log out from user “senthil” and log in to user “kumar” mail and check for any new mail.

SquirrelMail 1.4.22-3.el6 - Mozilla Firefox_003


Hurrah! We have got a new mail from senthil@unixmen.local mail id. To read the mail, click on it. You’ll now be able to read, reply, delete or compose a new mail.

SquirrelMail 1.4.22-3.el6 - Mozilla Firefox_004

That’s it for now. We’ve successfully configured a local mail server that will serve in/out mails within a local area network. But i want to configure a public mail server to send and receive mails to outside of our LAN, what should i do? That’s not that difficult either.

You should configure mail server with a public IP and request your ISP to put a MX record of your mail server into their DNS server and you’re done! Everything will be same as i described above.

--------------------------------------------------------------------- Setup Local Mail Server Using Postfix, Dovecot And Squirrelmail On CentOS 6.5/6.4

Vesta Control Panel – An Open Source, Free Web Hosting Control Panel For Linux

$
0
0

Introduction

Vesta Control panel is an open source, free, easy to install and configure web based control panel for Linux like systems. Using VestaCP anyone, even a novice system administrators can able to manage websites in VPS.

VestaCP is currently supporting the following operating systems.

  • RHEL 5 & 6;
  • CentOS 5 & 6;
  • Debian 7;
  • Ubuntu 12.04/12.10/13.04/13.10/14.04.

I tested this tool on my Ubuntu 14.04 server. It worked like a charm.

Features

VestaCP has plenty of useful features listed below.

  • Simple and Clean graphical user interface;
  • GPL v3 License;
  • Powerful CLI & API;
  • Secure Platform;
  • Auto updates;
  • Easy update manager;
  • Web, DNS, Database, Mail, FTP Server;
  • Nginx out of the box;
  • SSL certificates & SNI;
  • Wildcard support;
  • Configuration Templates;
  • DKIM support;
  • Fast Backups;
  • System Monitoring;
  • AntiSpam / Antivirus;
  • WHMCS billing support.

For the detailed features, look here.

Installation

As I noted above, VestaCP installation is lot easier than any other hosting control panels. All you need to do is just download the VestaCP installation script, and run it.

To download it, execute the following command on your Terminal with root privileges.

curl -O http://vestacp.com/pub/vst-install.sh

Next, run the script as shown below:

bash vst-install.sh

You’ll be asked to answer simple questions in order to install it on your VPS.

First, enter Y to proceed installation. Enter the valid Email address, and Enter your VPS FQDN. The FQDN will be selected by default. If you wish to change it, enter your VPS FQDN manually, else just hit the enter key.

root@server:~_010

This script will pull all required packages, and install them to install the Vesta control panel on your VPS. This will take a while depending upon your Internet speed.

After VestaCP is installed , you’ll see a screen like below.

root@server: ~_009

Note down the URL address, user name, and password. You need them to log in to the VestaCP web console.

Access Vesta Control Panel Dashboard

Open up your browser, and type the URL https://ip-address:8083. Don’t forget to use “htttps” in the URL. You’ll be pleased with following screen. Enter the user name and password.

Vesta - LOGIN - Mozilla Firefox_013

Now you’ll be able to access the dashboard. This is how my dashboard looked at first time.

Vesta - USER - Mozilla Firefox_014

After logging in to the VestaCp dashboard, the first step you might want to do is to change admin user default password.

To do that, click on the admin user on the top right of the dashboard.

Vesta - USER - Mozilla Firefox_015

Enter the new password of your choice, and click Save.

Vesta - USER - Mozilla Firefox_016

Congratulations!! VestaCp has been successfully installed on your VPS. Now, you can start using VestaCp to manage and host websites.

For more detailed information, check out the Official documentation page.

Cheers!!

Source & Reference Link:

---------------------------------------------------------------------
Vesta Control Panel – An Open Source, Free Web Hosting Control Panel For Linux

Install LEMP Server (Nginx, MySQL or MariaDB, PHP And phpMyAdmin) On Ubuntu 14.10/14.04/13.10

$
0
0

LEMP is a combination of the operating system and open-source software stack. The acronym LEMP comes from the first letters of Linux, Nginx(engine-x) HTTP Server, MySQL database, and PHP/Perl/Python.

In this tutorial, let us see how to install Nginx, MySQL or MariaDB, PHP and phpMyAdmin on Ubuntu 14.10.

Install Nginx

Nginx (pronounced as engine-x) is a free, open-source, high-performance HTTP server and reverse proxy, as well as an IMAP/POP3 proxy server written by Igor Sysoev.

To install Nginx enter the following command in your terminal:

Note: If you have already installed apache2 in your system, remove it first to avoid conflicts. To uninstall apache, run the following commands:

sudo apt-get purge apache2*
sudo apt-get autoremove -y

Now, install nginx using command:

sudo apt-get install nginx

Start Nginx service using the command:

sudo service nginx start

Test nginx

Open up your web browser and navigate to http://ip-address/ or http://localhost/. You will see a screen something like below.

Welcome to nginx! - Mozilla Firefox_005

Configure Nginx

Open the file /etc/nginx/nginx.conf in any editor:

sudo nano /etc/nginx/nginx.conf

Set the worker_processes (i.e No. of CPU’s in your system). To see the no. of CPU’s, use the command “lscpu”. In my case it’s “1″. So I set this as ’1′.

worker_processes 1;

Restart Nginx service:

sudo service nginx restart

The default vhost(server block) is defined in the /etc/nginx/sites-available/default file.

Open the file /etc/nginx/sites-available/default in any editor.

sudo nano /etc/nginx/sites-available/default

Under the Server section, set the server FQDN or IP address as shown below. Make sure you’ve added a index.php line.

[...]
server {
      listen 80 default_server;
      listen [::]:80 default_server ipv6only=on;
      root /usr/share/nginx/html;
      index index.php index.html index.htm;
      # Make site accessible from http://localhost/
      server_name server.unixmen.local;
[...]

Here,

  • listen 80; –> listen for ipv4
  • listen [::]:80 default_server ipv6only=on; –> listen for ipv6
  • root /usr/share/nginx/html; –> document root directory.
  • server_name server.unixmen.local; –> Server FQDN.

Now, scroll down further and find the section #location ~ \.php$. Uncomment and modify the following lines as shown below.

 location ~ \.php$ {
         try_files $uri =404;   ---------> Add this line
         fastcgi_split_path_info ^(.+\.php)(/.+)$;
         #       # NOTE: You should have "cgi.fix_pathinfo = 0;" in php.ini
         #
         #       # With php5-cgi alone:
         #       fastcgi_pass 127.0.0.1:9000;
         #       # With php5-fpm:
         fastcgi_pass unix:/var/run/php5-fpm.sock;
         fastcgi_index index.php;
         include fastcgi.conf;
    }

Here, I added an extra line ‘try_files $uri =404;’ to prevent zero day exploits.

Save and exit the file.

Test nginx configuration

Test the nginx configuration for any syntax errors using command:

sudo nginx -t

Sample output:

nginx: the configuration file /etc/nginx/nginx.conf syntax is ok
nginx: configuration file /etc/nginx/nginx.conf test is successful

Finally restart nginx service

sudo service nginx restart

Install MySQL

MySQL is a relational database management system (RDBMS) that runs as a server providing multi-user access to a number of databases, though SQLite probably has more total embedded deployments

sudo apt-get install mysql-server mysql-client

During installation, you’ll be asked to setup the MySQL root user password. Enter the password and click Ok.

sk@server: ~_001

Re-enter the password.

sk@server: ~_002

Now, MySQL server has been installed.

You can verify the MySQL server status using command:

sudo service mysql status

Sample output:

mysql start/running, process 5671

Note: If you want to use MariaDB instead of MySQL, then follow the below steps.

Install MariaDB

MariaDB is a drop in replacement for MySQL. It is a robust, scalable and reliable SQL server that comes rich set of enhancements.

First you have to remove existing MySQL packages if any. To completely uninstall MySQL with configuration files, enter the following command:

sudo apt-get purge mysql*

Run the following command to remove unwanted packages.

sudo apt-get autoremove

After removing MySQL, run the following command to install MariaDB.

sudo apt-get install mariadb-server mariadb-client

Alternatively, you can install it from MariaDB repository if you want to try most recent version of MariaDB. Run the following commands to add PPA. As of writing this, MariaDB PPA is not yet updated to Ubuntu 14.10. However, we can use the repository of Ubuntu 14.04 instead.

sudo apt-get install software-properties-common
sudo apt-key adv --recv-keys --keyserver hkp://keyserver.ubuntu.com:80 0xcbcb082a1bb943db
sudo add-apt-repository 'deb http://sgp1.mirrors.digitalocean.com/mariadb/repo/5.5/ubuntu trusty main'

Update the software sources list and install MariaDB using following commands:

sudo apt-get update
sudo apt-get install mariadb-server mariadb-client -y

During installation you will be asked to set database ‘root’ user password.

sk@server: ~_003

Re-enter password:

sk@server: ~_004

Click Yes to migrate to MariaDB. Note that you’ll not be asked this question if you install MariaDB before MySQL.

sk@server: ~_005

You can check the MariaDB version using command:

sudo mysql -v -u root -p

Sample output:

Welcome to the MariaDB monitor.  Commands end with ; or \g.
Your MariaDB connection id is 34
Server version: 5.5.39-MariaDB-2 (Ubuntu)

Copyright (c) 2000, 2014, Oracle, Monty Program Ab and others.

Reading history-file /home/sk/.mysql_history
Type 'help;' or '\h' for help. Type '\c' to clear the current input statement.

Check if mariadb is running or not, using the following command:

sudo service mysql status

Sample output:

 * /usr/bin/mysqladmin  Ver 9.0 Distrib 5.5.39-MariaDB, for debian-linux-gnu on x86_64
Copyright (c) 2000, 2014, Oracle, Monty Program Ab and others.

Server version        5.5.39-MariaDB-2
Protocol version    10
Connection        Localhost via UNIX socket
UNIX socket        /var/run/mysqld/mysqld.sock
Uptime:            2 min 21 sec

Threads: 1  Questions: 566  Slow queries: 0  Opens: 330  Flush tables: 4  Open tables: 22  Queries per second avg: 4.014

Install PHP

PHP (recursive acronym for PHP: Hypertext Preprocessor) is a widely used open-source general purpose scripting language that is especially suited for web development and can be embedded into HTML.

Install PHP with following command:

sudo apt-get install php5 php5-fpm php5-mysql

Configure PHP

Open php.ini file in any editor:

sudo nano /etc/php5/fpm/php.ini

Find the line ‘cgi.fix_pathinfo=1′, uncomment it and change the value 1 to 0.

cgi.fix_pathinfo=0

Now restart php-fpm service.

sudo service php5-fpm restart

Test PHP

Create a sample “testphp.php” file in nginx document root folder.

sudo nano /usr/share/nginx/html/testphp.php

Add the following lines in it.

<?php
 phpinfo();
?>

Save and exit the file.

Navigate to  http://server-ip-address/testphp.php. It will display all the details about php such as version, build date and commands etc.

phpinfo() - Mozilla Firefox_001

PHP-FPM listens on the socket /var/run/php5-fpm.sock by default. If you want to make PHP-FPM use a TCP connection, open the file /etc/php5/fpm/pool.d/www.conf,

sudo nano /etc/php5/fpm/pool.d/www.conf

Find the line listen = /var/run/php5-fpm.sock,

;listen = /var/run/php5-fpm.sock

and modify it to listen = 127.0.0.1:9000.

listen = 127.0.0.1:9000

Save and exit the file. Restart php5-fpm service.

sudo service php5-fpm restart

Now open the nginx configuration file:

sudo nano /etc/nginx/sites-available/default

Find the line fastcgi_pass unix:/var/run/php5-fpm.sock; and change it to fastcgi_pass 127.0.0.1:9000; as shown below.

location ~ \.php$ {
        try_files $uri =404;
        fastcgi_split_path_info ^(.+\.php)(/.+)$;fastcgi_pass 127.0.0.1:9000;
        #       # NOTE: You should have "cgi.fix_pathinfo = 0;" in php.ini
        #
        #       # With php5-cgi alone:
        fastcgi_pass 127.0.0.1:9000;
        #       # With php5-fpm:
        #        fastcgi_pass unix:/var/run/php5-fpm.sock;
        fastcgi_index index.php;
        include fastcgi.conf;
   }

Save and exit the file. Finally restart nginx service.

sudo service nginx restart

Manage MySQL Databases Using phpMyAdmin (Optional)

phpMyAdmin is a free open-source web interface tool used to manage your MySQL databases.

Install phpMyAdmin

It is available in the Official Debian repositories. So install it with command:

sudo apt-get install phpmyadmin

Select any webserver. By default, nginx will not be displayed here. So, select apache or lighttpd, and we will link phpmyadmin to work with nginx webserver later.

sk@server: ~_007

Select Yes to configure database for phpmyadmin with dbconfig-common.

sk@server: ~_008

Enter password of the database’s administrative user.

sk@server: ~_009

Enter MySQL application password phpmyadmin.

sk@server: ~_010

Re-enter the password.

sk@server: ~_011

The phpMyAdmin installation has been completed.

Create a symbolic link between phpMyAdmin and the website root directory. Here our website root document directory is /usr/share/nginx/html/.

sudo ln -s /usr/share/phpmyadmin/ /usr/share/nginx/html

Restart nginx server.

sudo service nginx restart

Access phpMyAdmin Web Console

Now you can access the phpmyadmin console by navigating to http://server-ip-address/phpmyadmin/ from your browser.

Enter your MySQL username and password which you have given in previous steps. In my case its “root” and “ubuntu”.

phpMyAdmin - Mozilla Firefox_002

You will be redirected to PhpMyAdmin main web interface.

192.168.1.100 - localhost | phpMyAdmin 4.2.6deb1 - Mozilla Firefox_003

Now you can manage your MySQL databases from phpMyAdmin web interface.

That’s it. Your LEMP server is now up and ready to use.

---------------------------------------------------------------------
Install LEMP Server (Nginx, MySQL or MariaDB, PHP And phpMyAdmin) On Ubuntu 14.10/14.04/13.10

openDCIM – A Free, Open Source Data Center Management Tool

$
0
0


About openDCIM

Today we present to you a great tool that will help you to manage your data center.

openDCIM is an free and open source solution for Data Center Infrastructure Management. It is already used by a few organizations, and is quickly improving due to the efforts of its developers. The number one goal for openDCIM is to eliminate the excuse for anybody to ever track their data center inventory using a spreadsheet or word processing document again. We’ve all been there in the past, which is what drove us developers to create this project.

Features

The following features are available in the present version:

  • Image mapping with custom image for creating click-able zones for each cabinet
  • Overlay layers on map for Power, Space, Temperature, and Weight capacity
  • Mapping of power connections from device -> power strip -> panel -> source feed
  • Mapping of network connections to any device classified as a switch
  • Chassis device support
  • Graphical Cabinet Viewer (user must supply graphic images)
  • Multiple levels of user rights
  • Basic workflow system for generating rack requests
  • Reporting on Hosting Costs by department based on a cost per U and cost per Watt formula
  • Reporting on Fault Tolerance status for devices, and impact simulation of a panel or source feed outage
  • Support for automatic transfer switches

Requirements

Before start installing openDCIM you need to have those requirements:

  • Web host running Apache 2.x (or higher) with an SSL Enabled site.
  • MySQL 5.x (or higher) database
  • PHP 5.3 (or higher)
  • User Authentication
  • Web Based Client

Let’s start.

openDCIM Server configuration

Before installing openDCIM, make sure that you have a properly configured instance of Apache/PHP running.

First steps to do is to install LAMP server under your centos server.

yum install httpd php mysql mysql-server php-mbstring php-mysql

For more details you can check our article Install LAMP Server (Apache, MySQL, PHP) On RHEL, CentOS, Scientific Linux 6.5/6.4

The next step is to create a database for openDCIM (change the database name dcim and the password dcimpassword to something that suits you):

mysql -u root -p
mysql> create database dcim;
mysql> grant all privileges on dcim.* to 'dcim' identified by 'dcimpassword';

Then you need to enable https under your web server. This command is to install mod_ssl under centos.

yum -y install mod_ssl

Next step is to generate the necessary keys and copy them to the proper directories:

cd /root
openssl genrsa -out ca.key 1024 
openssl req -new -key ca.key -out ca.csr
openssl x509 -req -days 365 -in ca.csr -signkey ca.key -out ca.crt
cp ca.crt /etc/pki/tls/certs
cp ca.key /etc/pki/tls/private/ca.key
cp ca.csr /etc/pki/tls/private/ca.csr

To let Apache know of the proper locations of the keys, edit /etc/httpd/conf/httpd.conf

vim +/SSLCertificateFile /etc/httpd/conf.d/ssl.conf

comment out the line

SSLCertificateFile /etc/pki/tls/certs/localhost.crt

..and substitute with this line

SSLCertificateFile /etc/pki/tls/certs/ca.crt

Also comment out the line

SSLCertificateKeyFile /etc/pki/tls/private/localhost.key

… and substitute with this ligne

SSLCertificateKeyFile /etc/pki/tls/private/ca.key

To set the server name:

vim +/ServerName /etc/httpd/conf/httpd.conf

Find the line…

#ServerName www.example.com:80

…and add below it:

ServerName opendcim.example.com:443

Finally restart Apache…

service httpd restart

After you enabled mod_ssl under your web service , you need now to create virtual host.

vim +/NameVirtualHost /etc/httpd/conf/httpd.conf

Find the line:

#NameVirtualHost *:80

and add below it:

NameVirtualHost *:443

Now create a new configuration file for the openDCIM VirtualHost…

vim /etc/httpd/conf.d/opendcim.example.com.conf

and finally add the lines

<VirtualHost *:443>
     ServerAdmin anis@unixmen.com
     DocumentRoot /var/www/opendcim
     ServerName opendcim.unximen.net
     <Directory /var/www/opendcim>
         AuthType Basic
         AuthName "openDCIM"   
         AuthUserFile /var/www/.htpasswd
         Require valid-user
     </Directory>
</VirtualHost>

You have protected the openDCIM web directory with a requirement for Basic authentication, with the lines already added in your Apache configuration file above.

Now, to create at least on user, do:

touch /var/www/.htpasswd
htpasswd /var/www/.htpasswd Administrator

You will be asked for a password for user “Administrator” twice.

The last step in the server configuration is to enable port 443 under your firewall

The iptables firewall is enabled on CentOS be default, and blocks access to HTTPS port 443. To allow it…

vim /etc/sysconfing/iptables

..and add below this line:

-A INPUT -m state --state NEW -m tcp -p tcp --dport 443 -j ACCEPT

Restart iptables:

service iptables restart

openDCIM Installation

Now after finished the configuration of the server, you need to download the openDCIM package from opendcim.com

cd /var/www
wget http://www.opendcim.org/packages/openDCIM-3.2.tar.gz

Extract the archive and create a symbolic link:

tar zxvf openDCIM-3.2.tar.gz
ln -s openDCIM-3.2.1 opendcim

The symbolic link is not required. If you don’t want to create it, just rename the directory openDCIM-2.1 to opendcim. However, having a symbolic link in place allows you to find out the version of openDCIM at a glance, and makes upgrades easier.

Now, prepare the configuration file for access to the database:

cd /var/www/opendcim
cp db.inc.php-dist db.inc.php
vim db.inc.php

Edit the following lines, to reflect your settings of database host (in this example localhost), database name (dcim), and credentials that you assigned when creating the database:

$dbhost = 'localhost';
$dbname = 'dcim';
$dbuser = 'dcim';
$dbpass = 'dcimpassword';

Finally, restart Apache one last time:

service httpd restart

Now, you can open openDCIM in your browser to proceed with the installation. If you have set up a DNS entry for a domain name to point to your web server’s IP, you will go to something similar to https://opendcim.example.com/. Otherwise, you can visit https://IP_of_web_server/.

Screenshots

1

2

3

That’s all for now. Thanks for visiting Unixmen. Stay tuned with us.

The post openDCIM – A Free, Open Source Data Center Management Tool appeared first on Unixmen.


Monitor Linux Server With Nagios Core Using SNMP

$
0
0


Nagios is the leader and industry standard in enterprise-class monitoring solutions. Nagios provides two monitoring tools Nagios Core and Nagios XI.

Nagios Core is a free and open source tool that allows you to monitor your entire IT infrastructure to ensure hosts, services and applications are functioning properly. For more information, you can visit the website of Nagios. This article is intended for use by Nagios Administrators who wish to monitor Linux servers with Nagios Core using the linux SNMP.

SNMP stands for simple network management protocol. It is a way that servers can share information about their current state, and also a channel through which an administer can modify pre-defined values. While the protocol itself is very simple, the structure of programs that implement SNMP can be very complex.

If you still didn’t install Nagios Core , check the following articles.

In this article we will show you how to install and configure SNMP in the remote server and how to add the host to Nagios Core.

Installing and Configuring SNMP Agent On The Remote Linux Machine

Install and Configure SNMP  on Ubuntu 14.04/14.10

We can begin to explore how SNMP can be implemented on a system by installing the SNMP agent on some Ubuntu systems.

1- Install SNMPd agent on Ubuntu Server

Type the following command as root, enter:

apt-get update && apt-get install snmpd

2- SNMPd Configuration

The snmpd daemon must be configured to work with Cacti. The configuration file is located at “/etc/snmp/snmpd.conf“. Make sure you are editing the snmpd.conf file and not the snmp.conf file.

To get started, on our agent computer, we need to open the daemon’s configuration file with sudo privileges:

sudo nano /etc/snmp/snmpd.conf

First, we need to change the agentAddress directive. Currently, it is set to only allow connections originating from the local computer. We need to comment out the current line, and uncomment the line underneath, which allows all connections

#  Listen for connections from the local system only
#agentAddress  udp:127.0.0.1:161
#  Listen for connections on all interfaces (both IPv4 *and* IPv6)
agentAddress udp:161,udp6:[::1]:161
Add view
view   all         included   .1                80
ACCESS CONTROL

Change the following line:

rocommunity public  default    -V systemonly

To:

rocommunity test1252serc default    -V all

The snmp community is test1252serc.

SYSTEM INFORMATION

You can add the physical location of your server and a contact email. These may be helpful for distinguishing machines if you are monitoring a large number of cloud servers.

sysLocation    Your System Location
sysContact     contact@email.com    

After you are done with your modifications, save the file, exit and restart the snmpd service.

$sudo service snmpd restart

Install and Configure SNMP on Centos

1- Install SNMP and SNMP Utilities

Installing SNMP and some optional SNMP utilities is as simple as running one command:

yum -y install net-snmp net-snmp-utils

2- Add a Basic Configuration for SNMP

Now, let’s take the default SNMP configuration file, /etc/snmp/snmpd.conf and move it to an alternate location,/etc/snmp/snmpd.conf.orig.

mv /etc/snmp/snmpd.conf /etc/snmp/snmpd.conf.orig

And now we’ll create a new /etc/snmp/snmpd.conf:

vim /etc/snmp/snmpd.conf
Insert the following text into the new /etc/snmp/snmpd.conf
# Map 'tes90w90t' community to the 'AllUser'
#       sec.name        source          community
com2sec AllUser         default         tes90w90t

# Map 'ConfigUser' to 'ConfigGroup' for SNMP Version 2c
# Map 'AllUser' to 'AllGroup' for SNMP Version 2c
#                       sec.model       sec.name
group   AllGroup        v2c             AllUser

# Define 'SystemView', which includes everything under .1.3.6.1.2.1.1 (or .1.3.6.1.2.1.25.1)
# Define 'AllView', which includes everything under .1
#                       incl/excl       subtree
view    SystemView      included        .1.3.6.1.2.1.1
view    SystemView      included        .1.3.6.1.2.1.25.1.1
view    AllView         included        .1

# Give 'ConfigGroup' read access to objects in the view 'SystemView'
# Give 'AllGroup' read access to objects in the view 'AllView'
#                       context model   level   prefix  read            write   notify
access  AllGroup        ""      any     noauth  exact   AllView         none    none

The above text is noted with basic information on the function of each configuration line. In short, we’re creating this scenarios for the polling

AllUser is assigned to AllGroup and may only use SNMP security model 2c , AllGroup can use the AllView .

AllView is assigned to the entire OID tree, and all of this is referenced in an SNMP poll by the secret, and uniquecommunity string tes90w90t.

Exit vim, and restart the SNMP service to reload the new configuration file:
service snmpd restart

Configure SNMP to start when the server boots:

chkconfig snmpd on

3- Test the SNMP Configuration

If you have a firewall configured, ensure that you have UDP port 161 open to your SNMP lookup server.

On your SNMP lookup server, you can do the following to perform a quick SNMP test to ensure that it’s working.

snmpwalk -v 2c -c tes90w90wer -O e 127.0.0.1 

you should get an output like below :

SNMPv2-MIB::sysDescr.0 = STRING: Linux 2.6.18-194.11.4.el5xen #1 SMP Tue 
SNMPv2-MIB::sysObjectID.0 = OID: NET-SNMP-MIB::netSnmpAgentOIDs.10
DISMAN-EVENT-MIB::sysUpTimeInstance = Timeticks: (242211) 0:40:22.11
SNMPv2-MIB::sysContact.0 = STRING: root@localhost
SNMPv2-MIB::sysName.0 = STRING: 
SNMPv2-MIB::sysLocation.0 = STRING: Unknown
SNMPv2-MIB::sysORLastChange.0 = Timeticks: (2) 0:00:00.02
SNMPv2-MIB::sysORID.1 = OID: SNMPv2-MIB::snmpMIB
SNMPv2-MIB::sysORID.2 = OID: TCP-MIB::tcpMIB
SNMPv2-MIB::sysORID.3 = OID: IP-MIB::ip
SNMPv2-MIB::sysORID.4 = OID: UDP-MIB::udpMIB
SNMPv2-MIB::sysORID.5 = OID: SNMP-VIEW-BASED-ACM-MIB::vacmBasicGroup
SNMPv2-MIB::sysORID.6 = OID: SNMP-FRAMEWORK-MIB::snmpFrameworkMIBCompliance
SNMPv2-MIB::sysORID.7 = OID: SNMP-MPD-MIB::snmpMPDCompliance
SNMPv2-MIB::sysORID.8 = OID: SNMP-USER-BASED-SM-MIB::usmMIBCompliance

Configure Nagios To Monitor The Linux Host

Before you start configuring nagios , Here are some useful OID’s on Linux:

Network Interface Statistics
List NIC names: .1.3.6.1.2.1.2.2.1.2 
Get Bytes IN: .1.3.6.1.2.1.2.2.1.10
Get Bytes IN for NIC 4: .1.3.6.1.2.1.2.2.1.10.4
Get Bytes OUT: .1.3.6.1.2.1.2.2.1.16
Get Bytes OUT for NIC 4: .1.3.6.1.2.1.2.2.1.16.4
Load
1 minute Load: .1.3.6.1.4.1.2021.10.1.3.1
5 minute Load: .1.3.6.1.4.1.2021.10.1.3.2
15 minute Load: .1.3.6.1.4.1.2021.10.1.3.3
CPU times
percentage of user CPU time: .1.3.6.1.4.1.2021.11.9.0
raw user cpu time: .1.3.6.1.4.1.2021.11.50.0
percentages of system CPU time: .1.3.6.1.4.1.2021.11.10.0
raw system cpu time: .1.3.6.1.4.1.2021.11.52.0
percentages of idle CPU time: .1.3.6.1.4.1.2021.11.11.0
raw idle cpu time: .1.3.6.1.4.1.2021.11.53.0
raw nice cpu time: .1.3.6.1.4.1.2021.11.51.0
Memory Statistics
Total Swap Size: .1.3.6.1.4.1.2021.4.3.0
Available Swap Space: .1.3.6.1.4.1.2021.4.4.0
Total RAM in machine: .1.3.6.1.4.1.2021.4.5.0
Total RAM used: .1.3.6.1.4.1.2021.4.6.0
Total RAM Free: .1.3.6.1.4.1.2021.4.11.0
Total RAM Shared: .1.3.6.1.4.1.2021.4.13.0
Total RAM Buffered: .1.3.6.1.4.1.2021.4.14.0
Total Cached Memory: .1.3.6.1.4.1.2021.4.15.0
Disk Statistics
Path where the disk is mounted: .1.3.6.1.4.1.2021.9.1.2.1
Path of the device for the partition: .1.3.6.1.4.1.2021.9.1.3.1
Total size of the disk/partion (kBytes): .1.3.6.1.4.1.2021.9.1.6.1
Available space on the disk: .1.3.6.1.4.1.2021.9.1.7.1
Used space on the disk: .1.3.6.1.4.1.2021.9.1.8.1
Percentage of space used on disk: .1.3.6.1.4.1.2021.9.1.9.1
Percentage of inodes used on disk: .1.3.6.1.4.1.2021.9.1.10.1
System Uptime OID’s
 .1.3.6.1.2.1.1.3.0

Now make sure your nagios is able to excute snmp on remote Linux system. Try to execute following command. In this example 192.168.5.178 is the ip address of the remote host.

snmpwalk -v 1 -c tes90w90wer 192.168.5.178 .1.3.6.1.4.1.2021.9.1.7.1
UCD-SNMP-MIB::dskAvail.1 = INTEGER: 110247880

Then add host entry for each remote box you will monitor. This example is using the linux­server template, be sure to
check that template out to verify the settings are the ones you want to use.

Edit the hosts.cfg file and add the default host template name and define remote hosts as shown below

nano /usr/local/nagios/etc/hosts.cfg
define host{ 
 use linux­server
 host_name class 
 alias Base 
 address 192.168.5.178 
 }

The last step is the configure services. Each service you want to monitor on the remote host must be entered individually.The check_nrpe command is used to access the remote server and then execute the Nagios plugin that is on the remote server and retrieve the information.

Now open services.cfg file add the following services to be monitored.

define service{
        use                     generic-service
        host_name               class 
        service_description     CPU Load
        check_command           check_snmp!tes90w90wer!1.3.6.1.2.1.2.2.1.2! 
        }

Next, verify Nagios Configuration files for any errors.

/usr/local/nagios/bin/nagios -v /usr/local/nagios/etc/nagios.cfg
Total Warnings: 0
Total Errors:   0

Finally, restart Nagios.

service nagios restart

Log into the web interface via : http://[SERVER_IP]/nagios , enter your login information and check for new Linux hosts added in nagios core service.

nagios

That’s all.

Congratulations! Enjoy your Monitoring platform Nagios Core.

The post Monitor Linux Server With Nagios Core Using SNMP appeared first on Unixmen.

The Basics of Everything – DNS

$
0
0


Following on from our previous post by one of my colleagues, I thought it would be a good idea to dive a little deeper in to the background of the Domain Name Server (DNS).

When it comes to the internet, there’s many problems. Both current and on the not too distant horizon. Although I’m a skeptic about whether this is potentially a real issue, but it’s worth mentioning that one of the most possible common problems of the internet today is the potential of running out of IPv4 addresses, due to the amount of different devices now connected to the internet. IPv6 was meant to be the savior technology that would rid this problem. Yet, IPv6 is not only much more complicated to roll out and administer, the worldwide roll-out of IPv6 network is progressing at very slow speeds. And if the lack of IPv4 addresses was to eventuate, then we’d have a real problem on our hands due to the slow implementation of the aforementioned protocol. And the other issue is that of running out of web domain addresses. Or suitable ones for what business and people really require to suit to content of their website.

2013 is going to be a big year for domain name registrars. ICANN recently announcing that this year will see the roll-out of many more varieties of possible domain names. It will happen in stages and will increase the potential of clients to get the real domain name that they intended to get, but one that also targets exactly the services on offer. The potential is there to have www.mywebsite.anything. That’s how far we’ve come with the technology of domain names and DNS.

It’s also important to go back to the very beginning of the design and creation of networking and the internet. In fact, websites did not even have domain names. Everything was connected and networked using the actual IP address of the client and server. Of course, any website can still be accessed today using the IP address of the server. Try entering 173.252.110.27 for Facebook. Or 74.125.224.100 for Google. Also note, there is actually many different IP addresses that Google can be accessed on. You see, it works just the same as it would if you enter that of the whole web URL itself. In fact, you can host your very own web server (or any other kind of server) from your computer at home and access it via the internet using the IP address. It’s simple and effective and very traditional in a sense.

The conception of the Domain Name Server (DNS as it’s known) was developed in the early 1980’s. The basics of the task of what a DNS does is really quite simple. The server aims to translate the website URL in to the actual IP address of the server the user is requesting. Once the translation has taken place, the server directs the user to the correct server location. The whole process is actually very quick. And with todays internet connection speeds, it’s so fast that the process is almost completely transparent. Most users are not even aware that an actual translation is actually taking place, due to the transparent process.

In a modern world we are all deeply surrounded and sometimes drowning in technology. It’s easy to get caught up in its aura and forget the very basics of how technology works and how devices and the internet connect. And when you allow your brain to absorb the information, the technology that once seemed so daunting and complicated, may not seem so complicated after all when you understand how they were designed and how the very foundations were formed.


The post The Basics of Everything – DNS appeared first on Unixmen.

Setup Social Publishing CMS (Content Managemnet System) Using Pligg

$
0
0


Pligg is an open-source CMS social publishing software that encourages visitors to register on your website so that they can submit content and connect with other users. It is used to setup your own social publishing community in just minutes.

unnamed

In this article, I use CentOS 6.4 to setup this website. My hostname and IP Address are server.unixmen.com and 192.168.1.200/24 respectively. Change these values as per your setup.

Prerequisites

Install the following prerequisites to install and configure Pligg:

[root@server ~]# yum install mysql mysql-server httpd php php-mysql php-gd php-imap php-ldap php-odbc php-pear php-xml php-xmlrpc php-mbstring wget unzip -y

Start/Restart MySQL and Apache services now:

[root@server ~]# /etc/init.d/mysqld start
[root@server ~]# /etc/init.d/httpd start
[root@server ~]# chkconfig mysqld on
[root@server ~]# chkconfig httpd on

Create MySQL Root user password:

[root@server ~]# /usr/bin/mysql_secure_installation 

NOTE: RUNNING ALL PARTS OF THIS SCRIPT IS RECOMMENDED FOR ALL MySQL
      SERVERS IN PRODUCTION USE!  PLEASE READ EACH STEP CAREFULLY!

In order to log into MySQL to secure it, we'll need the current
password for the root user.  If you've just installed MySQL, and
you haven't set the root password yet, the password will be blank,
so you should just press enter here.

Enter current password for root (enter for none): 
OK, successfully used password, moving on...

Setting the root password ensures that nobody can log into the MySQL
root user without the proper authorisation.

Set root password? [Y/n] y
New password: 
Re-enter new password: 
Password updated successfully!
Reloading privilege tables..
 ... Success!

By default, a MySQL installation has an anonymous user, allowing anyone
to log into MySQL without having to have a user account created for
them.  This is intended only for testing, and to make the installation
go a bit smoother.  You should remove them before moving into a
production environment.

Remove anonymous users? [Y/n] 
 ... Success!

Normally, root should only be allowed to connect from 'localhost'.  This
ensures that someone cannot guess at the root password from the network.

Disallow root login remotely? [Y/n] 
 ... Success!

By default, MySQL comes with a database named 'test' that anyone can
access.  This is also intended only for testing, and should be removed
before moving into a production environment.

Remove test database and access to it? [Y/n] 
 - Dropping test database...
 ... Success!
 - Removing privileges on test database...
 ... Success!

Reloading the privilege tables will ensure that all changes made so far
will take effect immediately.

Reload privilege tables now? [Y/n] 
 ... Success!

Cleaning up...

All done!  If you've completed all of the above steps, your MySQL
installation should now be secure.

Thanks for using MySQL!

Create MySQL Database and user for Pligg:

Here I create a database ‘pliggdb’ and user ‘pliggadmin’ with password ‘centos’:

[root@server ~]# mysql -u root -p
Enter password:
Welcome to the MySQL monitor.  Commands end with ; or \g.
Your MySQL connection id is 2
Server version: 5.1.69 Source distribution

Copyright (c) 2000, 2013, Oracle and/or its affiliates. All rights reserved.

Oracle is a registered trademark of Oracle Corporation and/or its
affiliates. Other names may be trademarks of their respective
owners.

Type 'help;' or '\h' for help. Type '\c' to clear the current input statement.

mysql> create database pliggdb;
Query OK, 1 row affected (0.01 sec)

mysql> GRANT ALL PRIVILEGES ON pliggdb.* TO 'pliggadmin' IDENTIFIED BY 'centos';
Query OK, 0 rows affected (0.01 sec)

mysql> flush privileges;
Query OK, 0 rows affected (0.01 sec)

mysql> exit
Bye

Open the Apache default port 80 through your firewall/router:

[root@server html]# vi /etc/sysconfig/iptables
# Firewall configuration written by system-config-firewall
# Manual customization of this file is not recommended.
*filter
:INPUT ACCEPT [0:0]
:FORWARD ACCEPT [0:0]
:OUTPUT ACCEPT [0:0]
-A INPUT -p udp -m state --state NEW --dport 80 -j ACCEPT
-A INPUT -p tcp -m state --state NEW --dport 80 -j ACCEPT
-A INPUT -p udp -m state --state NEW --dport 53 -j ACCEPT
-A INPUT -p tcp -m state --state NEW --dport 53 -j ACCEPT
-A INPUT -m state --state ESTABLISHED,RELATED -j ACCEPT
-A INPUT -p icmp -j ACCEPT
-A INPUT -i lo -j ACCEPT
-A INPUT -m state --state NEW -m tcp -p tcp --dport 22 -j ACCEPT
-A INPUT -j REJECT --reject-with icmp-host-prohibited
-A FORWARD -j REJECT --reject-with icmp-host-prohibited
COMMIT

Restart the iptables to save the changes:

[root@server html]# /etc/init.d/iptables restart

Disable SELinux and reboot your system:

[root@server ~]# vi /etc/sysconfig/selinux 
# This file controls the state of SELinux on the system.
# SELINUX= can take one of these three values:
#     enforcing - SELinux security policy is enforced.
#     permissive - SELinux prints warnings instead of enforcing.
#     disabled - No SELinux policy is loaded.
SELINUX=disabled
# SELINUXTYPE= can take one of these two values:
#     targeted - Targeted processes are protected,
#     mls - Multi Level Security protection.
SELINUXTYPE=targeted

Download Pligg

Download the latest Pligg software here. Extract the downloaded file using the following command:

[root@server ~]# unzip Pligg\ CMS\ 1.2.2.zip

This will create a directory called pligg in your current directory. Move all the contents of this directory to your Apache html folder(/var/www/html).

Now we have to rename the following files to make it work. Change to the html directory and enter the following commands to rename the necessary files:

[root@server ~]# cd /var/www/html/
[root@server html]# mv languages/lang_english.conf.default languages/lang_english.conf
[root@server html]# mv libs/dbconnect.php.default libs/dbconnect.php
[root@server html]# mv settings.php.default settings.php

Now set required permissions to the following folders as shown below:

[root@server html]# chmod 777 admin/backup/
[root@server html]# chmod 777 avatars/groups_uploaded/
[root@server html]# chmod 777 avatars/user_uploaded/
[root@server html]# chmod 777 cache/
[root@server html]# chmod 777 cache/admin_c/
[root@server html]# chmod 777 cache/templates_c/*.*
[root@server html]# chmod 777 templates/*.*
[root@server html]# chmod 777 languages/*.*
[root@server html]# chmod 666 libs/dbconnect.php
[root@server html]# chmod 666 settings.php

Begin Installation

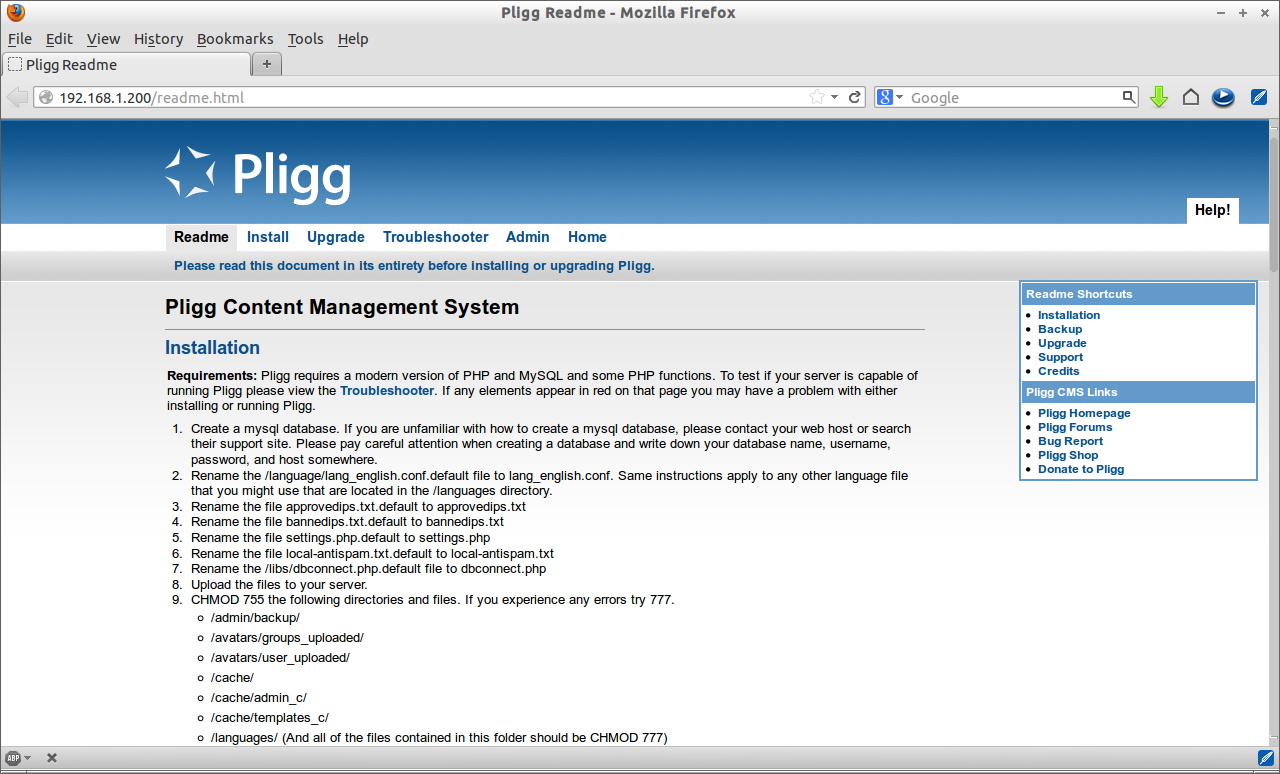
Navigate http://ip-address or domain-name/install/index.php and follow the on-screen instructions.

Pligg Readme - Mozilla Firefox_001


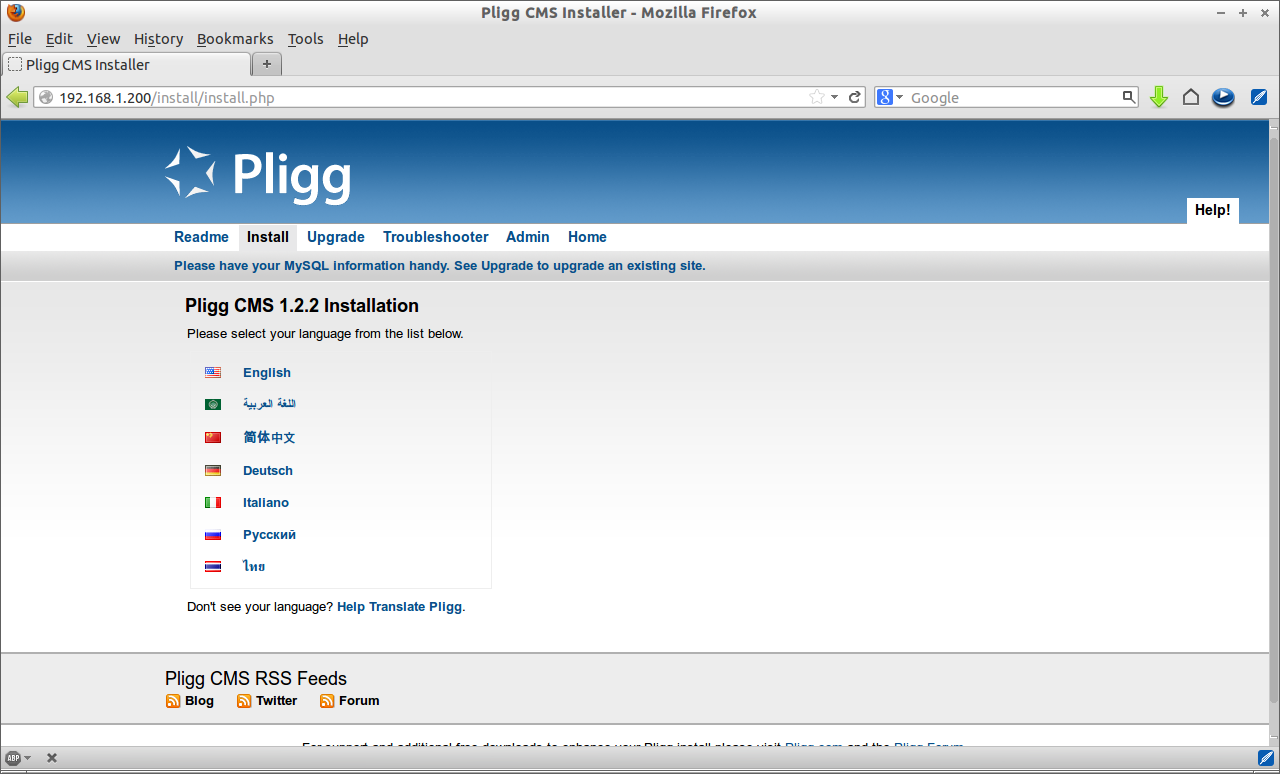
Go to Install menu and select the language.

Pligg CMS Installer - Mozilla Firefox_002

Click Next.

Pligg CMS Installer - Mozilla Firefox_003

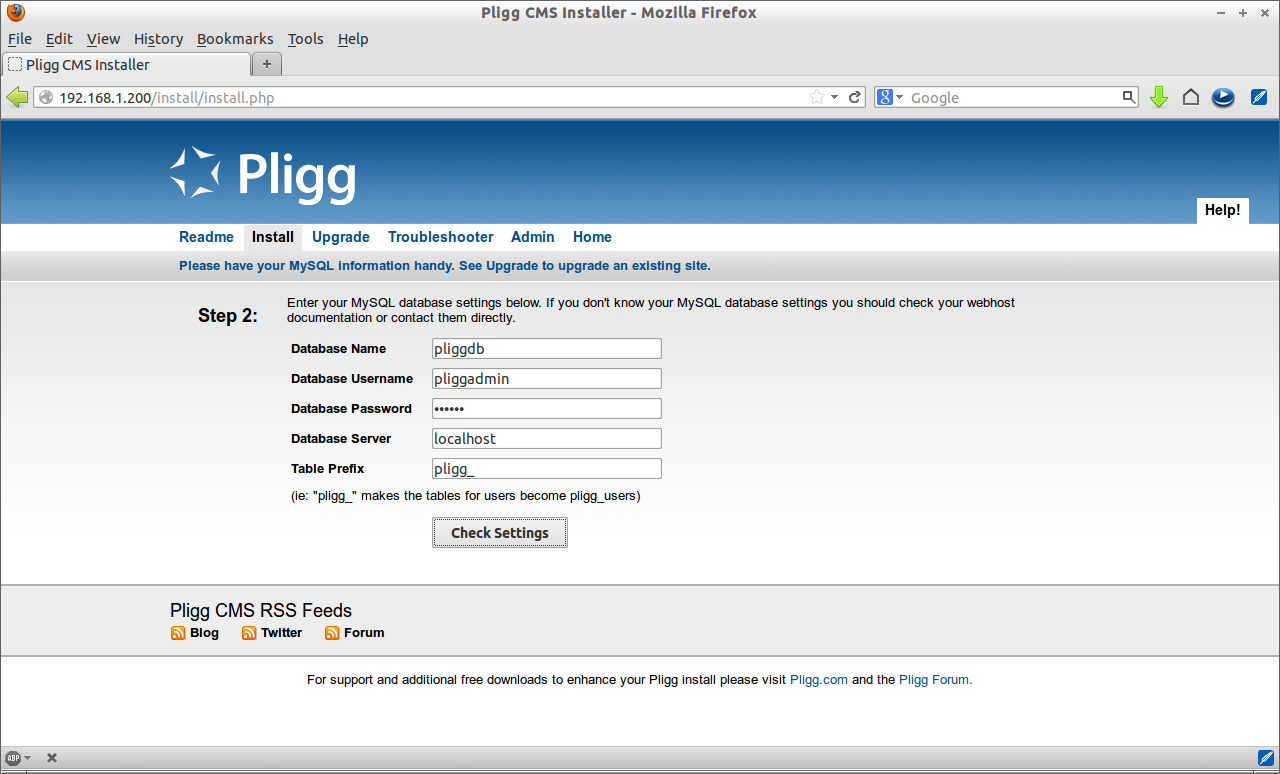
Enter the Database name, username and password. Click Check Settings to verify.

Pligg CMS Installer - Mozilla Firefox_004

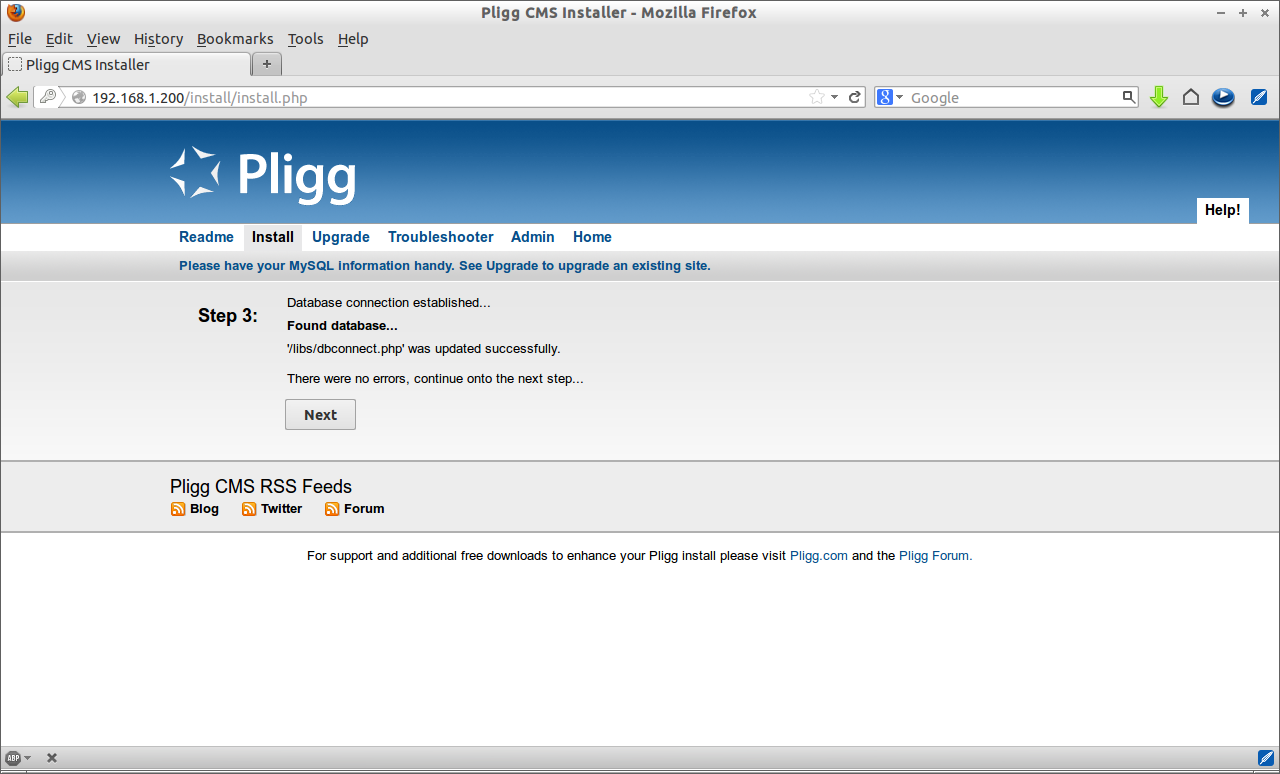
If you entered the valid database credentials, the database connection should established.

Pligg CMS Installer - Mozilla Firefox_005

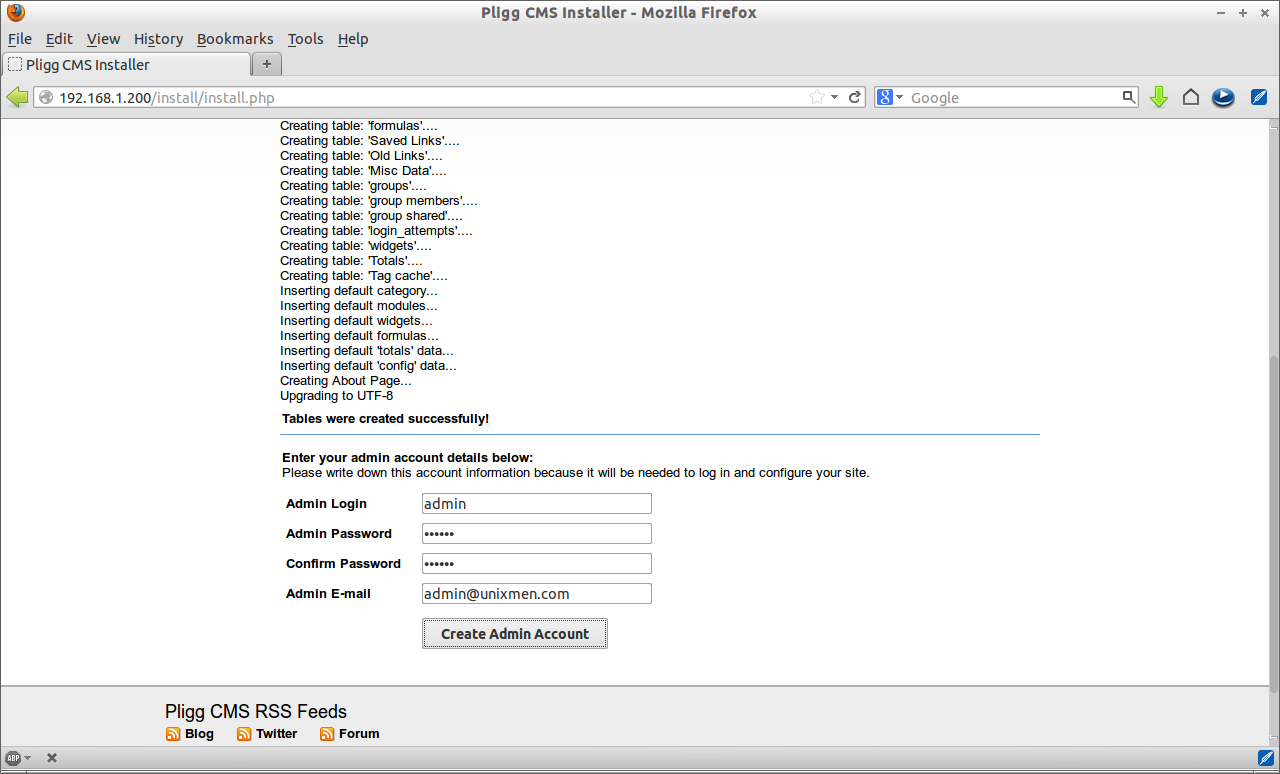
Now the necessary tables will be created. Enter the administrative account details and click Create Admin Account.

Pligg CMS Installer - Mozilla Firefox_006

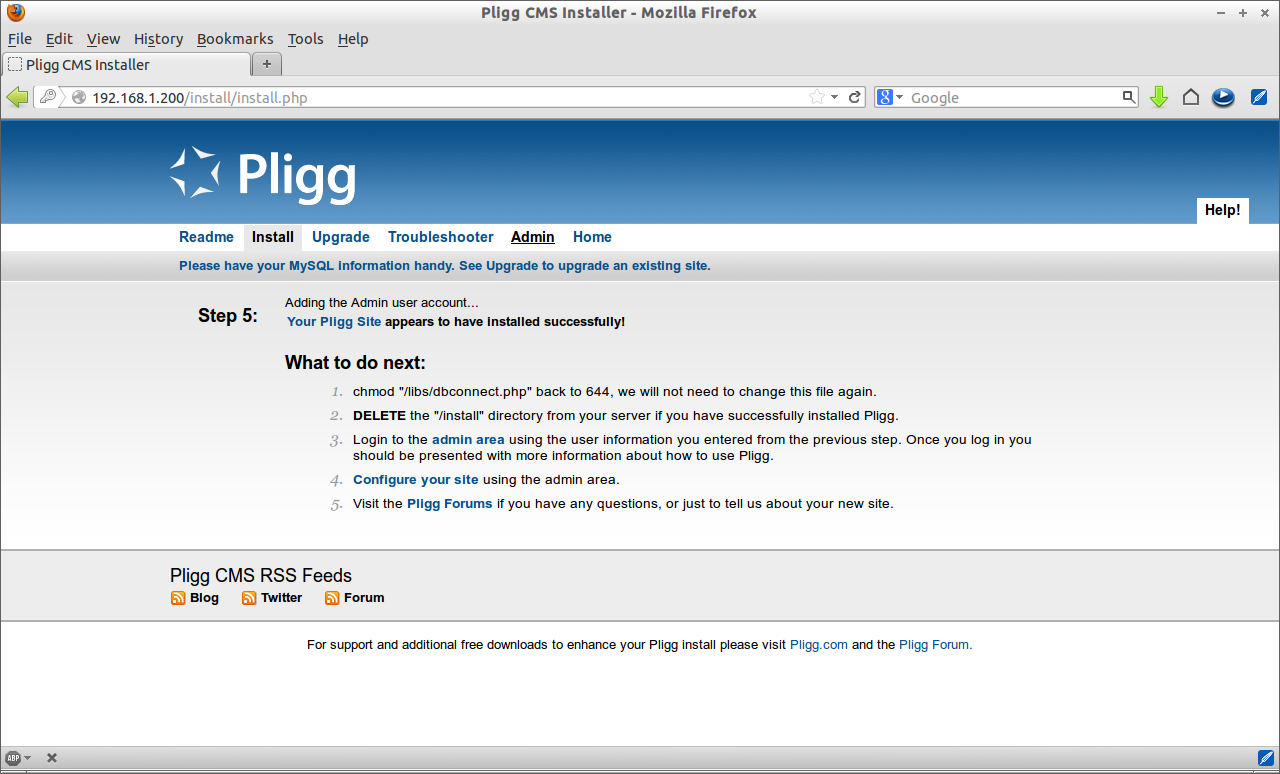
You’re done now. Your Pligg site is successfully installed.

Pligg CMS Installer - Mozilla Firefox_007

Post Installation

Delete the Install folder:

[root@server html]# rm -fr install/

Change the permission of “/libs/dbconnect.php” file back to 644:

[root@server html]# chmod 644 libs/dbconnect.php

Configure Pligg

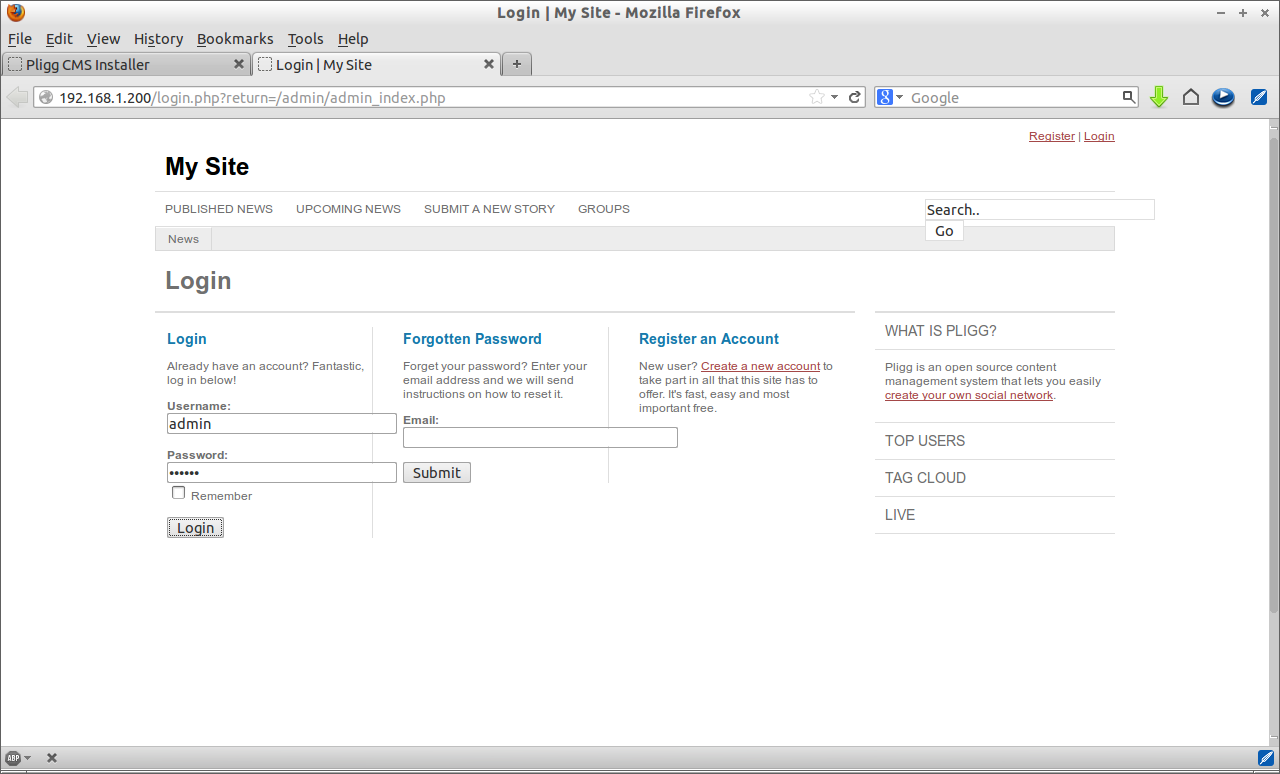
Next login to admin console to start configure Pligg:

Login | My Site - Mozilla Firefox_008

This is how your admin console looks.

My Site Admin Panel - Mozilla Firefox_009

That’s it. Customize your site as per your liking by adding modules, widgets and templates etc. If getting trouble to open any modules, check the permissions.

This is how your Homepage looks.

My Site - Your Source for Social News and Networking - Mozilla Firefox_010

To know more about Pligg installation, configuration, user guides and trouble shooting, visit the official documentation forum.

The post Setup Social Publishing CMS (Content Managemnet System) Using Pligg appeared first on Unixmen.

Networking in Python, Sockets

$
0
0


The key to networking in Python is the socket module, which provides a library for making network connections using Python.

The socket module is used for low level networking and it provides the standard BSD Sockets API. Unix programmers are very familiar with this networking service. If you want to build server sockets and clients, this the module that everything for you. There are a number of channels in which a socket may be implemented, such as TCP, UDP, Unix sockets and so on. Any communication goes through sockets, once you create a socket and are successfully connected you can read and write information from it. When you connect to facebook.com, your computer creates a client socket which will fetch the Facebook page. In simple words, the client socket retrieves information from the Facebook servers. To create a socket you must first import the socket module and use the socket.socket() function to create it. The syntax for this is shown below:

>>>import socket

>>>sock=socket.socket(socket_family,socket_type,protocol=0)

The socket family is either AF_UNIX or AF_INET. The socket type is either SOCK_STREAM or SOCK_DGRAM and the protocol default is set to zero. Once you have created the socket object you can use it to create a client socket or server socket by using specific functions for each one.

Server Socket Methods

Method Description:

s.bind() This method binds address (hostname, port number pair) to socket.
s.listen() This method sets up and start TCP listener.
s.accept() This passively accept TCP client connection, waiting until connection arrives (blocking).

Client Socket Methods

Method Description:

s.connect() This method actively initiates TCP server connection.

After you have learned server socker methods and client socket methods you can create a simple client which connect to a simple server. You can use your imagination to create a simple chat. You can read my previous articles on how to create a server and client in Python programming language.

The post Networking in Python, Sockets appeared first on Unixmen.

How to Secure Your Home Network with OpenDNS

$
0
0


OpenDNS is a free DNS alternative to your ISP DNS. It helps you to get faster and as well as safer browsing at absolutely free. It speeds up your browsing experience by connecting to better DNS servers that are faster and reliable.

Access-Blocked-Websites-at-work

Anyone can use this DNS for their individual system or home network. For some enhanced security levels you need to pay, but for individual and home networks it is entirely free. It is damn easy to setup and configure. You don’t need to download and setup any extra software. And it’s operating system independent too!

Features

You can use this for your personal computer or a home or school network systems. If you have kids playing around with internet often, this is a must have option to setup in your home. It can protect the kids from visiting to inappropriate sites such as pornography, gambling and social networks etc.

Also it has a smart enough feature to find typos in website addresses. For example if you type www.unixmen.om (note “c” is missing) in the address bar, OpenDNS will automatically correct the typo error and open the correct website www.unixmen.com.

Another notable advantages are Phishing, Malware protection and some other settings which are useful to protect your home network. For more information about OpenDNS, you can find in their official website.

Getting Started with OpenDNS

First you need to set the following DNS in your system or router. If you want to enable protection for a particular system, set the DNS in the network settings or if you want to enable protection to your home network, then enter the DNS in your router.

Here are the two DNS addresses provided by OpenDNS:

208.67.222.222
208.67.220.220

Set them in your network settings. Here I use this service for my personal system, so I set these two addresses in my network card settings.

Editing Wired connection 2_001Next go to www.opendns.com and create a free account. You may see there are three account types called OpenDNS Home, OpenDNS Home VIP and OpenDNS FamilyShield. OpenDNS Home VIP is a paid solution and the other two are free. OpenDNS FamilyShield is a pre-configured option to protect your home network, whereas OpenDNS Home allows you to customize the settings as per your liking.

Here I select OpenDNS Home. Click on Sign Up button. Enter your mail ID and password etc. Finally, click Continue.

OpenDNS Store - Free Parental Controls Sign-Up - Mozilla Firefox_003

You will see the three options such as Computer, Router and DNS Server. I want to setup this service in my personal system, so here I select Computer.

OpenDNS Store - Change your Settings - Mozilla Firefox_004

Choose your operating system. I select Ubuntu in the Unix/Linux tab.

OpenDNS Store - Change your Settings - Choose your computer - Mozilla Firefox_005

The next window will show the instructions how to setup your network settings.

OpenDNS Store - Change your Settings - Ubuntu - Mozilla Firefox_006

When all set click on the Test your new settings link at the bottom. Now you will be pleased with a success message. Click on OpenDNS Dashboard link to setup further settings.

OpenDNS Store - Customize your account - Mozilla Firefox_008

Configuration

This is how your dashboard looks.

OpenDNS Dashboard - Settings - Mozilla Firefox_010

As you see in the above screen shot, I didn’t confirm my mail ID yet. If you didn’t confirm your mail ID, some features will not work as expected. To do that, go to your mail. OpenDNS will send a confirmation link to your mail. Click on the link and after you confirm your mail ID, this is how your OpenDNS dashboard looks.

Click on Add a network. You will be redirected to the next page.

OpenDNS Dashboard - Mozilla Firefox_011

Enter your public IP. The public IP will be shown on the top of your dashboard or you can find it from www.whatismyip.com website. Click on Add this Network.

OpenDNS Dashboard - Settings - Mozilla Firefox_012

Check the box “Yes, it is a dynamic ip address” if yours is a dynamic address. Mine is dynamic IP. And download and install ddclient software in system to update the dynamic IP address to OpenDNS server whenever it changes.

OpenDNS Dashboard - Settings - Mozilla Firefox_013

Now your network has been successfully added.

OpenDNS Dashboard - Settings - Mozilla Firefox_014

Now it is time to configure some settings for our newly added network. Select your home network from Settings drop down box.

OpenDNS Dashboard - Settings - Web Content Filtering - Mozilla Firefox_015

Web Content Filtering

You may see the filtering levels such as High, Moderate, Low, None and Custom in this section. According to your setup, you can select any one of the levels. You can view the details of each level by clicking on the View button. Also you can customize the options of each level. Select the options what you want to restrict.

OpenDNS Dashboard - Settings - Web Content Filtering - Mozilla Firefox_016

Also you can add the exceptions. For example if you want to allow mail.yahoo.com domain, then add the domain in the Manage Individual Domains section.

Selection_017Security

In this section, you can set Malware and Phishing protection options. Also you can block individual IP addresses as well.

OpenDNS Dashboard - Settings - Security - Mozilla Firefox_019

Customization

In this section, you can add your own logo or photo of yours. Also you can send customized message along with blocked page.

OpenDNS Dashboard - Settings - Customization - Mozilla Firefox_020

Stats and Logs

If you want to see the logging activity just check this option, OpenDNS servers will automatically collect the logs for you.

OpenDNS Dashboard - Settings - Stats and Logs - Mozilla Firefox_021

Advanced Settings

This section has the options to enable dynamic IP update, domain name typo correction option and VPN exceptions etc.

OpenDNS Dashboard - Settings - Advanced Settings - Mozilla Firefox_022

Once you all set, save the changes by clicking on the Apply button.

Test your settings

Say for example lets open a porn site to see what happens. You may see a message that the domain is blocked as shown in the below screen shot.

Blocked Domain - Mozilla Firefox_023

This method is quite easy to setup basic web content filtering for your home or small schools. If you like this you can go for paid solutions of OpenDNS. For more details visit their official website. If you not satisfied with OpenDNS, then try some open-source firewall distributions such as Untangle and IPFire etc. Happy and safe browsing!

The post How to Secure Your Home Network with OpenDNS appeared first on Unixmen.

Install Moodle Learning Managment System on CentOS 6

$
0
0


Moodle is a Course Management System (CMS), also known as a Learning Management System (LMS) or a Virtual Learning Environment (VLE). It is a free web application that educators can use to create effective online/offline learning sites.

In this article, let us learn to build a LMS site with Moodle on CentOS 6.x. Here x stands for version such as 6.1, 6.2 etc. My testbox hostname and IP address are server.unixmen.com and 192.168.1.200/24 respectively.

Prerequisites

You should install and configure a LAMP server first. Moodle needs the following PHP extensions to run properly.

[root@server ~]# yum install php-iconv php-mbstring php-curl php-openssl php-tokenizer php-xmlpc php-soap php-ctype php-zip php-gd php-simplexml php-spl php-pcre php-dom php-xml php-intl php-json php-ldap php-pecl-apc -y

PHP settings

Open up /etc/php.ini file and make sure that you have configured the settings as shown below:

[root@server ~]# vi /etc/php.ini
 register_globals = Off
 safe_mode = Off
 memory_limit = 128M
 session.save_handler = files
 magic_quotes_gpc = Off
 magic_quotes_runtime = Off
 file_uploads = On
 session.auto_start = 0
 session.bug_compat_warn = Off
 post_max_size = 100M
 upload_max_filesize = 100M

Restart your web server:

[root@server ~]# service httpd restart

Create MySQL database and user for Moodle

Here I create a database ‘moodledb’ and a user ‘moodleadmin’ with password ‘centos’:

[root@server ~]# mysql -u root -p
Enter password:
Welcome to the MariaDB monitor.  Commands end with ; or \g.
Your MariaDB connection id is 1
Server version: 5.5.31-MariaDB MariaDB Server
Copyright (c) 2000, 2013, Oracle, Monty Program Ab and others.
Type 'help;' or '\h' for help. Type '\c' to clear the current input statement.

MariaDB [(none)]> create database moodledb;
Query OK, 1 row affected (0.04 sec)

MariaDB [(none)]> GRANT ALL PRIVILEGES ON moodledb.* TO 'moodleadmin' IDENTIFIED BY 'centos';
Query OK, 0 rows affected (0.03 sec)

MariaDB [(none)]> flush privileges;
Query OK, 0 rows affected (0.01 sec)

MariaDB [(none)]> exit
Bye

Install Moodle

Download the latest version from here. Or you can directly download from the terminal using the following command:

[root@server ~]# wget http://download.moodle.org/download.php/direct/stable25/moodle-latest-25.zip

Extract the downloaded zip file:

[root@server ~]# unzip moodle-latest-25.zip

This will create a new directory called moodle in your current directory. Copy all the contents of moodle to your website root document folder.

If your server is dedicated to host only moodle site, copy the contents of your moodle directory to /var/www/html/ directory. In this case your moodle website URL will be www.your-site.com.

If your server is shared server, copy the contents of moodle directory to /var/www/html/moodle/. In this case your moodle website URL will be www.your-site.com/moodle.

Here I use a sub directory to host my moodle site. So the command should be:

[root@server ~]# cp -fr moodle/ /var/www/html/moodle

Set the following permissions for root user to moodle directory:

[root@server ~]# chown -R root /var/www/html/moodle/
[root@server ~]# chmod -R 755 /var/www/html/moodle/

Create data directory for Moodle

Moodle requires a directory to store all of its files (all your site’s uploaded files, temporary data, session data etc.). The web server needs to be able to write to this directory. On larger systems consider how much free space you are going to use when allocating this directory.

IMPORTANT: This directory must NOT be accessible directly via the web. This would be a serious security hole. Do not try to place it inside your web root or inside your Moodle program files directory. Moodle will not install. It can go anywhere else convenient.

[root@server ~]# mkdir /var/www/moodledata/
[root@server ~]# chmod 777 /var/www/moodledata/

Begin Moodle installation

Open up your web browser and navigate to http://ip-address/ if you copied the moodle directory contents to Apache document root folder or http://ip-address/moodle if you copied the moodle directory contents to a sub directory of Apache root.

Choose your desired language and press Next.

Installation - Moodle 2.5+ (Build: 20130627) - Mozilla Firefox_001Enter Moodle data directory path and press Next.

Installation - Moodle 2.5+ (Build: 20130627) - Mozilla Firefox_003Select the database driver. In my case it’s mysql. Press Next.

Installation - Moodle 2.5+ (Build: 20130627) - Mozilla Firefox_004Enter database name and database user details and press Next.

Installation - Moodle 2.5+ (Build: 20130627) - Mozilla Firefox_005You will be asked to save the settings. The installer will ask you to create a config.php file in your moodle root folder with the contents of below output.

Installation - Moodle 2.5+ (Build: 20130627) - Mozilla Firefox_006So let us create a config.php file with following command:

[root@server ~]# vi /var/www/html/moodle/config.php

Add the lines from the above output as shown below:

<?php  // Moodle configuration file

unset($CFG);
global $CFG;
$CFG = new stdClass();

$CFG->dbtype    = 'mysqli';
$CFG->dblibrary = 'native';
$CFG->dbhost    = 'localhost';
$CFG->dbname    = 'moodledb';
$CFG->dbuser    = 'moodleadmin';
$CFG->dbpass    = 'centos';
$CFG->prefix    = 'mdl_';
$CFG->dboptions = array (
  'dbpersist' => 0,
  'dbsocket' => 0,
);

$CFG->wwwroot   = 'http://192.168.1.200/moodle';
$CFG->dataroot  = '/var/www/moodledata/';
$CFG->admin     = 'admin';

$CFG->directorypermissions = 0777;

require_once(dirname(__FILE__) . '/lib/setup.php');

// There is no php closing tag in this file,
// it is intentional because it prevents trailing whitespace problems!

Now click Next. And click on Continue to accept the License Agreement.

Installation - Moodle 2.5+ (Build: 20130627) - Mozilla Firefox_007Now the installer will check for all necessary modules are installed. If everything seems OK, press Continue.

Installation - Mozilla Firefox_008The moodle installer will create all necessary modules. This will take a while. After it completes everything, click Continue.

Installation - Moodle 2.5+ (Build: 20130627) - Mozilla Firefox_009 Create a Administrator account and click Update.

Installation - Mozilla Firefox_010Enter the Site name and click Save Changes button.

Unixmen LMS - Mozilla Firefox_012Now your moodle site has been successfully installed.

Setup cron for Moodle

It is very important to setup Cron. The Moodle ‘cron’ process is a PHP script that must be run regularly in the background. The Moodle cron script runs different tasks at differently scheduled intervals. The Moodle cron script runs tasks include sending mail, updating Moodle reports, RSS feeds, activity completions, posting forum messages and other tasks. Since different tasks have different schedules, not every task will run in Moodle when the cron script is triggered.

Install crontab package if it is not installed already:

[root@server ~]# yum install cronie

Now check which user is running the web server using the following command:

[root@server ~]# grep -i user /etc/httpd/conf/httpd.conf

This will display a result as shown below:

# User/Group: The name (or #number) of the user/group to run httpd as.
#  . On SCO (ODT 3) use "User nouser" and "Group nogroup".
#    suggested workaround is to create a user www and use that user.
User apache
# UserDir: The name of the directory that is appended onto a user's home
# directory if a ~user request is received.
# The path to the end user account 'public_html' directory must be
# accessible to the webserver userid.  This usually means that ~userid
# must have permissions of 711, ~userid/public_html must have permissions
<IfModule mod_userdir.c>
    # UserDir is disabled by default since it can confirm the presence
    # of a username on the system (depending on home directory
    UserDir disabled
    # To enable requests to /~user/ to serve the user's public_html
    # directory, remove the "UserDir disabled" line above, and uncomment
    #UserDir public_html
# Control access to UserDir directories.  The following is an example
LogFormat "%h %l %u %t \"%r\" %>s %b \"%{Referer}i\" \"%{User-Agent}i\"" combined
LogFormat "%{User-agent}i" agent
#LogFormat "%h %l %u %t \"%r\" %>s %b \"%{Referer}i\" \"%{User-Agent}i\" %I %O" combinedio

From the above result, apache user is running the web server. So let us set the cron job for apache user:

[root@server ~]# crontab -u apache -e

Add the followong line:

*/15 * * * *        /usr/bin/php /var/www/html/moodle/admin/cli/cron.php

The above command will run cron job every 15 minutes intervals on all day. Make sure that you have replaced with your own moodle path. Save and exit the file.

Go through the Moodle documentation page to know more about Moodle installation and administration.

The post Install Moodle Learning Managment System on CentOS 6 appeared first on Unixmen.

How to install – configure Ghost on openSUSE 42.2 Leap

$
0
0

What is Ghost?

In the Web 2.0 era, blogs are an important part of like for many people, and the popularity of WordPress and Tumblr, for instance, demonstrates fact.
Today we’ll talk about a platform for building and running online publications (like blogs, magazines, etc) called Ghost. This tool is open source and fully hackable, written in JavaScript and running on Node.js.
In this tutorial, we’ll see how to install – configure Ghost on openSUSE Leap 42.2, using Apache as the web server.

Node.js version

Ghost runs on top of Node.js. To be more exact, developers decided to support only LTS versions. In this tutorial we will be using version 4.2.x.
Even if this means that Ghost cannot use the latest features of Node.js, the choice seems reasonable as it leaves room for them to spend their time in building new features and fixing bugs rather than tracking changes in Node and having to retest their platform for every release.
For final users and admins, this results in a more stable and supported platform which many find appealing.

Getting started – Install Node.js and npm

Node.js version 4 is available already in openSUSE. To install it, just use

zypper

:

# zypper in nodejs
The following NEW package is going to be installed:
  nodejs4

1 new package to install.
Overall download size: 3.3 MiB. Already cached: 0 B. After the operation, additional
12.7 MiB will be used.
Continue? [y/n/? shows all options] (y): y
Retrieving package nodejs4-4.6.1-3.1.x86_64        (1/1),   3.3 MiB ( 12.7 MiB unpacked)
Retrieving: nodejs4-4.6.1-3.1.x86_64.rpm ...........................[done (846.4 KiB/s)]
Checking for file conflicts: .....................................................[done]
(1/1) Installing: nodejs4-4.6.1-3.1.x86_64 .......................................[done]

Next, install

npm

:

# zypper in npm

Check the version:

$ npm --version
2.15.9

Installing Ghost

Change the directory to

/srv/www

and download Ghost:

# cd /srv/www
# wget https://ghost.org/zip/ghost-latest.zip

Unzip it in a new directory named

ghost

 using the following code:

# unzip -d ghost ghost-latest.zip

Go to this new directory and install Ghost with

npm

:

# cd ghost
# npm install --production

Configure Ghost

The

ghost

directory contains an example of the configuration file. Use this.

# cp config.example.js config.js

Next, create a new user named ghostusr:

# useradd -d /srv/www -s /bin/bash -U ghostusr
# passwd ghostusr

Set this user to be the owner of the ghost directory:

# chown -R ghostusr:ghostusr /srv/www/ghost

Now, it’s possible to test Ghost with

npm

 by executing the following commands:

# su - ghostusr
$ cd ghost
$ npm start --production

It should result in output similar to this:

Migrations: Creating tables...
Migrations: Creating table: posts
Migrations: Creating table: users
Migrations: Creating table: roles
Migrations: Creating table: roles_users
Migrations: Creating table: permissions
Migrations: Creating table: permissions_users
Migrations: Creating table: permissions_roles
Migrations: Creating table: permissions_apps
Migrations: Creating table: settings
Migrations: Creating table: tags
Migrations: Creating table: posts_tags
Migrations: Creating table: apps
Migrations: Creating table: app_settings
Migrations: Creating table: app_fields
Migrations: Creating table: clients
Migrations: Creating table: client_trusted_domains
Migrations: Creating table: accesstokens
Migrations: Creating table: refreshtokens
Migrations: Creating table: subscribers
Migrations: Running fixture populations
Migrations: Creating owner
Ghost is running in production... 
Your blog is now available on http://my-ghost-blog.com

Open a new terminal window and test to see if Ghost is effectively running by executing the following command:

$ curl -I localhost:2368
HTTP/1.1 200 OK
X-Powered-By: Express
Cache-Control: public, max-age=0
Content-Type: text/html; charset=utf-8
Content-Length: 4554
ETag: W/"11ca-93Do3c+nffISfn1kLrmRZg"
Vary: Accept-Encoding
Date: Mon, 13 Mar 2017 07:59:39 GMT
Connection: keep-alive

In the terminal window running Ghost, stop it by entering CTRL+C.
Now, create a new systemd service:

# $EDITOR /etc/systemd/system/ghost.service

And paste the following configuration there:

[Unit]
Description=Ghost Blog - Publication platform
After=network.target

[Service]
Type=simple
# Ghost installation Directory
WorkingDirectory=/srv/www/ghost
User=ghostusr
Group=ghostusr
ExecStart=/usr/bin/npm start --production
ExecStop=/usr/bin/npm stop --production
Restart=always
SyslogIdentifier=Ghost

[Install]
WantedBy=multi-user.target

Reload systemd daemon:

# systemct daemon-reload

and then start the new service:

# systemctl start ghost

Check the status:

# systemctl status ghost

And it will show the folowing:

ghost.service - Ghost Blog - Publication platform
   Loaded: loaded (/etc/systemd/system/ghost.service; disabled; vendor preset: disabled)
   Active: active (running) since Mon 2017-03-13 09:06:41 CET; 5s ago

To make it start up at boot time:

# systemctl enable ghost

Installing and configuring Apache

Install Apache 2 with

zypper

:

# zypper in apache2

And create a new Virtual Host for Ghost:

# $EDITOR /etc/apache2/sites-available/ghost.conf

There, paste:

 <VirtualHost *:80> 
    #Domain Name 
    ServerName myghostblog.com 
    ServerAlias www.myghostblog.com 
 
    #HTTP proxy/gateway server 
    ProxyRequests off  
    ProxyPass / http://127.0.0.1:2368/  
    ProxyPassReverse / http:/127.0.0.1:2368/      
</VirtualHost>

Save and exit.
Activate the proxy module, activate Ghost and restart everything:

# a2enmod proxy proxy_http
# ln -s /etc/apache2/sites-available/ghost.conf /etc/apache2/sites-enabled/ghost.conf
# systemctl restart apache2
# systemctl restart ghost

Open a web browser and visit http://localhost:2368, and:
Screenshot_20170313_092200
Ghost is up and running!

Enable SSL

Create a new directory which will contain certificates:

# mkdir -p /etc/apache2/certs

And generate a new certificate there:

# openssl req -x509 -nodes -days 365 -newkey rsa:4096 -keyout /etc/apache2/certs/ghost.key -out /etc/apache2/certs/ghost.crt

Change permissions:

# chmod 600 /etc/apache2/certs/*

Finally, edit the Virtual Host configuration to enable SSL:

# $EDITOR /etc/apache2/sites-available/ghost.conf
<VirtualHost *:80>
    ServerName myghostblog.com
    ServerAlias www.myghostblog.com

    # Force http to https
    Redirect permanent / https://myghostblog.com/
#    ProxyRequests off 
#    ProxyPass / http://127.0.0.1:2368/ 
#    ProxyPassReverse / http:/127.0.0.1:2368/     
</VirtualHost>

<VirtualHost *:443>

   ServerName myghostblog.com

   SSLEngine on
   SSLCertificateFile /etc/apache2/certs/ghost.crt
   SSLCertificateKeyFile /etc/apache2/certs/ghost.key

   ProxyPass / http://127.0.0.1:2368/
   ProxyPassReverse / http:/127.0.0.1:2368/
   ProxyPreserveHost   On

   RequestHeader set X-Forwarded-Proto "https"

</VirtualHost>

Save, exit, and restart Apache:

# a2enmod ssl headers
# systemctl restart apache2

Conclusion

Ghost is now up and running. Go to localhost:2368/ghost/ to finish the set up of the admin account, and then start blogging!

The post How to install – configure Ghost on openSUSE 42.2 Leap appeared first on Unixmen.


E Commerce Development and Security

$
0
0

website builder

With the use of Linux and a few other commercial components, our company has built a reliable e-commerce solution that is very reliable and made our business so reliable that otherwise have been impossible. Before the use of Linux, we have to implement such a system that was solely in the domain of other organizations that was possible with large cash outlays and dedicated personnel. Linux comes up with building a top-quality, open system available at almost no cost.

E-Commerce or Electronic Commerce refers to the transactions via the internet. Each time individuals and corporations are buying or selling products and services online they’re engaging in e-commerce. The term e-commerce also encompasses other activities including online auctions, internet banking, payment gateways, and online ticketing. Linux has provided a strong platform with a huge selection of open source e-commerce software available. E-commerce has become the face of the retail market. From the firste-commerce transaction in 1994 to 2020 the e-commerce industry has grown into a business of $4.13 trillion. Today, e-commerce shares 14 percent of the entire retail business within the world. Figures predict that this number will grow to 21 percent by 2023. E-Commercehas a great scope for entrepreneurs. E-Commerce sites like Alibaba and Amazon are some of the largest businesses within the world. It’s some time to become the subsequent Jack Ma.

Here is our quick guide about the way to establish an e-commerce business of your own.

You can start your own e-commerce business by simply developing a website. A decent e-commerce website is mobile-friendly, catchy to its users, and encompasses a sound program. Several online web developersgive services to create an e-commerce website We have some best open e-commerce solutions that you can deploy with your own Linux server. 3 Best E-Commerce Website Builders of 2020

Wix is the first e-commerce website builder on our list

Wix is the best e-commerce website, builder. Wix helps you build an SEO-friendly website and it isa hundred percent free from the commission on transactions. Wix is accessible for $23 per month. It also offers a 14-day free trial. Wix offers 500 plus templates, SEO tools, Mobile optimization, Wix chats, multiple payment methods, and global shipping.

Shopify ranks 2nd in the top ecommerce website builders

Shopify is the preferred e-commerce website builder. Itis a dedicated e-commerce builder, meaning Its sole purpose is to help people build online stores. It’s no surprise, then, that its templates, features, and apps are all geared towards e-commerce success. Shopify has three pricing plans ranging from $29 to $299 per month. It also offers 14 day free trials. Shopify provides the unlimited sale of products, multichannel sale across social media and different markets, assigned inventory store your products at 4 different places, shipping discounts up to 64 percent on DHL Express, UPS, or USPS.

BIGCommerce is the third top e-commerce website builder

BigCommerce is one of the foremost powerful and scalable e-commerce website builders on the market, due to its impressive range of built-in sales tools. It got a sturdy concentrate on fuelling growth for businesses, so if you’re ambitious and searching to power up your store, BigCommerce has the features to support you. BigCommerce offers 0 percent transaction fees, unlimited products, storage and bandwidth, multi-currency, real-time shipping quotes, and BigCommerce mobile app. BigCommerce has three pricing options starting from $29.95 to $299.95. It also provides 15 days free trial

Cyber Security

The next step is providing security to your e-commerce website. Security is amongst the key aspects of any endeavor online.It’s a top priority for any online company that is serious about gaining a customer’s trust and regeneration. If your business isn’t able to protect itself on the net, it’s unable to protect customers’ data also. So, the thing you wish to secure yourself could be a Virtual Private Network VPN. A VPN is a multifunctional tool. It’s used for:

  • Data security (encryption technology);
  • Online anonymity (hiding and replacing a real Internet Protocol address and geographical location);
  • Unlimited Internet access (you get access to previouslyblocked content).

A VPN could be a universal tool. Regardless of how old or new your online company is, you will always pick a service that suits your budget at the moment. There are a variety of VPN providers within the market, we’ve gathered you an inventory of top VPN providers.

List of Top VPN Providers

ExpressVPN

ExpressVPN is a top VPN providers thanks to its fantastic apps, easy use, superb speeds, excellent 24/7 customerservice support, and wide compatibility across devices. You’ll be able to use the service in Mac, Windows, iOS, Android, even Linux or BlackBerry, and you will also install it on your Android TV, games console, or your home router. With a kill switch, split tunneling, DNS leak protection, and military-grade encryption as standard, your data will stay secure, plus its no-logging policy assures your anonymity in any situation. The pricing of Express VPN is as following

  • 12 Month offer is available at $6.67 per month
  • 6 monthly offer is available at $9.99 per month
  • 1-month offer is available at $12.95 per month

NordVPN

NordVPN with its 5400+ servers operating from 89 different locations is the 2nd best VPN provider. It’s hot on its heels and provides a seriously secure, privacy-focused experience. You’ll be covered by military-grade encryption alongside all the quality extra features you’ve come to expect.Kill switch and a choice of protocols to permit you to decide on if you would like extra speed or safety. You’ll even have a superb selection of apps for almost any device you’d like to cover. Those apps do present one amongst Nord’s downsides though, on desktop and larger screens the map-based interface is the type of use, but on handheld devices, it’s much clumsier than a server list. The pricing schedule of NordVPN is as follows

  • NordVPN for 2 years at $3.71 per month
  • NordVPN for 1 year at $4.92 per month
  • For 1 month it is available at $11.95 per month.

Surfshark

Surfshark is a mid-range, economical, yet powerful VPN. Though it’s not incredibly in-depth, Surfshark’s apps look great and are easy to use. All you would like to try to do is tap the short connect button, and you’re off. You’ll even be able to get apps for plenty of devices including Android, iOS, Windows, Mac, and Linux. On that note, with Surfshark you are visiting to be able to protect every device you own because it offers unlimited simultaneous connections with one subscription. Meaning you’ll cover 10, 20, even 50 devices with one plan. Surfshark’s no slouch within the privacy department, with a kill switch, split tunneling, and AES-256 encryption. The pricing of Surfshark is as follows.

  • For 24 month it is available at $2.21 per month
  • For 6 month it is available at $6.49 per month
  • For 1 month it is available at $12.95 per month

The post E Commerce Development and Security appeared first on Unixmen.

Setup Social Publishing CMS (Content Managemnet System) Using Pligg

$
0
0

Pligg is an open-source CMS social publishing software that encourages visitors to register on your website so that they can submit content and connect with other users. It is used to setup your own social publishing community in just minutes.

unnamed

In this article, I use CentOS 6.4 to setup this website. My hostname and IP Address are server.unixmen.com and 192.168.1.200/24 respectively. Change these values as per your setup.

Prerequisites

Install the following prerequisites to install and configure Pligg:

[root@server ~]# yum install mysql mysql-server httpd php php-mysql php-gd php-imap php-ldap php-odbc php-pear php-xml php-xmlrpc php-mbstring wget unzip -y

Start/Restart MySQL and Apache services now:

[root@server ~]# /etc/init.d/mysqld start
[root@server ~]# /etc/init.d/httpd start
[root@server ~]# chkconfig mysqld on
[root@server ~]# chkconfig httpd on

Create MySQL Root user password:

[root@server ~]# /usr/bin/mysql_secure_installation 

NOTE: RUNNING ALL PARTS OF THIS SCRIPT IS RECOMMENDED FOR ALL MySQL
      SERVERS IN PRODUCTION USE!  PLEASE READ EACH STEP CAREFULLY!

In order to log into MySQL to secure it, we'll need the current
password for the root user.  If you've just installed MySQL, and
you haven't set the root password yet, the password will be blank,
so you should just press enter here.

Enter current password for root (enter for none): 
OK, successfully used password, moving on...

Setting the root password ensures that nobody can log into the MySQL
root user without the proper authorisation.

Set root password? [Y/n] y
New password: 
Re-enter new password: 
Password updated successfully!
Reloading privilege tables..
 ... Success!

By default, a MySQL installation has an anonymous user, allowing anyone
to log into MySQL without having to have a user account created for
them.  This is intended only for testing, and to make the installation
go a bit smoother.  You should remove them before moving into a
production environment.

Remove anonymous users? [Y/n] 
 ... Success!

Normally, root should only be allowed to connect from 'localhost'.  This
ensures that someone cannot guess at the root password from the network.

Disallow root login remotely? [Y/n] 
 ... Success!

By default, MySQL comes with a database named 'test' that anyone can
access.  This is also intended only for testing, and should be removed
before moving into a production environment.

Remove test database and access to it? [Y/n] 
 - Dropping test database...
 ... Success!
 - Removing privileges on test database...
 ... Success!

Reloading the privilege tables will ensure that all changes made so far
will take effect immediately.

Reload privilege tables now? [Y/n] 
 ... Success!

Cleaning up...

All done!  If you've completed all of the above steps, your MySQL
installation should now be secure.

Thanks for using MySQL!

Create MySQL Database and user for Pligg:

Here I create a database ‘pliggdb’ and user ‘pliggadmin’ with password ‘centos’:

[root@server ~]# mysql -u root -p
Enter password:
Welcome to the MySQL monitor.  Commands end with ; or \g.
Your MySQL connection id is 2
Server version: 5.1.69 Source distribution

Copyright (c) 2000, 2013, Oracle and/or its affiliates. All rights reserved.

Oracle is a registered trademark of Oracle Corporation and/or its
affiliates. Other names may be trademarks of their respective
owners.

Type 'help;' or '\h' for help. Type '\c' to clear the current input statement.

mysql> create database pliggdb;
Query OK, 1 row affected (0.01 sec)

mysql> GRANT ALL PRIVILEGES ON pliggdb.* TO 'pliggadmin' IDENTIFIED BY 'centos';
Query OK, 0 rows affected (0.01 sec)

mysql> flush privileges;
Query OK, 0 rows affected (0.01 sec)

mysql> exit
Bye

Open the Apache default port 80 through your firewall/router:

[root@server html]# vi /etc/sysconfig/iptables
# Firewall configuration written by system-config-firewall
# Manual customization of this file is not recommended.
*filter
:INPUT ACCEPT [0:0]
:FORWARD ACCEPT [0:0]
:OUTPUT ACCEPT [0:0]
-A INPUT -p udp -m state --state NEW --dport 80 -j ACCEPT
-A INPUT -p tcp -m state --state NEW --dport 80 -j ACCEPT
-A INPUT -p udp -m state --state NEW --dport 53 -j ACCEPT
-A INPUT -p tcp -m state --state NEW --dport 53 -j ACCEPT
-A INPUT -m state --state ESTABLISHED,RELATED -j ACCEPT
-A INPUT -p icmp -j ACCEPT
-A INPUT -i lo -j ACCEPT
-A INPUT -m state --state NEW -m tcp -p tcp --dport 22 -j ACCEPT
-A INPUT -j REJECT --reject-with icmp-host-prohibited
-A FORWARD -j REJECT --reject-with icmp-host-prohibited
COMMIT

Restart the iptables to save the changes:

[root@server html]# /etc/init.d/iptables restart

Disable SELinux and reboot your system:

[root@server ~]# vi /etc/sysconfig/selinux 
# This file controls the state of SELinux on the system.
# SELINUX= can take one of these three values:
#     enforcing - SELinux security policy is enforced.
#     permissive - SELinux prints warnings instead of enforcing.
#     disabled - No SELinux policy is loaded.
SELINUX=disabled
# SELINUXTYPE= can take one of these two values:
#     targeted - Targeted processes are protected,
#     mls - Multi Level Security protection.
SELINUXTYPE=targeted

Download Pligg

Download the latest Pligg software here. Extract the downloaded file using the following command:

[root@server ~]# unzip Pligg\ CMS\ 1.2.2.zip

This will create a directory called pligg in your current directory. Move all the contents of this directory to your Apache html folder(/var/www/html).

Now we have to rename the following files to make it work. Change to the html directory and enter the following commands to rename the necessary files:

[root@server ~]# cd /var/www/html/
[root@server html]# mv languages/lang_english.conf.default languages/lang_english.conf
[root@server html]# mv libs/dbconnect.php.default libs/dbconnect.php
[root@server html]# mv settings.php.default settings.php

Now set required permissions to the following folders as shown below:

[root@server html]# chmod 777 admin/backup/
[root@server html]# chmod 777 avatars/groups_uploaded/
[root@server html]# chmod 777 avatars/user_uploaded/
[root@server html]# chmod 777 cache/
[root@server html]# chmod 777 cache/admin_c/
[root@server html]# chmod 777 cache/templates_c/*.*
[root@server html]# chmod 777 templates/*.*
[root@server html]# chmod 777 languages/*.*
[root@server html]# chmod 666 libs/dbconnect.php
[root@server html]# chmod 666 settings.php

Begin Installation

Navigate http://ip-address or domain-name/install/index.php and follow the on-screen instructions.

Pligg Readme - Mozilla Firefox_001


Go to Install menu and select the language.

Pligg CMS Installer - Mozilla Firefox_002

Click Next.

Pligg CMS Installer - Mozilla Firefox_003

Enter the Database name, username and password. Click Check Settings to verify.

Pligg CMS Installer - Mozilla Firefox_004

If you entered the valid database credentials, the database connection should established.

Pligg CMS Installer - Mozilla Firefox_005

Now the necessary tables will be created. Enter the administrative account details and click Create Admin Account.

Pligg CMS Installer - Mozilla Firefox_006

You’re done now. Your Pligg site is successfully installed.

Pligg CMS Installer - Mozilla Firefox_007

Post Installation

Delete the Install folder:

[root@server html]# rm -fr install/

Change the permission of “/libs/dbconnect.php” file back to 644:

[root@server html]# chmod 644 libs/dbconnect.php

Configure Pligg

Next login to admin console to start configure Pligg:

Login | My Site - Mozilla Firefox_008

This is how your admin console looks.

My Site Admin Panel - Mozilla Firefox_009

That’s it. Customize your site as per your liking by adding modules, widgets and templates etc. If getting trouble to open any modules, check the permissions.

This is how your Homepage looks.

My Site - Your Source for Social News and Networking - Mozilla Firefox_010

To know more about Pligg installation, configuration, user guides and trouble shooting, visit the official documentation forum.

The post Setup Social Publishing CMS (Content Managemnet System) Using Pligg appeared first on Unixmen.

Can Linux Run Video Games?

$
0
0

linux gaming

Linux and Gaming

Linux is a widely used and popular open source operating system that was first released back in 1991. It differs from operating systems like Windows and macOS in that it is open source and it is highly customizable through its use of “distributions”. Distributions or “distros” are basically different versions of Linux that can be installed along with the Linux core software so that users can customize their system to fit their specific need. Some of the more popular Linux distributions are Ubuntu, Debian and Fedora.

For many years Linux had the reputation of being a terrible gaming platform and it was believed that users wouldn’t be able to engage in this popular form of entertainment. The main reason for this is that commercially successful games just weren’t being developed for Linux. A few well known video game titles like Doom, Quake and SimCity made it to Linux but for the most part they were overlooked through the 1990’s. However, things have changed a lot since then and there is an every expanding library of popular video games you can play on Linux.

Where to Find Video Games for Linux

Gamers now have quite a few options when it comes to finding video games that run on Linux. You should probably start with native Linux games. These are actually games that were designed to run on Linux. Some of the places to find native Linux games include:

  • Steam: Steam offer plenty of native Linux games ranging from lesser known Indie games to popular commercial games. A few games are even free. Steam has a native desktop client for Linux users that often comes preinstalled with distros.
  • com: GOG.com is similar to Steam in that they offer a great selection of native Linux video games. However, all GOG.com games are DRM free and they don’t offer a desktop client. Once you purchase a game it is always available for you in your account and can be downloaded at any time.
  • io: Itch.io is a good place to look for indie native Linux games. You can buy games and there is also a good selection of free games.
  • Linux distribution software repositories: Check the software repositories of the Linux distribution you are using. There will generally be some games included. Some distributions like Ubuntu have a section dedicated to games.

Although there are a growing number of native Linux games, there are still a lot of popular games for Windows that aren’t available for Linux. Fortunately, there are a number of tools that make it possible to run Windows games on Linux.

  • Steam Play: Many Windows games can be played using a tool from Valve called Proton. When you are using Linux look through your Steam library. You will notice that some games have a blue “Install” button even though they aren’t listed as Linux compatible in the Steam store. These are games that can be run on Linux using Proton. Some games not yet cleared by Steam will run as well. Rather than try every game yourself you can visit ProtonDB which maintains a list of games that work with Proton along with any tweaks that need to be made for the best performance.
  • Wine is a compatibility layer that allows you to run Windows applications in other systems like Linux. Wine is available in most Linux distribution’s repository. Wine also has a database of games and other applications they support you can look through.
  • Lutris: Lutris is a game management program that runs games under WINE and some other compatibility layers or emulators. It supports a variety of sources including Epic Games Launcher, Origin and several others. They maintain a list of games that they support.

There are plenty of Windows games you can run on Linux and no reason why you can’t play as well as you do when using Windows. If you are having trouble leveling up or winning the best loot, consider trying AskBoosters for help with your game.

Aside from native Linux games and Windows games there are a huge amount of browser based games that work on any system including Linux.

Linux Distributions for Gaming

There are many different distributions for Linux and games can be played on any of them. That being said, some are better suited for playing video games than others. Here are some the best Linux distributions for gamers:

  • SteamOS is based on Debian and was designed for gaming. It comes pre-installed with Steam and was designed and built by Valve. The SteamOS only has Steam installed by default but by activating the “desktop mode” a desktop OS with all the features is available and you will be able to run other applications besides Steam and games. It comes already set up so no installation is necessary and you won’t have to configure anything, making it the ideal distribution for beginners. It includes ready to play games and there is support for many graphic cards and gaming related hardware
  • Ubuntu GamePack: This distro is based on Ubuntu and is optimized for gaming. Unlike SteamOS there are no preinstalled games in Ubuntu GamePack, but the Steam client, Wine, PlayOnLinux and Lutris all come preinstalled. There are over 6 thousand Linux and Windows games that are guaranteed to launch in Ubuntu GamePack.
  • Lakka: Lakka doesn’t have any desktop environment and its sole purpose is to turn a computer into a retro gaming console. It is very lightweight and comes with many emulators preinstalled. There are a variety of retro games you can play using this Linux distribution.
  • Manjaro Gaming Edition: Manjaro Gaming Edition is a rolling-releases distro based on Manjaro. It comes with almost everything you need pre-installed including PlayOnLinux, Lutris and Minecraft. However, Steam will have to be manually installed. It also includes a number of editing tools, chatting software streaming apps and more. A nice feature is that some popular graphics card drivers also come preinstalled and are updated regularly.

There are plenty of other Linux distributions that are good for video games so you are sure to find one that fits your specific needs.

The post Can Linux Run Video Games? appeared first on Unixmen.

5 Cybersecurity Tips to Help Linux Users Protect Their Computers

$
0
0

cyber security

Cybercrime is a  growing threat that has caused most internet users to rethink how they protect their data and information. Cybercriminals are getting more sophisticated with their methods and are coming up with new ways to mask their internet identity to avoid a jail term. Whether is through phishing attacks, ransomware or hijacking a computer to mine cryptocurrency, evidence shows that criminals are honing their skills and are becoming more brazen in their attack.

There are numerous Linux computers out there, they’re so much that it’s practically impossible to say the exact number that’s currently being used. This popularity has made hackers see it as a perfect beehive to harness the private information of private individuals, and also install ransomware and milk users’ of their hard-earned money. As such, it is essential that every Linux user take steps to protect their identity and data from these nefarious individuals. The cost of cybercrime is over $600 billion annually, this shows that it’s a highly sophisticated threat you should take seriously. Here are tips on how to protect your device as a Linux user:

  1. Protect your Linux computer from unwanted snoopers

The internet is a perfect replica of the real world. It is an embodiment of the good, the bad, and the ugly; there are people that use the internet with the primary aim of gaining access to computers illegally.

The consequence of hackers gaining access to your device can be very grave; some of the problems it causes include duplicating your identity to commit a crime, stealing your financial details to withdraw your money, etc. Public Wi-Fi can be a minefield for hackers if you don’t protect your device. An attacker can use an unsecured network to modify or steal your data.

Installing Linux VPN is a great step towards having a secured Linux system as it’ll help to prevent ISPs and hackers from snooping around and gathering your private information while using your Linux system. It protects your details by masking IP addresses to prevent a direct target from hackers.

A VPN offers an effective way to secure your online activity by encrypting your network.

  1. Opt for Full Disk Encryption

Even if you generate a strong password for your Linux, it doesn’t take away the possibility that someone can gain access to your device when it’s stolen. A way they can use to illegally gain access is via a USB Key.

If they succeed in accessing your data, then they can snoop around all they want, read your files and probably sell the content of your computer to fellow criminals.

To stop this, use full disk encryption to protect your drive. By encrypting your drive, your data will remain secure as intruders can’t access anything without first entering the right FDE password.

  1. Update Your Software Regularly

As your Linux system is exposed to the internet, hackers are consistently looking for loopholes to explore in the operating system to enable them to gain access to your sensitive files. And some old Linux software has numerous loopholes that hackers can explore. As such, it’s a huge security risk to allow these loopholes to exist for a prolonged period.

Outdated Linux software comes with a much bigger problem than the pain and frustration from lag time and the constant notification to update your software. It throws open your system to the prying eyes of an average hacker. And when they’re in, they can lock you out of your computer or sell your information to terrorists and other criminals. Using outdated software is synonymous with living in a house without doors and windows.

Security updates are a major reason for you to keep your software updated. Doing this automatically erases most loopholes that hackers might want to exploit. It also improves the overall function of your Linux computer so that you can have a better user experience with it.

  1. Use Linux’s Firewall

Some security threats are peculiar to Linux, so much so that third-party solutions might be ineffective against them.

Such security threats are usually from a loophole that is on the Linux system and leaves the system in a position where it’s susceptible to cyberattacks.

To solve this problem, it’s best that you learn how to use LINUX’s firewall. The firewall component is popularly regarded as “ipstable.” Apart from preventing cyberattacks, it also helps to manage the traffic that comes to your computer.

  1. Improve your browser’s security

About 14.76% of cyberattacks in the 3rd quarter of 2020 happened through the browser—this holds true irrespective of your preferred browser. As such, it is sacrosanct to be particular about your browser’s security if you’re serious about keeping your device safe.

Negligence of your browser’s security can lead to a myriad of problem, some of which includes phishing, identity theft, and other cybercrimes.

There are numerous free extensions to improve the security of your browsers so it shouldn’t be difficult to find an effective one to install.

Conclusion

A report has shown that hackers have targeted Linux systems for years. As such, it’s best to protect your system from the prying eyes of hackers that want to gain access to your data illegally. In this article, we’ve discussed the different ways to protect your Linux computer.

The post 5 Cybersecurity Tips to Help Linux Users Protect Their Computers appeared first on Unixmen.

5 Tips for an Effective Cyber Security Strategy for Your Business

$
0
0

cyber security

Cyber attacks have drastically advanced, with criminals using more sophisticated tools to steal and misuse company data. This has increased ransomware, phishing attempts, DoS attacks, SQL injections, and more. Installing antiviruses and setting up a firewall is no longer enough. You need an effective cyber security strategy to maximize your organization’s resiliency and security.

Your cyber security strategy should outline every individual’s duties and responsibilities towards ensuring the company’s cyber security. It gives you a deeper understanding of your risks, enables early risk detection, is inherently proactive, supports a swift response, and helps you meet compliance standards. This article outlines five tips for an effective cyber security strategy for your business.

1.    Create a cyber attack recovery plan

Cyber attacks can be costly and sometimes threaten your business’s existence, calling for a recovery plan. Their operational and financial repercussions may include notification and remediation costs, loss of customers, reduced productivity, long-term litigation and reputation damage costs, and restoration of key business systems.

With a cyber attack recovery plan, which includes instructions guiding teams on preparing for, spotting, countering, and recovering from cyber attacks, you can protect your business, employees, and client data and finances. A comprehensive response plan should address everything that might be affected by the loss of crucial information and operational systems.

2.    Ensure excellent data management

Data management safeguards your company and its employees from data breaches, thefts, and losses with encryption and authentication tools. Solid data security keeps crucial company data backed up and easy to retrieve in case the primary source isn’t available. In addition, security becomes a critical concern if your information has personally identifiable data that requires careful management to comply with consumer protection laws. Effective data management ensures that persons across your company can access reliable data for their queries.

3.    Implement access control

Access control limits access to data and data processing systems. If implemented effectively, access controls mitigate the risk of information getting accessed unlawfully, without proper authorization, and the possibility of a data breach. While a focus on privacy and security is crucial to protecting company information while meeting data protection legal obligations, you should balance accessibility because being overly restrictive may lead to information silos. To create a successful access control environment, consider:

  • Access control principles
  • Who approves access requests
  • Who ensures proper access implementation
  • How you’ll document access
  • How you’ll implement access controls
  • Periodic access control audit procedure

4.    Initiate cyber security training for employees

Empowering your workers to identify common cyber security threats, such as phishing, business email compromise, spyware, and ransomware, is crucial to your business’s cyber security. Cyber security training helps employees understand business operation threats and vulnerabilities and how to spot and counter them, enhancing data security. It also reduces downtime and the costs associated with cybercrime, makes employees more productive, ensures better compliance, and increases customer trust.

5.    Conduct a cybersecurity risk assessment

A cybersecurity risk assessment is crucial in identifying your business’s vulnerability areas. It can also help you educate your employees on the potential threats the company might face, where the risks may occur, and how they can affect their role. Cybersecurity risk assessment enables you to mitigate breaches or attacks, keeping you prepared for the worst.

Endnote

Cyber security is vital to every organization’s growth and success. Use these tips to create an effective cyber security strategy for your business.

The post 5 Tips for an Effective Cyber Security Strategy for Your Business appeared first on Unixmen.

Viewing all 62 articles
Browse latest View live