Quantcast
Channel: Linux webhosting Archives | Unixmen
Viewing all 62 articles
Browse latest View live

Top 5: The Best Budget and Unlimited WebHosting Plans

$
0
0

We have ranked the best affordable five webhosting services for your convenience: Web Hosting Companies with unlimited, cheap plans, featuring auto-install functions like one-click installation for WordPress, Joomla, Drupal and other content management systems (CMS). When it comes to chosing a webhoster, the most important measure is the quality of the support.

Top 5 Webhosting Providers

February 2012

Rank Webhosting provider

        Price

Features        Control panel Support

Guarantee 

1 Bluehost $6,95/month Based on our experience, bluehost is the best webhosting provider. Quotation from Bluehost website: “From the business owner to the individual who desires full functionality on a small budget, Bluehost provides your complete web hosting solution.”For complete features go to the website
Cpanel 24/7 support
Online chat
Excellent support
 45-day money-back guarantee
2  inmotion-logo $5.95/month Plans start at $5.95/month
Unlimited disk space 
Unlimited data transfer 
Free choice of data center location
True 24/7 U.S. based toll-free support  
Rated 3 out of 3 stars by CNET.com!
Cpanel 24/7 support
Online chat
90-day money-back guarantee
3 eboundhost-logo
$3.95/month
Unlimited websites per account
Unmetered transfer bandwith (NEW)
Unmetered hard drive storage (NEW)
Unmetered mailboxes (NEW)
For full features visit Visit BoundHost page
Cpanel 24/7 support 90-day money-back guarantee
4 iPage $3.50/month Unlimited disk space
Unlimited transfer/ bandwith
Unlimited domains allowed
Unlimited MySQL Databases            
 
Cpanel 24/7 support Online chat
5 logo_HostPapa $4.95/month  Unlimited disk space
Unlimited domain names on one account
1 Free domain name for life
Unlimited bandwidth
Personal website tools
FREE setup! Save $29.95!
FREE soholaunch site builder software
Cpanel 24/7 support Online chat 30-day money-back guarantee


For VPS Hosting, Hostgator is the best choice, register today and save $9.94 by using this couponcode : unixmencoupon

--------------------------------------------------------------------- Top 5: The Best Budget and Unlimited WebHosting Plans


Top 5 Linux VPS Hosting

The Basics of Everything – DNS

$
0
0

Following on from our previous post by one of my colleagues, I thought it would be a good idea to dive a little deeper in to the background of the Domain Name Server (DNS).

When it comes to the internet, there’s many problems. Both current and on the not too distant horizon. Although I’m a skeptic about whether this is potentially a real issue, but it’s worth mentioning that one of the most possible common problems of the internet today is the potential of running out of IPv4 addresses, due to the amount of different devices now connected to the internet. IPv6 was meant to be the savior technology that would rid this problem. Yet, IPv6 is not only much more complicated to roll out and administer, the worldwide roll-out of IPv6 network is progressing at very slow speeds. And if the lack of IPv4 addresses was to eventuate, then we’d have a real problem on our hands due to the slow implementation of the aforementioned protocol. And the other issue is that of running out of web domain addresses. Or suitable ones for what business and people really require to suit to content of their website.

2013 is going to be a big year for domain name registrars. ICANN recently announcing that this year will see the roll-out of many more varieties of possible domain names. It will happen in stages and will increase the potential of clients to get the real domain name that they intended to get, but one that also targets exactly the services on offer. The potential is there to have www.mywebsite.anything. That’s how far we’ve come with the technology of domain names and DNS.

It’s also important to go back to the very beginning of the design and creation of networking and the internet. In fact, websites did not even have domain names. Everything was connected and networked using the actual IP address of the client and server. Of course, any website can still be accessed today using the IP address of the server. Try entering 173.252.110.27 for Facebook. Or 74.125.224.100 for Google. Also note, there is actually many different IP addresses that Google can be accessed on. You see, it works just the same as it would if you enter that of the whole web URL itself. In fact, you can host your very own web server (or any other kind of server) from your computer at home and access it via the internet using the IP address. It’s simple and effective and very traditional in a sense.

The conception of the Domain Name Server (DNS as it’s known) was developed in the early 1980′s. The basics of the task of what a DNS does is really quite simple. The server aims to translate the website URL in to the actual IP address of the server the user is requesting. Once the translation has taken place, the server directs the user to the correct server location. The whole process is actually very quick. And with todays internet connection speeds, it’s so fast that the process is almost completely transparent. Most users are not even aware that an actual translation is actually taking place, due to the transparent process.

In a modern world we are all deeply surrounded and sometimes drowning in technology. It’s easy to get caught up in its aura and forget the very basics of how technology works and how devices and the internet connect. And when you allow your brain to absorb the information, the technology that once seemed so daunting and complicated, may not seem so complicated after all when you understand how they were designed and how the very foundations were formed.


--------------------------------------------------------------------- The Basics of Everything – DNS

Install Memcached PHP Extension in CentOS

$
0
0

Memcached is a general-purpose distributed memory caching system that was originally developed by Danga Interactive for LiveJournal, but is now used by many other sites. It is often used to speed up dynamic database-driven websites by caching data and objects in RAM to reduce the number of times an external data source (such as a database or API) must be read. Memcached runs on Unix, Linux, Windows and Mac OS X and is distributed under a permissive free software license.

Memcached’s APIs provide a giant hash table distributed across multiple machines. When the table is full, subsequent inserts cause older data to be purged in least recently used (LRU) order. Applications using Memcached typically layer requests and additions into RAM before falling back on a slower backing store, such as a database.

The system is used by sites including YouTube, Reddit, Zynga, Facebook, Orange, Twitter and Wikipedia. Engine Yard is using Memcached as the part of their platform as a service technology stack and Heroku offers a managed Memcached service built on Couchbase Server as part of their platform as a service. Google App Engine, AppScale, Windows Azure and Amazon Web Services also offer a Memcached service through an API.


Install Memcached daemon:

The Memcached software doesn’t exist in the standard CentOS repository. You can download from EPEL repository.

Update the repositories:

yum update -y

Start the installation:

yum install memcached

Configure Memcached:

vi   /etc/sysconfig/memcached
PORT="11211"
USER="memcached"
MAXCONN="1024"
CACHESIZE="2048"
OPTIONS=""

Start Memcached:

chkconfig --levels 235 memcached on

/etc/init.d/memcached start

Check and verify Memcached

root@ns5001089 [~]# netstat -an | grep 11211
tcp 0 0 0.0.0.0:11211 0.0.0.0:* LISTEN
tcp 0 0 127.0.0.1:51555 127.0.0.1:11211 TIME_WAIT
tcp 0 0 :::11211 :::* LISTEN
udp 0 0 0.0.0.0:11211 0.0.0.0:*
udp 0 0 :::11211 :::*
root@ns5001089 [~]# memcached-tool localhost:11211 stats
#localhost:11211 Field Value
 accepting_conns 1
 auth_cmds 0
 auth_errors 0
 bytes 44808145
 bytes_read 45373990
 bytes_written 71278002
 cas_badval 0
 cas_hits 0
 cas_misses 0
 cmd_flush 0
 cmd_get 4073
 cmd_set 546
 conn_yields 0
 connection_structures 16
 curr_connections 10
 curr_items 531
 decr_hits 0
 decr_misses 0
 delete_hits 0
 delete_misses 0
 evictions 0
 get_hits 744
 get_misses 3329
 incr_hits 0
 incr_misses 0
 limit_maxbytes 2147483648
 listen_disabled_num 0
 pid 14356
 pointer_size 64
 rusage_system 2.628164
 rusage_user 2.664166
 threads 4
 time 1366212222
 total_connections 3004
 total_items 546
 uptime 237459
 version 1.4.4
root@ns5001089 [~]#


Memcached PHP Extension

Install Pecl too:

yum install php-pear
yum install php-pecl-memcache

Then Start using pecl to fetch PHP Extensions:

pecl install memcache
 downloading memcache-2.2.7.tgz ...
 Starting to download memcache-2.2.7.tgz (36,459 bytes)
 ..........done: 36,459 bytes
 11 source files, building
 running: phpize
 Configuring for:
 PHP Api Version: 20090626
 Zend Module Api No: 20090626
 Zend Extension Api No: 220090626
 Enable memcache session handler support? [yes] :
 building in /root/tmp/pear/pear-build-rootkFeKkf/memcache-2.2.7
 running: /root/tmp/pear/memcache/configure --enable-memcache-session=yes
 checking for grep that handles long lines and -e... /bin/grep
 checking for egrep... /bin/grep -E
 checking for a sed that does not truncate output... /bin/sed
 checking for cc... cc
 checking for C compiler default output file name... a.out
 checking whether the C compiler works... yes
 checking whether we are cross compiling... no
 checking for suffix of executables...
 checking for suffix of object files... o
 checking whether we are using the GNU C compiler... yes
 checking whether cc accepts -g... yes
 checking for cc option to accept ISO C89... none needed
 checking how to run the C preprocessor... cc -E
 checking for icc... no
 checking for suncc... no
 checking whether cc understands -c and -o together... yes
 checking for system library directory... lib
 checking if compiler supports -R... no
 checking if compiler supports -Wl,-rpath,... yes
 checking build system type... x86_64-unknown-linux-gnu
 checking host system type... x86_64-unknown-linux-gnu
 checking target system type... x86_64-unknown-linux-gnu
 checking for PHP prefix... /usr/local
 checking for PHP includes... -I/usr/local/include/php -I/usr/local/include/php/main -I/usr/local/include/php/TSRM -I/usr/local/include/php/Zend -I/usr/local/include/php/ext -I/usr/local/include/php/ext/date/lib
 checking for PHP extension directory... /usr/local/lib/php/extensions/no-debug-non-zts-20090626
 checking for PHP installed headers prefix... /usr/local/include/php
 checking if debug is enabled... no
 checking if zts is enabled... no
 checking for re2c... re2c
 checking for re2c version... 0.13.5 (ok)
 checking for gawk... gawk
 checking whether to enable memcache support... yes, shared
 checking whether to enable memcache session handler support... yes
 checking for the location of ZLIB... no
 checking for the location of zlib... /usr
 checking for session includes... /usr/local/include/php
 checking for memcache session support... enabled
 checking for ld used by cc... /usr/bin/ld
 checking if the linker (/usr/bin/ld) is GNU ld... yes
 checking for /usr/bin/ld option to reload object files... -r
 checking for BSD-compatible nm... /usr/bin/nm -B
 checking whether ln -s works... yes
 checking how to recognize dependent libraries... pass_all
 checking for ANSI C header files... yes
 checking for sys/types.h... yes
 checking for sys/stat.h... yes
 checking for stdlib.h... yes
 checking for string.h... yes
 checking for memory.h... yes
 checking for strings.h... yes
 checking for inttypes.h... yes
 checking for stdint.h... yes
 checking for unistd.h... yes
 checking dlfcn.h usability... yes
 checking dlfcn.h presence... yes
 checking for dlfcn.h... yes
 checking the maximum length of command line arguments... 1572864
 checking command to parse /usr/bin/nm -B output from cc object... ok
 checking for objdir... .libs
 checking for ar... ar
 checking for ranlib... ranlib
 checking for strip... strip
 checking if cc supports -fno-rtti -fno-exceptions... no
 checking for cc option to produce PIC... -fPIC
 checking if cc PIC flag -fPIC works... yes
 checking if cc static flag -static works... yes
 checking if cc supports -c -o file.o... yes
 checking whether the cc linker (/usr/bin/ld -m elf_x86_64) supports shared libraries... yes
 checking whether -lc should be explicitly linked in... no
 checking dynamic linker characteristics... GNU/Linux ld.so
 checking how to hardcode library paths into programs... immediate
 checking whether stripping libraries is possible... yes
 checking if libtool supports shared libraries... yes
 checking whether to build shared libraries... yes
 checking whether to build static libraries... no
creating libtool
 appending configuration tag "CXX" to libtool
 configure: creating ./config.status
 config.status: creating config.h
 running: make
...........................
cc -shared .libs/memcache.o .libs/memcache_queue.o .libs/memcache_standard_hash.o .libs/memcache_consistent_hash.o .libs/memcache_session.o -Wl,-soname -Wl,memcache.so -o .libs/memcache.so
 creating memcache.la
 (cd .libs && rm -f memcache.la && ln -s ../memcache.la memcache.la)
 /bin/sh /root/tmp/pear/pear-build-rootkFeKkf/memcache-2.2.7/libtool --mode=install cp ./memcache.la /root/tmp/pear/pear-build-rootkFeKkf/memcache-2.2.7/modules
 cp ./.libs/memcache.so /root/tmp/pear/pear-build-rootkFeKkf/memcache-2.2.7/modules/memcache.so
 cp ./.libs/memcache.lai /root/tmp/pear/pear-build-rootkFeKkf/memcache-2.2.7/modules/memcache.la
 PATH="$PATH:/sbin" ldconfig -n /root/tmp/pear/pear-build-rootkFeKkf/memcache-2.2.7/modules
 ----------------------------------------------------------------------
 Libraries have been installed in:
 /root/tmp/pear/pear-build-rootkFeKkf/memcache-2.2.7/modules
If you ever happen to want to link against installed libraries
 in a given directory, LIBDIR, you must either use libtool, and
 specify the full pathname of the library, or use the `-LLIBDIR'
 flag during linking and do at least one of the following:
 - add LIBDIR to the `LD_LIBRARY_PATH' environment variable
 during execution
 - add LIBDIR to the `LD_RUN_PATH' environment variable
 during linking
 - use the `-Wl,--rpath -Wl,LIBDIR' linker flag
 - have your system administrator add LIBDIR to `/etc/ld.so.conf'
See any operating system documentation about shared libraries for
 more information, such as the ld(1) and ld.so(8) manual pages.
 ----------------------------------------------------------------------
Build complete.
 Don't forget to run 'make test'.
running: make INSTALL_ROOT="/root/tmp/pear/pear-build-rootkFeKkf/install-memcache-2.2.7" install
 Installing shared extensions: /root/tmp/pear/pear-build-rootkFeKkf/install-memcache-2.2.7/usr/local/lib/php/extensions/no-debug-non-zts-20090626/
 running: find "/root/tmp/pear/pear-build-rootkFeKkf/install-memcache-2.2.7" | xargs ls -dils
 1199741 4 drwxr-xr-x 3 root root 4096 Apr 17 10:32 /root/tmp/pear/pear-build-rootkFeKkf/install-memcache-2.2.7
 1199770 4 drwxr-xr-x 3 root root 4096 Apr 17 10:32 /root/tmp/pear/pear-build-rootkFeKkf/install-memcache-2.2.7/usr
 1199771 4 drwxr-xr-x 3 root root 4096 Apr 17 10:32 /root/tmp/pear/pear-build-rootkFeKkf/install-memcache-2.2.7/usr/local
 1199772 4 drwxr-xr-x 3 root root 4096 Apr 17 10:32 /root/tmp/pear/pear-build-rootkFeKkf/install-memcache-2.2.7/usr/local/lib
 1199773 4 drwxr-xr-x 3 root root 4096 Apr 17 10:32 /root/tmp/pear/pear-build-rootkFeKkf/install-memcache-2.2.7/usr/local/lib/php
 1199774 4 drwxr-xr-x 3 root root 4096 Apr 17 10:32 /root/tmp/pear/pear-build-rootkFeKkf/install-memcache-2.2.7/usr/local/lib/php/extensions
 1199775 4 drwxr-xr-x 2 root root 4096 Apr 17 10:32 /root/tmp/pear/pear-build-rootkFeKkf/install-memcache-2.2.7/usr/local/lib/php/extensions/no-debug-non-zts-20090626
 1199769 248 -rwxr-xr-x 1 root root 246440 Apr 17 10:32 /root/tmp/pear/pear-build-rootkFeKkf/install-memcache-2.2.7/usr/local/lib/php/extensions/no-debug-non-zts-20090626/memcache.so
 Build process completed successfully
 Installing '/usr/local/lib/php/extensions/no-debug-non-zts-20090626/memcache.so'
 install ok: channel://pecl.php.net/memcache-2.2.7
 Extension memcache enabled in php.ini

Restart Apache:

/etc/init.d/httpd   restart

Check Memcached plugin in PHP:

php -i | grep memcach
memcache
memcache support => enabled
memcache.allow_failover => 1 => 1
memcache.chunk_size => 8192 => 8192
memcache.default_port => 11211 => 11211
memcache.default_timeout_ms => 1000 => 1000
memcache.hash_function => crc32 => crc32
memcache.hash_strategy => standard => standard
memcache.max_failover_attempts => 20 => 20
Registered save handlers => files user sqlite memcache

Enjoy!

--------------------------------------------------------------------- Install Memcached PHP Extension in CentOS

Install Easy Hosting Control Panel (EHCP) in Ubuntu 12.10 Server / Debian 6

$
0
0

EHCP is an open-source and powerful hosting control panel that lets you to host any websites, create email accounts, create additional (sub) domains and create FTP accounts and many more. It is only the first hosting control panel that provide the built-in support for nginx with PHP-FPM.

In this How-to, I will show you how to install EHCP in Ubuntu 12.10 Server. It should work well on all other distributions such as Debian, RHEL and CentOS.

Get the latest version of EHCP:

unixmen@server:~$ wget http://www.ehcp.net/ehcp_latest.tgz
unixmen@server:~$ tar -zxvf ehcp_latest.tgz

Now execute the install.sh script to begin installation:

unixmen@server:~$ cd ehcp/
unixmen@server:~/ehcp$ sudo ./install.sh

Read the installer instructions very carefully and follow the instructions. The installer will install all the necessary packages like Apache, MySQL, Postfix and PHP. And also during the installation it will ask you to configure some services and to enter the passwords for EHCP admin accounts. The installation will take nearly 1 hour depending upon your internet speed.

After a while, you will be asked to set MySQL root password.

Enter the password and click OK.

Re-enter the password and click OK.

Now select the mail server which one is compatible to you.

In my case I select “Internet Site”.

Enter your mail domain name and Click OK.

Select ‘Yes’ to create web based directories.

Click ‘OK’ to create SSL certificate.

Choose your desired webserver and click OK.

Configure phpmyadmin to administer the databases. Click Yes.

Specify the phpmyadmin database administrative user password.

Enter your MySQL root password and click OK.

Confirm the password.

Now configure the roundcube-core.

Select the database for roundcube. In my case I select MySQL.

Specify the password for roundcube administrative account.

Specify MySQL password for roundcube.

Confirm the password.

That’s it. The installation is now complete.

Now open the EHCP console by pointing your web browser with “http://ip-address/” or “http://localhost”.

Click on the link “Click here for the control panel on your server”. Enter the administrative credentials. The default password for admin account is 1234. If you had entered a new password during the installation please provide the same.

The main console window EHCP will look like below.

From here you can create domains, users, FTP accounts and databases and email accounts for the domains.

--------------------------------------------------------------------- Install Easy Hosting Control Panel (EHCP) in Ubuntu 12.10 Server / Debian 6

Install WordPress 3.5.1 Using LAMP Server on CentOS 6.4 / RHEL 6.4 / Scientific Linux 6.4

$
0
0

WordPress is a most popular free and open-source blogging software and content management system based on PHP and MySQL. Using WordPress we can easily create a website or a blog of any type with absolutely free of cost.

Install WordPress in CentOS 6.4

Prerequisites

In this How-to, I am gonna to show you how to install WordPress using LAMP server on CentOS 6.4. But it may work on RHEl 6.x / Scientific Linux 6.x and other RPM based distros. I assume that you already installed and configured LAMP server properly. To know more about install LAMP server on CentOS 6.4, please visit here.

Download the latest WordPress version

Download the latest version of WordPress and extract it to Apache root document folder:

[root@server ~]# wget http://WordPress.org/latest.zip
[root@server ~]# unzip latest.zip
[root@server ~]# mv WordPress/ /var/www/html/

Create MySQL Database and user for WordPress:

[root@server ~]# mysql -u root -p
 Enter password:
 Welcome to the MySQL monitor.  Commands end with ; or \g.
 Your MySQL connection id is 11
 Server version: 5.1.67 Source distribution
Copyright (c) 2000, 2012, Oracle and/or its affiliates. All rights reserved.
Oracle is a registered trademark of Oracle Corporation and/or its
 affiliates. Other names may be trademarks of their respective
 owners.
Type 'help;' or '\h' for help. Type '\c' to clear the current input statement.
mysql> create database wpdb;
 Query OK, 1 row affected (0.00 sec)
mysql> create user wpuser@localhost identified by "centos";
 Query OK, 0 rows affected (0.00 sec)
mysql> grant all on wpdb.* to wpuser@localhost;
 Query OK, 0 rows affected (0.01 sec)
mysql> flush privileges;
 Query OK, 0 rows affected (0.00 sec)
mysql> exit
 Bye

Replace the database user, database name and password as your own.

Now create a virtualhost for WordPress in Apache main configuration file as shown below:

[root@server ~]# vi /etc/httpd/conf/httpd.conf

## Add the following lines at the end ##

<VirtualHost *:80>
 ServerAdmin admin@unixmen.com
 DocumentRoot /var/www/html/WordPress
 ServerName server.unixmen.com
 ErrorLog /var/log/httpd/WordPress-error-log
 CustomLog /var/log/httpd/WordPress-acces-log common
 </VirtualHost>

Restart the Apache service to save the changes:

[root@server ~]# /etc/init.d/httpd restart

Add the FQDN details to ‘/etc/hosts’ file:

[root@server ~]# vi /etc/hosts
192.168.1.200   server.unixmen.com      server

Configure WordPress

Enter the database name and database user in WordPress config.php file:

[root@server ~]# cp /var/www/html/WordPress/wp-config-sample.php /var/www/html/WordPress/wp-config.php
[root@server ~]# vi /var/www/html/WordPress/wp-config.php 

## Find and Update the database name, database username, mysql root password as follows ##

// ** MySQL settings - You can get this info from your web host ** //
/** The name of the database for WordPress */
define('DB_NAME', 'wpdb');
/** MySQL database username */
define('DB_USER', 'wpuser');
/** MySQL database password */
define('DB_PASSWORD', 'centos');
/** MySQL hostname */
define('DB_HOST', 'localhost');

Now start the WordPress installation by pointing your browser with “http://your-ip-address/” or “http://localhost/”. You should see the following WordPress welcome page.

Note: If you got any “403:forbidden error”, disable SELinux and try again.

Enter the blog name, password and email ID and click Install WordPress:

Now the WordPress installation is completed.

Click Login and enter the username as admin and password which we created in earlier steps.

Now your site dashboard will appear. Here from you can customize your blog as per your requirements.

After customizing your blog, preview your blog.

That’s it. Happy blogging!

--------------------------------------------------------------------- Install WordPress 3.5.1 Using LAMP Server on CentOS 6.4 / RHEL 6.4 / Scientific Linux 6.4

How to Find Default Gateway in Linux

$
0
0

A gateway is a node or a router that acts as an access point to passes network data from local networks to remote networks. There are many ways to find out your gateway in Linux. Here are some of them from Terminal.

You can find default gateway using ip, route and netstat commands in Linux systems.

Using route command

Open up your terminal and type the following commands:

sk@sk:~$ route -n
Kernel IP routing table
Destination     Gateway         Genmask         Flags Metric Ref    Use Iface
0.0.0.0         192.168.1.1     0.0.0.0         UG    0      0        0 eth1
192.168.1.0     0.0.0.0         255.255.255.0   U     1      0        0 eth1

The above output shows my default gateway is 192.168.1.1. UG stands for the network link is Up and G stands for Gateway.

Using ip route

Use the following command:

sk@sk:~$ ip route show
default via 192.168.1.1 dev eth1  proto static 
192.168.1.0/24 dev eth1  proto kernel  scope link  src 192.168.1.100  metric 1

Using netstat

Use the following command:

sk@sk:~$ netstat -rn
Kernel IP routing table
Destination     Gateway         Genmask         Flags   MSS Window  irtt Iface
0.0.0.0         192.168.1.1     0.0.0.0         UG        0 0          0 eth1
192.168.1.0     0.0.0.0         255.255.255.0   U         0 0          0 eth1

And finally you can view it using the eth config files. If your network interface is eth0, then the command should be:

In RHEL based systems:

[root@server ~]# cat /etc/sysconfig/network-scripts/ifcfg-eth0
DEVICE="eth0"
BOOTPROTO=none
NM_CONTROLLED="yes"
ONBOOT=yes
TYPE="Ethernet"
UUID="bcb0a409-d7d4-4f2f-882f-ec46e07e670d"
HWADDR=08:00:27:A6:0C:AC
IPADDR=192.168.1.200
PREFIX=24
GATEWAY=192.168.1.1
DNS1=8.8.8.8
DNS2=192.168.1.200
DEFROUTE=yes
IPV4_FAILURE_FATAL=yes
IPV6INIT=no
NAME="System eth0"

And for Debian based systems, use the following command:

sk@sk:~$ cat /etc/network/interfaces 
# interfaces(5) file used by ifup(8) and ifdown(8)
auto lo
iface lo inet loopback

auto eth0
iface eth0 inet static
address 192.168.1.100
netmask 255.255.255.0
network 192.168.1.0
broadcast 192.168.1.255
gateway 192.168.1.1

That’s it.

--------------------------------------------------------------------- How to Find Default Gateway in Linux

Setup the Raspberry Pi as a NAS

$
0
0

The Raspberry Pi is a great device with many possibilities and one such great use is as a NAS server for your LAN.

The Raspberry Pi by itself is limited by the space it can offer so you will need to add a USB SATA storage device like the Thermaltake BlacX attached to the Pi with a drive size of your preference, my own is a 1TB drive with NTFS shared to Windows OS and MAC OS systems for access.

First install, NTFS support:

$ sudo apt-get install ntfs-3g

Create the mount directory and mount it:

$ sudo mkdir /media/ext

Mount as NTFS as user id pi:

$ sudo mount -t auto /dev/sda1 /media/ext

Create a share directory”

$ sudo mkdir /media/ext/share

Install Samba support:

$ sudo apt-get install samba samba-common-bin

Edit Samba config and create the share drive:

$ sudo nano /etc/samba/smb.conf

Remove the # symbol from the security = user line (by highlighting it with the cursor and pressing delete) to enable username/password verification for the Samba shares.

Next, we’re going to add an entirely new section to the configuration file. Scroll all the way down to the very bottom of the file and enter the following text:

[Backup]
 comment = Backup Folder
 path = /media/ext/share
 valid users = @users
 force group = users
 browsable = yes
 create mask = 0660
 directory mask = 0771
 read only = no

Press CTRL+X to exit, press Y when asked if you want to keep changes and overwrite the existing configuration file. When back at the command prompt enter the following command to restart the Samba daemons:

$ sudo /etc/init.d/samba restart

At this point we need to add in a user that can access the Pi’s Samba shares. We’re going to make an account with the username backups and the password backups4pi. You can make your username and password whatever you wish. To do so type the following commands:

$ sudo useradd backups -m -G users
$ sudo passwd backups

You’ll be prompted to type in the password twice to confirm. After confirming the password, it’s time to add “backups” as a legitimate Samba user. Enter the following command:

$ sudo smbpasswd -a backups

Edit fstab and add the entry for the mount:

$ sudo nano /etc/fstab

This will open up the file systems table in nano so we can add a few quick entries. Within the nano editor add the following lines:

/dev/sda1 /media/ext auto noatime 0 0

This will install the auto USB mounting system:

$ sudo apt-get install autofs

However we need to set up a config file to allow the auto mounting of the USB disk:

$ sudo vi /etc/auto.master

At the end of the file is +auto.master. You need to add the following below the +auto.master entry:

 +auto.master
 /media/ /etc/auto.ext-usb --timeout=10,defaults,user,exec,uid=1000

That’s all you need and can now access the share from any system in your LAN.

--------------------------------------------------------------------- Setup the Raspberry Pi as a NAS


ClusterSSH: Manage Multiple SSH Sessions on Linux

$
0
0

ClusterSSH is a Cluster administration tool via SSH. It is used to control number of xterm windows via a single graphical console window to allow commands to be interactively run on multiple servers over an SSH connection. If you’re are a Linux administrator managing hundreds of machines, you may have chances to enter same command on many servers. To do that, you have to login to each server and should enter the command on each server. It is such a time consuming process. Using ClusterSSH, the commands typed in the administration console window will replicate to all servers. In simple words it is an excellent tool for making the same change on multiple servers at the same time.

Install ClusterSSH

On Ubuntu/Debian:

sk@sk:~$ sudo apt-get install clusterssh

On RHEL/CentOS:

It will not be found in official repositories. So add EPEL repository and install clusterssh.

To add EPEL repository, enter the following command:

[root@server ~]# rpm -ivh http://dl.fedoraproject.org/pub/epel/6/i386/epel-release-6-8.noarch.rpm

Now install ClusterSSH:

[root@server ~]# yum install clusterssh -y

Configure ClusterSSH

Configuration is simple and straight forward. Create a ClusterSSH config file and define the clusters. For instance, I am managing two servers Ubuntu 13.04 server and CentOS 6 server from my Ubuntu 13.04 desktop. Here I use my cluster name as testcluster and ip address of both servers are 192.168.1.200 and 192.168.1.201 respectively.

First create a cluster config file as shown below:

sk@sk:~$ sudo nano /etc/clusters
clusters = testcluster
testcluster = 192.168.1.200 192.168.1.201

Save and exit the file. Here, testcluster is my cluster name. 192.168.1.200 is my CentOS 6 server IP address and 192.168.1.201 is my Ubuntu 13.04 server IP address. You can use hostnames instead.

Run ClusterSSH

Open up your terminal and run the following command. You must allow the port 22 through Firewall/Router to access the servers from any remote machines:

sk@sk:~$ sudo cssh -l root testcluster

The terminal windows of all servers will be automatically opened as shown below.

pcmanfm_002

Enter the Root password on both servers SSH sessions. Now you will see that two servers are logged-in through SSH.

Alternatively you can launch it using individual hostname or IP address instead of cluster name:

sk@sk:~$ sudo cssh -l root 192.168.1.200 192.168.1.201

Usage

The small window called CSSH(2) is the administration console window of ClusterSSH. The commands typed in the administration console will reflect on both servers.

For example, I type hostname command and hit enter on the ClusterSSH administration console. As you seen in the below screen shot, the command hostname is performed automatically on both servers at the same time and displays the result.

pcmanfm_003

Kind note: If you type any wrong commands or inappropriate commands in CSSH admin console, it will perform on all servers simultaneously and will lead you into trouble. Double check the commands before hit enter. Enjoy!

--------------------------------------------------------------------- ClusterSSH: Manage Multiple SSH Sessions on Linux

Block SSH Brute Force Attacks Using SSHGuard

$
0
0

SSHGuard is a fast and lightweight monitoring tool written in C language. It monitors and protects servers  from brute force attacks using their logging activity. If someone continuously trying to access your server via SSH with many(may be four) unsuccessful attempts, the SSHGuard will block him/her for a bit by putting their IP address in iptables. Then it releases the lock automatically after sometime.

term-bruteforce

Not only SSH, it protects almost all services such as sendmail, exim, dovecot, vsftpd, proftpd and many. For more information refer the official website.

Install SSHGuard

On Ubuntu/Debian:

sk@sk:~$ sudo apt-get install sshguard

On CentOS/RHEL:

[root@server ~]# rpm -ivh http://flexbox.sourceforge.net/centos/5/i386/sshguard-1.5-2.el5.i386.rpm

If you are using different architecture, download the corresponding RPM here.

Configure SSHGuard with Iptables/Netfilter

The SSHGuard doesn’t have a configuration file. All you have to do is create a new chain for SSHGuard in iptables to insert blocking rules.

For IPv4 support :

[root@server ~]# iptables -N sshguard

For IPv6:

[root@server ~]# ip6tables -N sshguard

Now update the INPUT chain to pass the traffic to the sshguard. Specify --dport option to protect all the ports of services using sshguard. If you want to prevent attackers from doing any traffic to the host, remove the option completely

Block all traffic from abusers

For IPv4 support:

[root@server ~]# iptables -A INPUT -j sshguard

For IPv6 support:

[root@server ~]# iptables -A INPUT -j sshguard

Block particular services such as SSH, FTP, POP, IMAP from abusers

For IPv4 support:

[root@server ~]# iptables -A INPUT -m multiport -p tcp --destination-ports 21,22,110,143 -j sshguard

For IPv6 support:

[root@server ~]# ip6tables -A INPUT -m multiport -p tcp --destination-ports 21,22,110,143-j sshguard

Finally, save the iptables rule.

[root@server ~]# service iptables save
iptables: Saving firewall rules to /etc/sysconfig/iptables:[ OK ]

Verify that you have NOT a default allow rule passing all ssh traffic higher in the chain. Verify that you have NOT a default deny rule blocking all ssh traffic in your firewall. In either case, you already have the skill to adjust your firewall setup.

Here is a sample ruleset that makes sense:

[root@server ~]# iptables -N sshguard

Block whatever sshguard says is bad:

[root@server ~]# iptables -A INPUT -j sshguard

Enable ssh, dns, http, https:

[root@server ~]# iptables -A INPUT -p tcp --dport 22 -j ACCEPT
[root@server ~]# iptables -A INPUT -p udp --dport 53 -j ACCEPT
[root@server ~]# iptables -A INPUT -p tcp --dport 80 -j ACCEPT
[root@server ~]# iptables -A INPUT -p tcp --dport 443 -j ACCEPT

Block everything else:

[root@server ~]# iptables -P INPUT DROP

Configure SSHGuard without Iptables/Netfilter

If you do not use iptables, the following commands will create and save an iptables configuration that does absolutely nothing except allowing sshguard to work:

[root@server ~]# iptables -F
[root@server ~]# iptables -X
[root@server ~]# iptables -P INPUT ACCEPT
[root@server ~]# iptables -P FORWARD ACCEPT
[root@server ~]# iptables -P OUTPUT ACCEPT
[root@server ~]# iptables -N sshguard
[root@server ~]# iptables -A INPUT -j sshguard

Finally save the iptables configuration:

[root@server ~]# service iptables save
iptables: Saving firewall rules to /etc/sysconfig/iptables:[ OK ]

That’s it. Now you have installed and configured SSHGuard to protect your ssh, ftp and other services from brute force attackers.

--------------------------------------------------------------------- Block SSH Brute Force Attacks Using SSHGuard

Install Tripwire Intrusion Detection System (IDS) on Linux

$
0
0

Tripwire is an open-source security and data integrity tool useful for monitoring and alerting on specific file change(s) on a range of systems. If any file gets modified or changed, it will send a alert to you. If the changes are valid, the you can accept the changes by updating the tripwire database.

Install Tripwire

On Ubuntu/Debian:

sk@sk:~$ sudo apt-get install tripwire

sk@sk: ~_001

Select Internet site and Enter.

sk@sk: ~_002

Enter the mail (FQDN) name.

sk@sk: ~_003

Now the Tripwire configuration task starts.

sk@sk: ~_004

Select Yes to create site key pass phrases.

sk@sk: ~_005

Select yes to rebuild the Tripwire configuration file.

sk@sk: ~_008

Rebuild Tripwire policy file. Select Yes.

sk@sk: ~_009

Enter site-key passphrase.

sk@sk: ~_010

Re-enter site-key passphrase.

sk@sk: ~_011

Enter local key passphrase.

sk@sk: ~_012

Re-enter passphrase.

sk@sk: ~_013

Now the Tripwire has been installed with local and site key passphrases.

sk@sk: ~_014

On CentOS/RHEL, Tripwire will not be found on official repository. So add EPEL repository to install Tripwire:

[root@server ~]# rpm -ivh http://dl.fedoraproject.org/pub/epel/6/i386/epel-release-6-8.noarch.rpm

Now install Tripwire:

[root@server ~]# yum install tripwire -y

Create keyfile pass phrases

Likewise in Ubuntu local and site keyfile passphrases will not be created when installing Tripwire. Enter the following commands to create site and local keyfile pass phrases for Tripwire:

[root@server ~]# tripwire-setup-keyfiles

----------------------------------------------
The Tripwire site and local passphrases are used to sign a variety of

files, such as the configuration, policy, and database files.

Passphrases should be at least 8 characters in length and contain both

letters and numbers.

See the Tripwire manual for more information.

----------------------------------------------

Creating key files...

(When selecting a passphrase, keep in mind that good passphrases typically

have upper and lower case letters, digits and punctuation marks, and are

at least 8 characters in length.)

Enter the site keyfile passphrase:   

Verify the site keyfile passphrase:

Generating key (this may take several minutes)...Key generation complete.

(When selecting a passphrase, keep in mind that good passphrases typically

have upper and lower case letters, digits and punctuation marks, and are

at least 8 characters in length.)

Enter the local keyfile passphrase:

Verify the local keyfile passphrase:

Generating key (this may take several minutes)...Key generation complete.

----------------------------------------------

Signing configuration file...

Please enter your site passphrase: 

Wrote configuration file: /etc/tripwire/tw.cfg

A clear-text version of the Tripwire configuration file:

/etc/tripwire/twcfg.txt

has been preserved for your inspection. It is recommended that you

move this file to a secure location and/or encrypt it in place (using a

tool such as GPG, for example) after you have examined it.

----------------------------------------------

Signing policy file...

Please enter your site passphrase: 

Wrote policy file: /etc/tripwire/tw.pol

A clear-text version of the Tripwire policy file:

/etc/tripwire/twpol.txt

has been preserved for your inspection. This implements a minimal

policy, intended only to test essential Tripwire functionality. You

should edit the policy file to describe your system, and then use

twadmin to generate a new signed copy of the Tripwire policy.

Once you have a satisfactory Tripwire policy file, you should move the

clear-text version to a secure location and/or encrypt it in place

(using a tool such as GPG, for example).

Now run "tripwire --init" to enter Database Initialization Mode. This

reads the policy file, generates a database based on its contents, and

then cryptographically signs the resulting database. Options can be

entered on the command line to specify which policy, configuration, and

key files are used to create the database. The filename for the

database can be specified as well. If no options are specified, the

default values from the current configuration file are used.

Initialize Tripwire Database

On Ubuntu/Debian:

sk@sk:~$ sudo tripwire --init
Please enter your local passphrase: 
Parsing policy file: /etc/tripwire/tw.pol
Generating the database...
*** Processing Unix File System ***

### Warning: File system error.

### Filename: /var/lib/tripwire/sk.twd

### No such file or directory

### Continuing...

### Warning: File system error.

### Filename: /etc/rc.boot

### No such file or directory

[...]

### Continuing...

The object: "/proc/sys/fs/binfmt_misc" is on a different file system...ignoring.

Wrote database file: /var/lib/tripwire/sk.twd

The database was successfully generated.

On CentOS/RHEL:

[root@server ~]# tripwire --init
Please enter your local passphrase: 
Parsing policy file: /etc/tripwire/tw.pol
Generating the database...
*** Processing Unix File System ***
### Warning: File system error.
### Filename: /dev/kmem
### No such file or directory
### Continuing...
[...]

### Continuing...

Wrote database file: /var/lib/tripwire/server.unixmen.com.twd

The database was successfully generated.

In the both above outputs, you may notice that a error called “No such file or Directory” and “file system error”. This is because the tripwire scans every files/directories which are mentioned in the tripwire configuration file. The files/directories might not be existed in your system. Comment the lines which are showing this error in the tripwire config file or leave it as is.

To do that open the file /etc/tripwire/twpol.txt and comment the file/directory lines which are not present in your system.

On Ubuntu/Debian:

sk@sk:~$ sudo vi /etc/tripwire/twpol.txt 

On CentOS/RHEL:

[root@server ~]# vi /etc/tripwire/twpol.txt 

Find and comment the lines which are showing error. Save and close the file.

Testing Tripwire

Let us add a file called unixmen to see how Tripwire IDS works.

[root@server ~]# touch unixmen

Now run the Tripwire interactive command.

[root@server ~]# tripwire --check --interactive

Once you run this command, tripwire will collect all the files/directories changes/modifications and automatically open the result in the vi editor.

This is how your output looks:

Open Source Tripwire(R) 2.4.1 Integrity Check Report

Report generated by: root

Report created on: Friday 21 June 2013 02:05:02 PM IST

Database last updated on: Never

===============================================================================

Report Summary:

===============================================================================

Host name: server.unixmen.com

Host IP address: Unknown IP

Host ID: None

Policy file used: /etc/tripwire/tw.pol

Configuration file used: /etc/tripwire/tw.cfg

Database file used: /var/lib/tripwire/server.unixmen.com.twd

Command line used: tripwire --check --interactive

===============================================================================

Rule Summary:

[...]

Scroll down through the file and it will show a notification that a new file called unixmen have been added:

[...]

Remove the "x" from the adjacent box to prevent updating the database

with the new values for this object.

Added:

[x] "/root/unixmen"

Modified:

[x] "/root"

[...]

-------------------------------------------------------------------------------

*** End of report ***

Open Source Tripwire 2.4 Portions copyright 2000 Tripwire, Inc. Tripwire is a registered

trademark of Tripwire, Inc. This software comes with ABSOLUTELY NO WARRANTY;

for details use --version. This is free software which may be redistributed

or modified only under certain conditions; see COPYING for details.

All rights reserved.

If this is a valid, you can accept the changes by updating the Tripwire database. Or just remove the x mark and update database. Type :q to save and exit from the file. It will ask the local passphrase, enter the passphrase. Now the tripwire database has been updated.

View Tripwire report files

Normally Tripwire report file is stored under /var/lib/tripwire/report/ directory with extension .twr. You can’t view this type of files using any editor. First you have to convert the files to txt file. To do that enter the following command in the terminal:

[root@server ~]# twprint --print-report --twrfile /var/lib/tripwire/report/server.unixmen.com-20130621-141518.twr > /tmp/tripwire_report.txt

Now open it using your favorite editor:

[root@server ~]# vi /tmp/tripwire_report.txt

Note: Report is not encrypted.

Open Source Tripwire(R) 2.4.1 Integrity Check Report

Report generated by: root

Report created on: Friday 21 June 2013 02:15:18 PM IST

Database last updated on: Never

==============================================================================

Report Summary:

================================================================
==============

Host name: server.unixmen.com

Host IP address: Unknown IP

Host ID: None

Policy file used: /etc/tripwire/tw.pol

Configuration file used: /etc/tripwire/tw.cfg

Database file used: /var/lib/tripwire/server.unixmen.com.twd

Command line used: tripwire --check --interactive

===============================================================================

Rule Summary:

======================================

[...]

To view the Tripwire configuration location:

[root@server ~]# twadmin --print-cfgfile
ROOT =/usr/sbin
POLFILE =/etc/tripwire/tw.pol
DBFILE =/var/lib/tripwire/$(HOSTNAME).twd
REPORTFILE =/var/lib/tripwire/report/$(HOSTNAME)-$(DATE).twr
SITEKEYFILE =/etc/tripwire/site.key
LOCALKEYFILE =/etc/tripwire/$(HOSTNAME)-local.key
EDITOR =/bin/vi
LATEPROMPTING =false
LOOSEDIRECTORYCHECKING =false
MAILNOVIOLATIONS =true
EMAILREPORTLEVEL =3
REPORTLEVEL =3
MAILMETHOD =SENDMAIL
SYSLOGREPORTING =false
MAILPROGRAM =/usr/sbin/sendmail -oi -t

To view the Policy file location:

[root@server ~]# twadmin --print-polfile

Schedule Tripwire check Using Cron

Open the /etc/crontab file and append the lines as shown below:

[root@server ~]# vi /etc/crontab

00 12 * * * /usr/sbin/tripwire --check

The above command will execute Tripwire check daily at 12′o clock.

--------------------------------------------------------------------- Install Tripwire Intrusion Detection System (IDS) on Linux

Copying Files to Multiple Systems Simultaneously with PSSH

$
0
0

Have you ever wondered if there is a simple way to copy files and run commands on multiple machines from one command?

Well there are several tools available that will allow us to do just that, but for starters we will discuss just pssh (Parallel SSH).

pssh (Parallel SSH)

pssh (Parallel SSH) is a command-line tool that includes pscp and allows you to send commands and copy files to multiple server via a list or individually. It makes it very easy to distribute commands and files to a few or hundreds of servers.

Installation is pretty simple with Fedora and RHEL/CentOS:

sudo yum install pssh

Say I wanted to copy two files to multiple hosts to the /tmp directory and limit the command to execute to 5 systems at a time and execute as root I would run the following command on RHEL/CentOS 5.x and higher:

pscp.pssh -vA -h ~/myhosts.txt -l id -p 5 -e /tmp upgrade_prog upgrade_prog.tar.gz /tmp/

-vA switch tells pscp to run in verbose mode and ask for a password.
-h switch tells pscp the list of hosts are located in this file and this location.
-p switch says execute on 5 systems at a time
-e switch tells pscp to output the error log to /tmp on my system

Then finally, the files to send and the destination on the systems.

NAME
pscp — parallel process kill program
SYNOPSIS
pscp  [-vAr]  [-h  hosts_file]  [-H  [user@]host[:port]] [-l user] [-p par] [-o outdir] [-e errdir] [-t timeout] [-O options] [-x
args] [-X arg] local remote
DESCRIPTION
pscp is a program for copying files in parallel to a number of hosts.  It provides features such as passing a  password  to  scp,
saving output to files, and timing out.
OPTIONS
-h host_file
--hosts host_file

Read hosts from the given host_file. Lines in the host file are of the form [user@]host[:port] and can include blank
lines and comments (lines beginning with “#”). If multiple host files are given (the -h option is used more  than  once),
then pscp behaves as though these files were concatenated together. If a host is specified multiple times, then pscp will
connect the given number of times.

-H     [user@]host[:port]
--host [user@]host[:port]
-H     "[user@]host[:port] [ [user@]host[:port ] ... ]"
--host "[user@]host[:port] [ [user@]host[:port ] ... ]"
Add the given host strings to the list of hosts.  This option may be given multiple times, and may be used in  conjunction
with the -h option.
-l user
--user user
Use the given username as the default for any host entries that don't specifically specify a user.
-p parallelism
--par parallelism
Use the given number as the maximum number of concurrent connections.
-t timeout
--timeout timeout
Make connections time out after the given number of seconds.  With a value of 0, pscp will not timeout any connections.
-o outdir
--outdir outdir

Save standard output to files in the given directory. Filenames are of the form [user@]host[:port][.num] where the user
and port are only included for hosts that explicitly specify them. The number is a counter that is incremented each  time
for hosts that are specified more than once.

-e errdir
--errdir errdir
Save standard error to files in the given directory.  Filenames are of the same form as with the -o option.
-x args
--extra-args args
Passes  extra  SSH command-line arguments (see the ssh(1) man page for more information about SSH arguments).  This option
may be specified multiple times.  The arguments are processed to split on whitespace,  protect  text  within  quotes,  and
escape with backslashes.  To pass arguments without such processing, use the -X option instead.
-X arg
--extra-arg arg
Passes  a single SSH command-line argument (see the ssh(1) man page for more information about SSH arguments).  Unlike the
-x option, no processing is performed on the argument, including word splitting.  To pass multiple command-line arguments,
-O options
--options options
SSH  options in the format used in the SSH configuration file (see the ssh_config(5) man page for more information).  This
option may be specified multiple times.
-A
--askpass

Prompt for a password and pass it to SSH. The password may be used for either to unlock a key or for password authentication. The password is transferred in a fairly secure manner. e.g. It will not show up in argument list. However, be
aware that a Root user on your system could potentially intercept the password.

-v
--verbose
Include error messages from ssh with the -i and \ options.
-r
--recursive
Recursively copy directories.

TIPS
The ssh_config file can include an arbitrary number of Host sections.  Each host entry specifies ssh options which apply only  to
the given host.  Host definitions can even behave like aliases if the HostName option is included.  This ssh feature, in combina-
tion with pssh host files, provides a tremendous amount of flexibility.

EXIT STATUS
The exit status codes from pscp are as follows:
0      Success
1      Miscellaneous error
2      Syntax or usage error
3      At least one process was killed by a signal or timed out.
4      All processes completed, but at least one scp process reported an error (exit status other than 0).

As with PSCP you can use PSSH to run Command multiple hosts. The syntax is similar to PSCP.

pssh -vA -h ~/myhosts.txt -l id -p 5 -t 5 -e /tmp -o /tmp hostname

This example is running the hostname command on the list of servers and writes the output to the /tmp directory.

Using the two commands you can accomplish many tasks on multiple servers with a short amount of time and effort.

Also note, when using pssh or pssh.pscp for the first time you will receive a failure, this is due to the ssh key not existing in your known_hosts file. If you use the -X arg option you can pass -oStrictHostKeyChecking=no ssh parameter and it will add the key to your known_hosts file. Using -x args you can string multiple ssh options.

Example:

pssh -vA -h ~/myhosts.txt -l id -p 5 -t 5 -e /tmp -o /tmp -X "-oStrictHostChecking=no" hostname

--------------------------------------------------------------------- Copying Files to Multiple Systems Simultaneously with PSSH

How to Secure Your Home Network with OpenDNS

$
0
0

OpenDNS is a free DNS alternative to your ISP DNS. It helps you to get faster and as well as safer browsing at absolutely free. It speeds up your browsing experience by connecting to better DNS servers that are faster and reliable.

Access-Blocked-Websites-at-work

Anyone can use this DNS for their individual system or home network. For some enhanced security levels you need to pay, but for individual and home networks it is entirely free. It is damn easy to setup and configure. You don’t need to download and setup any extra software. And it’s operating system independent too!

Features

You can use this for your personal computer or a home or school network systems. If you have kids playing around with internet often, this is a must have option to setup in your home. It can protect the kids from visiting to inappropriate sites such as pornography, gambling and social networks etc.

Also it has a smart enough feature to find typos in website addresses. For example if you type www.unixmen.om (note “c” is missing) in the address bar, OpenDNS will automatically correct the typo error and open the correct website www.unixmen.com.

Another notable advantages are Phishing, Malware protection and some other settings which are useful to protect your home network. For more information about OpenDNS, you can find in their official website.

Getting Started with OpenDNS

First you need to set the following DNS in your system or router. If you want to enable protection for a particular system, set the DNS in the network settings or if you want to enable protection to your home network, then enter the DNS in your router.

Here are the two DNS addresses provided by OpenDNS:

208.67.222.222
208.67.220.220

Set them in your network settings. Here I use this service for my personal system, so I set these two addresses in my network card settings.

Editing Wired connection 2_001Next go to www.opendns.com and create a free account. You may see there are three account types called OpenDNS Home, OpenDNS Home VIP and OpenDNS FamilyShield. OpenDNS Home VIP is a paid solution and the other two are free. OpenDNS FamilyShield is a pre-configured option to protect your home network, whereas OpenDNS Home allows you to customize the settings as per your liking.

Here I select OpenDNS Home. Click on Sign Up button. Enter your mail ID and password etc. Finally, click Continue.

OpenDNS Store - Free Parental Controls Sign-Up - Mozilla Firefox_003

You will see the three options such as Computer, Router and DNS Server. I want to setup this service in my personal system, so here I select Computer.

OpenDNS Store - Change your Settings - Mozilla Firefox_004

Choose your operating system. I select Ubuntu in the Unix/Linux tab.

OpenDNS Store - Change your Settings - Choose your computer - Mozilla Firefox_005

The next window will show the instructions how to setup your network settings.

OpenDNS Store - Change your Settings - Ubuntu - Mozilla Firefox_006

When all set click on the Test your new settings link at the bottom. Now you will be pleased with a success message. Click on OpenDNS Dashboard link to setup further settings.

OpenDNS Store - Customize your account - Mozilla Firefox_008

Configuration

This is how your dashboard looks.

OpenDNS Dashboard - Settings - Mozilla Firefox_010

As you see in the above screen shot, I didn’t confirm my mail ID yet. If you didn’t confirm your mail ID, some features will not work as expected. To do that, go to your mail. OpenDNS will send a confirmation link to your mail. Click on the link and after you confirm your mail ID, this is how your OpenDNS dashboard looks.

Click on Add a network. You will be redirected to the next page.

OpenDNS Dashboard - Mozilla Firefox_011

Enter your public IP. The public IP will be shown on the top of your dashboard or you can find it from www.whatismyip.com website. Click on Add this Network.

OpenDNS Dashboard - Settings - Mozilla Firefox_012

Check the box “Yes, it is a dynamic ip address” if yours is a dynamic address. Mine is dynamic IP. And download and install ddclient software in system to update the dynamic IP address to OpenDNS server whenever it changes.

OpenDNS Dashboard - Settings - Mozilla Firefox_013

Now your network has been successfully added.

OpenDNS Dashboard - Settings - Mozilla Firefox_014

Now it is time to configure some settings for our newly added network. Select your home network from Settings drop down box.

OpenDNS Dashboard - Settings - Web Content Filtering - Mozilla Firefox_015

Web Content Filtering

You may see the filtering levels such as High, Moderate, Low, None and Custom in this section. According to your setup, you can select any one of the levels. You can view the details of each level by clicking on the View button. Also you can customize the options of each level. Select the options what you want to restrict.

OpenDNS Dashboard - Settings - Web Content Filtering - Mozilla Firefox_016

Also you can add the exceptions. For example if you want to allow mail.yahoo.com domain, then add the domain in the Manage Individual Domains section.

Selection_017Security

In this section, you can set Malware and Phishing protection options. Also you can block individual IP addresses as well.

OpenDNS Dashboard - Settings - Security - Mozilla Firefox_019

Customization

In this section, you can add your own logo or photo of yours. Also you can send customized message along with blocked page.

OpenDNS Dashboard - Settings - Customization - Mozilla Firefox_020

Stats and Logs

If you want to see the logging activity just check this option, OpenDNS servers will automatically collect the logs for you.

OpenDNS Dashboard - Settings - Stats and Logs - Mozilla Firefox_021

Advanced Settings

This section has the options to enable dynamic IP update, domain name typo correction option and VPN exceptions etc.

OpenDNS Dashboard - Settings - Advanced Settings - Mozilla Firefox_022

Once you all set, save the changes by clicking on the Apply button.

Test your settings

Say for example lets open a porn site to see what happens. You may see a message that the domain is blocked as shown in the below screen shot.

Blocked Domain - Mozilla Firefox_023

This method is quite easy to setup basic web content filtering for your home or small schools. If you like this you can go for paid solutions of OpenDNS. For more details visit their official website. If you not satisfied with OpenDNS, then try some open-source firewall distributions such as Untangle and IPFire etc. Happy and safe browsing!

--------------------------------------------------------------------- How to Secure Your Home Network with OpenDNS

FireSSH: A Browser Based SSH Client to Manage Your Servers

$
0
0

FireSSH is a cross platform browser based SSH client tool written entirely in JavaScript. You don’t need to install any SSH client in your system. All you need to have is a Mozilla Firefox browser. If you have a portable browser, then things will be much easier to you. Wherever you go, you can connect to remote servers/systems using this Firefox Add-on.

Installing FireSSH

Installing FireSSH is simple and straight forward. You need not to be a geek to install this add-on. Open Firefox. Go to Tools -> Add-ons. Type firessh in the search box and hit Enter. Now install it by clicking on Install button.

Add-ons Manager - Mozilla Firefox_002

FireSSH has been installed. You need to restart the browser once to activate this add-on.

Run FireSSH

Open your Mozilla Firefox and enter your remote system URL as ssh://ip-address in the address bar. Alternatively you can launch it from Tools -> Web Developer -> FireSSH. Enter the remote system username and password. That’s it. You’re done!

sk@server1: ~ - FireSSH - Mozilla Firefox_003

Now you will able to manage your remote server from any system and anywhere.

--------------------------------------------------------------------- FireSSH: A Browser Based SSH Client to Manage Your Servers

Install Yii PHP Framework on Ubuntu/Debian

$
0
0

Yii is an open source, fast, secure and as well as high performance PHP framework used for developing large-scale web applications. In this walk-through let us learn how to install Yii on Ubuntu/Debian and its derivatives.

Install Yii On Ubuntu

I tested this under Ubuntu 12.10 Server, although it will work on Ubuntu/Debian new editions. Well, let us get started!

If you haven’t installed Apache and PHP, install them with following command:

sk@server1:~$ sudo apt-get install apache2 php5 libapache2-mod-php5

If things goes well, you should see the Apache home page as shown below. Navigate to http://ip-address/ from your browser to see Apache home page.

192.168.1.201 - Chromium_007

Create MySQL database for Yii

Let us create a database ‘yiidb‘ and a database user called ‘yiiuser‘ with password ‘ubuntu‘. Change these values as per your scenario:

sk@server1:~$ mysql -u root -p
Enter password: 
Welcome to the MySQL monitor. Commands end with ; or \g.
Your MySQL connection id is 45
Server version: 5.5.31-0ubuntu0.12.10.1 (Ubuntu)

Copyright (c) 2000, 2013, Oracle and/or its affiliates. All rights reserved. 

Oracle is a registered trademark of Oracle Corporation and/or its affiliates. Other names may be trademarks of their respective owners.

Type 'help;' or '\h' for help. Type '\c' to clear the current input statement.

mysql> create database yiidb;

Query OK, 1 row affected (0.02 sec)

mysql> GRANT ALL PRIVILEGES ON yiidb.* TO 'yiiuser' IDENTIFIED BY 'ubuntu';

Query OK, 0 rows affected (0.00 sec)

mysql> flush privileges;

Query OK, 0 rows affected (0.01 sec)

mysql> exit

Bye

Now grab the latest version from the official download page or simply download it via terminal as shown below:

sk@server1:~$ wget http://yii.googlecode.com/files/yii-1.1.13.e9e4a0.tar.gz

Extract the downloaded file:

sk@server1:~$ tar zxvf yii-1.1.13.e9e4a0.tar.gz

It will be extracted as a folder called “yii-1.1.13.e9e4a0″ in your current directory. Change to this directory and move all contents to /var/www/ folder as shown below:

sk@server1:~$ sudo mv yii-1.1.13.e9e4a0/ /var/www/yii

Now create a directory under /var/www/yii/ directory for a sample project. Let’s call it as unixmen. So here I create a folder called unixmen under /var/www/yii/ directory:

sk@server1:~$ sudo mkdir /var/www/yii/unixmen

Assign the full permission for unixmen directory:

sk@server1:~$ sudo chmod -R 777 /var/www/yii/unixmen/

Enter the following command to begin installation:

sk@server1:~$ php /var/www/yii/framework/yiic.php webapp /var/www/yii/unixmen/
 Create a Web application under '/var/www/yii/unixmen'? (yes|no) [no]:yes
 mkdir /var/www/yii/unixmen/css
 generate css/screen.css
 generate css/bg.gif
 generate css/form.css
 generate css/ie.css
 generate css/print.css
 generate css/main.css
 generate index-test.php
 generate index.php
 mkdir /var/www/yii/unixmen/images
 mkdir /var/www/yii/unixmen/themes
 mkdir /var/www/yii/unixmen/themes/classic
 mkdir /var/www/yii/unixmen/themes/classic/views
 mkdir /var/www/yii/unixmen/themes/classic/views/system
 mkdir /var/www/yii/unixmen/themes/classic/views/layouts
 generate themes/classic/views/.htaccess
 mkdir /var/www/yii/unixmen/themes/classic/views/site
 mkdir /var/www/yii/unixmen/assets
 mkdir /var/www/yii/unixmen/protected
 mkdir /var/www/yii/unixmen/protected/data
 generate protected/data/testdrive.db
 generate protected/data/schema.sqlite.sql
 generate protected/data/schema.mysql.sql
 mkdir /var/www/yii/unixmen/protected/controllers
 generate protected/controllers/SiteController.php
 mkdir /var/www/yii/unixmen/protected/tests
 generate protected/tests/phpunit.xml
 mkdir /var/www/yii/unixmen/protected/tests/fixtures
 mkdir /var/www/yii/unixmen/protected/tests/unit
 generate protected/tests/WebTestCase.php
 mkdir /var/www/yii/unixmen/protected/tests/functional
 generate protected/tests/functional/SiteTest.php
 generate protected/tests/bootstrap.php
 mkdir /var/www/yii/unixmen/protected/tests/report
 mkdir /var/www/yii/unixmen/protected/runtime
 mkdir /var/www/yii/unixmen/protected/messages
 mkdir /var/www/yii/unixmen/protected/config
 generate protected/config/main.php
 generate protected/config/console.php
 generate protected/config/test.php
 mkdir /var/www/yii/unixmen/protected/extensions
 mkdir /var/www/yii/unixmen/protected/views
 mkdir /var/www/yii/unixmen/protected/views/layouts
 generate protected/views/layouts/main.php
 generate protected/views/layouts/column1.php
 generate protected/views/layouts/column2.php
 mkdir /var/www/yii/unixmen/protected/views/site
 generate protected/views/site/login.php
 generate protected/views/site/index.php
 generate protected/views/site/contact.php
 mkdir /var/www/yii/unixmen/protected/views/site/pages
 generate protected/views/site/pages/about.php
 generate protected/views/site/error.php
 mkdir /var/www/yii/unixmen/protected/components
 generate protected/components/UserIdentity.php
 generate protected/components/Controller.php
 mkdir /var/www/yii/unixmen/protected/commands
 mkdir /var/www/yii/unixmen/protected/commands/shell
 generate protected/yiic.php
 mkdir /var/www/yii/unixmen/protected/migrations
 mkdir /var/www/yii/unixmen/protected/models
 generate protected/models/ContactForm.php
 generate protected/models/LoginForm.php
 generate protected/.htaccess
 generate protected/yiic
 generate protected/yiic.bat

Your application has been created successfully under /var/www/yii/unixmen.

Now test the new project by navigating to http://ip-address/yii/unixmen from your browser.

My Web Application - Chromium_008

Yii Framework has been installed now.

Enable Yii code generation tool GiiModule

Starting from version 1.1.2, Yii is equipped with a web-based code generation tool called GiiModule. GiiModule is a module which provides web-based code generation capabilities.

To enable GiiModule, edit the main.php file found under /var/www/yii/unixmen/protected/config/ directory:

sk@server1:~$ sudo nano var/www/yii/unixmen/protected/config/main.php

Scroll down to modules section. It will look like as shown below:

[...]
'modules'=>array(
 // uncomment the following to enable the Gii tool
 /*
 'gii'=>array(
 'class'=>'system.gii.GiiModule',
 'password'=>'Enter Your Password Here',
 // If removed, Gii defaults to localhost only. Edit car$
 'ipFilters'=>array('127.0.0.1','::1'),
 ),
 */
 ),
[...]

Remove  “/*” and “*/” lines to uncomment and enter your ip address series in the ipFilters line. And specify the password to login to code generator. I use ubuntu as my password. So after modification, it will look like as follows:

[...]
'modules'=>array(
 // uncomment the following to enable the Gii tool

'gii'=>array(

 'class'=>'system.gii.GiiModule',

 'password'=>'ubuntu',

 // If removed, Gii defaults to localhost only. Edit car$

 'ipFilters'=>array('127.0.0.1','192.168.1.*'),
 ),
),
[...]

Scroll down further, you will find db section looks like as follows:

[...]
/*
 'db'=>array(
 'connectionString' => 'mysql:host=localhost;dbname=test$
 'emulatePrepare' => true,
 'username' => 'root',
 'password' => '',
 'charset' => 'utf8',
 ),
 */
[...]

Remove  “/*” and “*/” lines to uncomment and enter your database name, database username and password. So after the modification, it will look like as follows:

[...]
// uncomment the following to use a MySQL database
'db'=>array(
 'connectionString' => 'mysql:host=localhost;dbname=yiidb',
 'emulatePrepare' => true,
 'username' => 'root',
 'password' => 'ubuntu',
 'charset' => 'utf8',
 ),
[...]

Save and exit the file. Now try to access the GiiModule by navigating to http://ip-address/yii/unixmen/index.php?r=gii from your browser.

Enter the password to login to yii code generator. In my case its ubuntu.

Gii - Login Generator - Chromium_011

Now you will able to login to GiiModule code generator.

Gii: a Web-based code generator for Yii - Chromium_012

That;s it. Start using Yii. I highly recommend to refer the Yii Wiki page for beginners.

--------------------------------------------------------------------- Install Yii PHP Framework on Ubuntu/Debian


Install LAMP (Apache with MariaDB and PHP) on CentOS/RHEL/Scientific Linux 6

$
0
0

LAMP is a combination of operating system and open-source software stack. The acronym LAMP is derived from first letters of Linux, Apache HTTP Server, MySQL database, and PHP, Perl or Python. We already have shown you how to install LAMP on many platforms.

In this tutorial, we have covered LAMP installation with MariaDB instead of MySQL on RHEL/CentOS/Scientific Linux 6.x. Here x stands for version such as 6.1, 6.2 etc.

My testbox hostname and IP address are server.unixmen.com and 192.168.1.200/24, respectively.

Install Apache

Apache is an open-source multi-platform web server. It provides a full range of web server features including CGI, SSL and virtual domains.

To install Apache, enter the following command from your terminal:

[root@server ~]# yum install httpd -y

Start the Apache service and let it to start automatically on every reboot:

[root@server ~]# /etc/init.d/httpd start
[root@server ~]# chkconfig httpd on

Allow Apache server default port 80 through your firewall/router if you want to connect from remote systems:

[root@server ~]# vi /etc/sysconfig/iptables
[...]
-A INPUT -p udp -m state --state NEW --dport 80 -j ACCEPT
 -A INPUT -p tcp -m state --state NEW --dport 80 -j ACCEPT
[...]

Restart iptables:

[root@server ~]# /etc/init.d/iptables restart

Test Apache:

Open your web browser and navigate to http://localhost/ or http://server-ip-address/.

Apache HTTP Server Test Page powered by CentOS - Mozilla Firefox_001Install MariaDB

MariaDB is a drop in replacement for MySQL. It is a robust, scalable and reliable SQL server that comes rich set of enhancements.

First you have to remove existing MySQL packages if any:

[root@server ~]# yum remove mysql* mysql-server mysql-devel mysql-libs

Install REMI Repository to resolve MySQL Compatibility issue

You will probably get dependencies errors while installing MariaDB. So let us add REMI Repository to solve dependencies problems:

Thanks to AskMonty Knowledgebase to help me to solve the dependencies issues.

[root@server ~]# rpm -ivh http://rpms.famillecollet.com/enterprise/remi-release-6.rpm

Install compat-mysql55 package now:

[root@server ~]# yum --enablerepo=remi-test --disablerepo=remi install compat-mysql55

Create a repository file for MariaDB and add the following lines:

For 32bit systems:

[root@server ~]# vi /etc/yum.repos.d/mariadb.repo
# MariaDB 5.5 CentOS repository list - created 2013-06-06 07:42 UTC
# http://mariadb.org/mariadb/repositories/
[mariadb]
name = MariaDB
baseurl = http://yum.mariadb.org/5.5/centos6-x86
gpgkey=https://yum.mariadb.org/RPM-GPG-KEY-MariaDB
gpgcheck=1

For 64bit systems:

[root@server ~]# vi /etc/yum.repos.d/mariadb.repo
# MariaDB 5.5 CentOS repository list - created 2013-06-06 07:53 UTC
# http://mariadb.org/mariadb/repositories/
[mariadb]
name = MariaDB
baseurl = http://yum.mariadb.org/5.5/centos6-amd64
gpgkey=https://yum.mariadb.org/RPM-GPG-KEY-MariaDB
gpgcheck=1

Save and exit the file and run yum update command:

[root@server ~]# yum update

Now start installing MariaDB:

[root@server ~]# yum install MariaDB-devel MariaDB-client MariaDB-server -y

Start MariaDB service and let it to start automatically on every reboot:

[root@server ~]# /etc/init.d/mysql start
Starting MySQL... SUCCESS! 
[root@server ~]# chkconfig mysql on

Set MySQL root password

By default MySWL root password is empty. So to prevent unauthorized access to MySQL, let us set root user password:

[root@server ~]# /usr/bin/mysql_secure_installation 
/usr/bin/mysql_secure_installation: line 379: find_mysql_client: command not found

NOTE: RUNNING ALL PARTS OF THIS SCRIPT IS RECOMMENDED FOR ALL MariaDB
      SERVERS IN PRODUCTION USE!  PLEASE READ EACH STEP CAREFULLY!

In order to log into MariaDB to secure it, we'll need the current
password for the root user.  If you've just installed MariaDB, and
you haven't set the root password yet, the password will be blank,
so you should just press enter here.

Enter current password for root (enter for none): 
OK, successfully used password, moving on...

Setting the root password ensures that nobody can log into the MariaDB
root user without the proper authorisation.

You already have a root password set, so you can safely answer 'n'.

Change the root password? [Y/n] y
New password: 
Re-enter new password: 
Password updated successfully!
Reloading privilege tables..
 ... Success!

By default, a MariaDB installation has an anonymous user, allowing anyone
to log into MariaDB without having to have a user account created for
them.  This is intended only for testing, and to make the installation
go a bit smoother.  You should remove them before moving into a
production environment.

Remove anonymous users? [Y/n] 
 ... Success!

Normally, root should only be allowed to connect from 'localhost'.  This
ensures that someone cannot guess at the root password from the network.

Disallow root login remotely? [Y/n] 
 ... Success!

By default, MariaDB comes with a database named 'test' that anyone can
access.  This is also intended only for testing, and should be removed
before moving into a production environment.

Remove test database and access to it? [Y/n] 
 - Dropping test database...
ERROR 1008 (HY000) at line 1: Can't drop database 'test'; database doesn't exist
 ... Failed!  Not critical, keep moving...
 - Removing privileges on test database...
 ... Success!

Reloading the privilege tables will ensure that all changes made so far
will take effect immediately.

Reload privilege tables now? [Y/n] 
 ... Success!

Cleaning up...

All done!  If you've completed all of the above steps, your MariaDB
installation should now be secure.

Thanks for using MariaDB!

Install PHP

PHP (recursive acronym for PHP: Hypertext Preprocessor) is a widely used open-source general purpose scripting language that is especially suited for web development and can be embedded into HTML.

Install PHP with following command:

[root@server ~]# yum install php -y

Test PHP

Create a sample “testphp.php” file in Apache document root folder and append the lines as shown below:

[root@server ~]# vi /var/www/html/testphp.php
<?php
phpinfo();
?>

Restart httpd service:

[root@server ~]# /etc/init.d/httpd restart

Navigate to  http://server-ip-address/testphp.php. It will display all the details about php such as version, build date and commands etc.

phpinfo() - Mozilla Firefox_002If you want to install all php modules, enter the command yum install php* -y and restart the httpd service. To verify for the modules, open web browser and navigate to http://server-ip-address/testphp.php. You will able to see all php modules.

Install phpMyAdmin (Optional)

phpMyAdmin is a free open-source web interface tool used to manage your MySQL databases. By default phpMyAdmin will not be not found in CentOS/RHEL/Scientific Linux official repositories. So let us install it from EPEL repository.

To do so add EPEL repository first:

[root@server ~]# rpm -ivh http://dl.fedoraproject.org/pub/epel/6/i386/epel-release-6-8.noarch.rpm

Now install phpMyAdmin:

 [root@server ~]# yum install phpmyadmin -y

Configure phpMyAdmin

Open the phpmyadmin.conf file. Find and comment the whole /<Directory> section as shown below:

[root@server ~]# vi /etc/httpd/conf.d/phpMyAdmin.conf

Alias /phpMyAdmin /usr/share/phpMyAdmin
Alias /phpmyadmin /usr/share/phpMyAdmin

## Comment the following Section ##
#<Directory /usr/share/phpMyAdmin/>
#   <IfModule mod_authz_core.c>
#     # Apache 2.4
#     <RequireAny>
#       Require ip 127.0.0.1
#       Require ip ::1
#     </RequireAny>
#   </IfModule>
#   <IfModule !mod_authz_core.c>
#     # Apache 2.2
#     Order Deny,Allow
#     Deny from All
#     Allow from 127.0.0.1
#     Allow from ::1
#   </IfModule>
#</Directory>

Open  “config.inc.php” file and change from “cookie” to “http” to change the authentication in phpMyAdmin:

[root@server ~]# cp /usr/share/phpMyAdmin/config.sample.inc.php /usr/share/phpMyAdmin/config.inc.php 
[root@server ~]# vi /usr/share/phpMyAdmin/config.inc.php
[...] 
/* Authentication type */
$cfg['Servers'][$i]['auth_type'] = 'http';
[...]

Restart the Apache service:

[root@server ~]# /etc/init.d/httpd restart

Now you can access the phpmyadmin console by navigating to http://server-ip-address/phpmyadmin/ from your browser.

Enter your MySQL username and password which you have given in previous steps. In my case its “root” and “centos”.

Mozilla Firefox_003You will be redirected to PhpMyAdmin main web interface.

192.168.1.200 - localhost | phpMyAdmin 2.11.11.3 - Mozilla Firefox_004Now you will able to manage your MariaDB databases from phpMyAdmin web interface.

That’s it. Your LAMP server is up and running now.

--------------------------------------------------------------------- Install LAMP (Apache with MariaDB and PHP) on CentOS/RHEL/Scientific Linux 6

Install LEMP Server (Nginx with MariaDB and PHP) on CentOS 6

$
0
0

LEMP is a combination of operating system and open-source software stack. The acronym LEMP is derived from first letters of Linux, Nginx HTTP Server, MySQL database, and PHP, Perl or Python. We already have shown you how to install LAMP on many platforms.

In this tutorial, we have covered LEMP installation with MariaDB instead of MySQL on RHEL/CentOS/Scientific Linux 6.x. Here x stands for version such as 6.1, 6.2 etc.

My testbox hostname and IP address are server.unixmen.com and 192.168.1.200/24, respectively.

Install Nginx

Nginx (pronounced engine-x) is a free, open-source, high-performance HTTP server and reverse proxy, as well as an IMAP/POP3 proxy server written by Igor Sysoev. According to netcraft web server survey 14.08% web sites are served by Nginx.

Nginx will not be found in the official CentOS repository, so lets install EPEL repository first:

[root@server ~]# rpm -ivh http://dl.fedoraproject.org/pub/epel/6/i386/epel-release-6-8.noarch.rpm

Now install Nginx with following command:

[root@server ~]# yum install nginx -y

Start Nginx and make it to start automatically on every reboot:

[root@server ~]# /etc/init.d/nginx start 
Starting nginx: [ OK ] 
[root@server ~]# chkconfig nginx on

Stop Apache or any other web servers if you have any:

[root@server ~]# /etc/init.d/httpd stop 
[root@server ~]# chkconfig httpd off

Open the Nginx port 80 through your firewall/router if you want to access the web server from other systems:

[root@server ~]# vi /etc/sysconfig/iptables 
[...]
-A INPUT -p udp -m state --state NEW --dport 80 -j ACCEPT 
-A INPUT -p tcp -m state --state NEW --dport 80 -j ACCEPT
[...]

Restart iptables:

[root@server ~]# /etc/init.d/iptables restart

Now point your web browser with “http://192.168.1.200″. The test page of nginx will open.

Test Page for the Nginx HTTP Server on EPEL - Mozilla Firefox_001Nginx web server has been installed now.

Configure Nginx

Open the file /etc/nginx/nginx.conf and set the worker_processes (i.e No. of CPU’s in your system). To see the no. of CPU’s, use the command “lscpu”. In my case it’s “1″. So I set this as ’1′:

[root@server ~]# vi /etc/nginx/nginx.conf 
worker_processes 1;

Save and close the file. Open and Edit the “/etc/nginx/conf.d/default.conf” as shown below:

[root@server ~]# vi /etc/nginx/conf.d/default.conf
#
# The default server
#
server {
    listen       80;
    server_name  server.unixmen.com;

    #charset koi8-r;

    #access_log  logs/host.access.log  main;

    location / {
        root   /usr/share/nginx/html;
        index  index.html index.htm;
    }

    error_page  404              /404.html;
    location = /404.html {
        root   /usr/share/nginx/html;
    }

    # redirect server error pages to the static page /50x.html
    #
    error_page   500 502 503 504  /50x.html;
    location = /50x.html {
        root   /usr/share/nginx/html;
    }

    # proxy the PHP scripts to Apache listening on 127.0.0.1:80
    #
    #location ~ \.php$ {
    #    proxy_pass   http://127.0.0.1;
    #}

    # pass the PHP scripts to FastCGI server listening on 127.0.0.1:9000
    ## Uncomment or Add the following lines
    location ~ \.php$ {
        root           html;
        fastcgi_pass   127.0.0.1:9000;
        fastcgi_index  index.php;
        fastcgi_param  SCRIPT_FILENAME  $document_root$fastcgi_script_name;
        include        fastcgi_params;
    }

    # deny access to .htaccess files, if Apache's document root
    # concurs with nginx's one
    #
    #location ~ /\.ht {
    #    deny  all;
    #}
}

Save and close the file. Restart Nginx service:

[root@server ~]# /etc/init.d/nginx restart

Install MariaDB

MariaDB is a drop in replacement for MySQL. It is a robust, scalable and reliable SQL server that comes rich set of enhancements.

First you have to remove existing MySQL packages if any:

[root@server ~]# yum remove mysql* mysql-server mysql-devel mysql-libs

Install REMI Repository to resolve MySQL Compatibility issue

You will probably get dependencies errors while installing MariaDB. So let us add REMI Repository to solve dependencies problems:

Thanks to AskMonty Knowledgebase to help me to solve the dependencies issues.

[root@server ~]# rpm -ivh http://rpms.famillecollet.com/enterprise/remi-release-6.rpm

Install compat-mysql55 package now:

[root@server ~]# yum --enablerepo=remi-test --disablerepo=remi install compat-mysql55

Create a repository file for MariaDB and add the following lines:

For 32bit systems:

[root@server ~]# vi /etc/yum.repos.d/mariadb.repo
# MariaDB 5.5 CentOS repository list - created 2013-06-06 07:42 UTC
# http://mariadb.org/mariadb/repositories/
[mariadb]
name = MariaDB
baseurl = http://yum.mariadb.org/5.5/centos6-x86
gpgkey=https://yum.mariadb.org/RPM-GPG-KEY-MariaDB
gpgcheck=1

For 64bit systems:

[root@server ~]# vi /etc/yum.repos.d/mariadb.repo
# MariaDB 5.5 CentOS repository list - created 2013-06-06 07:53 UTC
# http://mariadb.org/mariadb/repositories/
[mariadb]
name = MariaDB
baseurl = http://yum.mariadb.org/5.5/centos6-amd64
gpgkey=https://yum.mariadb.org/RPM-GPG-KEY-MariaDB
gpgcheck=1

Save and exit the file and run yum update command:

[root@server ~]# yum update

Now start installing MariaDB:

[root@server ~]# yum install MariaDB-devel MariaDB-client MariaDB-server -y

Start MariaDB service and let it to start automatically on every reboot:

[root@server ~]# /etc/init.d/mysql start
Starting MySQL... SUCCESS! 
[root@server ~]# chkconfig mysql on

Set MySQL root password

By default MySQL root password is empty. So to prevent unauthorized access to MySQL, let us set root user password:

[root@server ~]# /usr/bin/mysql_secure_installation 
/usr/bin/mysql_secure_installation: line 379: find_mysql_client: command not found

NOTE: RUNNING ALL PARTS OF THIS SCRIPT IS RECOMMENDED FOR ALL MariaDB
      SERVERS IN PRODUCTION USE!  PLEASE READ EACH STEP CAREFULLY!

In order to log into MariaDB to secure it, we'll need the current
password for the root user.  If you've just installed MariaDB, and
you haven't set the root password yet, the password will be blank,
so you should just press enter here.

Enter current password for root (enter for none): 
OK, successfully used password, moving on...

Setting the root password ensures that nobody can log into the MariaDB
root user without the proper authorisation.

You already have a root password set, so you can safely answer 'n'.

Change the root password? [Y/n] y
New password: 
Re-enter new password: 
Password updated successfully!
Reloading privilege tables..
 ... Success!

By default, a MariaDB installation has an anonymous user, allowing anyone
to log into MariaDB without having to have a user account created for
them.  This is intended only for testing, and to make the installation
go a bit smoother.  You should remove them before moving into a
production environment.

Remove anonymous users? [Y/n] 
 ... Success!

Normally, root should only be allowed to connect from 'localhost'.  This
ensures that someone cannot guess at the root password from the network.

Disallow root login remotely? [Y/n] 
 ... Success!

By default, MariaDB comes with a database named 'test' that anyone can
access.  This is also intended only for testing, and should be removed
before moving into a production environment.

Remove test database and access to it? [Y/n] 
 - Dropping test database...
ERROR 1008 (HY000) at line 1: Can't drop database 'test'; database doesn't exist
 ... Failed!  Not critical, keep moving...
 - Removing privileges on test database...
 ... Success!

Reloading the privilege tables will ensure that all changes made so far
will take effect immediately.

Reload privilege tables now? [Y/n] 
 ... Success!

Cleaning up...

All done!  If you've completed all of the above steps, your MariaDB
installation should now be secure.

Thanks for using MariaDB!

Install PHP

PHP (recursive acronym for PHP: Hypertext Preprocessor) is a widely used open-source general purpose scripting language that is especially suited for web development and can be embedded into HTML.

Install PHP with following command:

[root@server ~]# yum install php php-common php-fpm php-mysql -y

Start php-fpm service and let it to start automatically on every reboot:

[root@server ~]# /etc/init.d/php-fpm start 
[root@server ~]# chkconfig php-fpm on

Configure PHP

Open up /etc/php.ini file in any editor. Find the line cgi.fix_pathinfo and change the value from 1 to 0 (zero):

[root@server ~]# vi /etc/php.ini
[...]
; http://www.php.net/manual/en/ini.core.php#ini.cgi.fix-pathinfo
cgi.fix_pathinfo=0
[...]

Open up the file /etc/php-fpm.d/www.conf and change the user and group values from apache to nginx:

[root@server ~]# vi /etc/php-fpm.d/www.conf 
[...]
; Unix user/group of processes
; Note: The user is mandatory. If the group is not set, the default user's group
;       will be used.
; RPM: apache Choosed to be able to access some dir as httpd
user = nginx
; RPM: Keep a group allowed to write in log dir.
group = nginx
[...]

Save and close the file. Restart php-fpm service:

[root@server ~]# /etc/init.d/php-fpm restart

Test PHP

Create a sample “testphp.php” file in Apache document root folder and append the lines as shown below:

[root@server ~]# vi /usr/share/nginx/html/testphp.php 
<?php
phpinfo();
?>

Save and close the file. Restart Nginx service:

[root@server ~]# /etc/init.d/nginx restart

Navigate to  http://server-ip-address/testphp.php. It will display all the details about PHP such as version, build date and commands etc.

phpinfo() - Mozilla Firefox_002If you want to install all PHP modules, enter the command yum install php* -y and restart the Nginx service. To verify for the modules, open up your eb browser and navigate to http://server-ip-address/testphp.php. You will able to see all PHP modules.

That’s it. Your LEMP server is ready to use.

--------------------------------------------------------------------- Install LEMP Server (Nginx with MariaDB and PHP) on CentOS 6

Install Moodle Learning Managment System on CentOS 6

$
0
0

Moodle is a Course Management System (CMS), also known as a Learning Management System (LMS) or a Virtual Learning Environment (VLE). It is a free web application that educators can use to create effective online/offline learning sites.

In this article, let us learn to build a LMS site with Moodle on CentOS 6.x. Here x stands for version such as 6.1, 6.2 etc. My testbox hostname and IP address are server.unixmen.com and 192.168.1.200/24 respectively.

Prerequisites

You should install and configure a LAMP server first. Moodle needs the following PHP extensions to run properly.

[root@server ~]# yum install php-iconv php-mbstring php-curl php-openssl php-tokenizer php-xmlpc php-soap php-ctype php-zip php-gd php-simplexml php-spl php-pcre php-dom php-xml php-intl php-json php-ldap php-pecl-apc -y

PHP settings

Open up /etc/php.ini file and make sure that you have configured the settings as shown below:

[root@server ~]# vi /etc/php.ini
 register_globals = Off
 safe_mode = Off
 memory_limit = 128M
 session.save_handler = files
 magic_quotes_gpc = Off
 magic_quotes_runtime = Off
 file_uploads = On
 session.auto_start = 0
 session.bug_compat_warn = Off
 post_max_size = 100M
 upload_max_filesize = 100M

Restart your web server:

[root@server ~]# service httpd restart

Create MySQL database and user for Moodle

Here I create a database ‘moodledb’ and a user ‘moodleadmin’ with password ‘centos’:

[root@server ~]# mysql -u root -p
Enter password:
Welcome to the MariaDB monitor.  Commands end with ; or \g.
Your MariaDB connection id is 1
Server version: 5.5.31-MariaDB MariaDB Server
Copyright (c) 2000, 2013, Oracle, Monty Program Ab and others.
Type 'help;' or '\h' for help. Type '\c' to clear the current input statement.

MariaDB [(none)]> create database moodledb;
Query OK, 1 row affected (0.04 sec)

MariaDB [(none)]> GRANT ALL PRIVILEGES ON moodledb.* TO 'moodleadmin' IDENTIFIED BY 'centos';
Query OK, 0 rows affected (0.03 sec)

MariaDB [(none)]> flush privileges;
Query OK, 0 rows affected (0.01 sec)

MariaDB [(none)]> exit
Bye

Install Moodle

Download the latest version from here. Or you can directly download from the terminal using the following command:

[root@server ~]# wget http://download.moodle.org/download.php/direct/stable25/moodle-latest-25.zip

Extract the downloaded zip file:

[root@server ~]# unzip moodle-latest-25.zip

This will create a new directory called moodle in your current directory. Copy all the contents of moodle to your website root document folder.

If your server is dedicated to host only moodle site, copy the contents of your moodle directory to /var/www/html/ directory. In this case your moodle website URL will be www.your-site.com.

If your server is shared server, copy the contents of moodle directory to /var/www/html/moodle/. In this case your moodle website URL will be www.your-site.com/moodle.

Here I use a sub directory to host my moodle site. So the command should be:

[root@server ~]# cp -fr moodle/ /var/www/html/moodle

Set the following permissions for root user to moodle directory:

[root@server ~]# chown -R root /var/www/html/moodle/
[root@server ~]# chmod -R 755 /var/www/html/moodle/

Create data directory for Moodle

Moodle requires a directory to store all of its files (all your site’s uploaded files, temporary data, session data etc.). The web server needs to be able to write to this directory. On larger systems consider how much free space you are going to use when allocating this directory.

IMPORTANT: This directory must NOT be accessible directly via the web. This would be a serious security hole. Do not try to place it inside your web root or inside your Moodle program files directory. Moodle will not install. It can go anywhere else convenient.

[root@server ~]# mkdir /var/www/moodledata/
[root@server ~]# chmod 777 /var/www/moodledata/

Begin Moodle installation

Open up your web browser and navigate to http://ip-address/ if you copied the moodle directory contents to Apache document root folder or http://ip-address/moodle if you copied the moodle directory contents to a sub directory of Apache root.

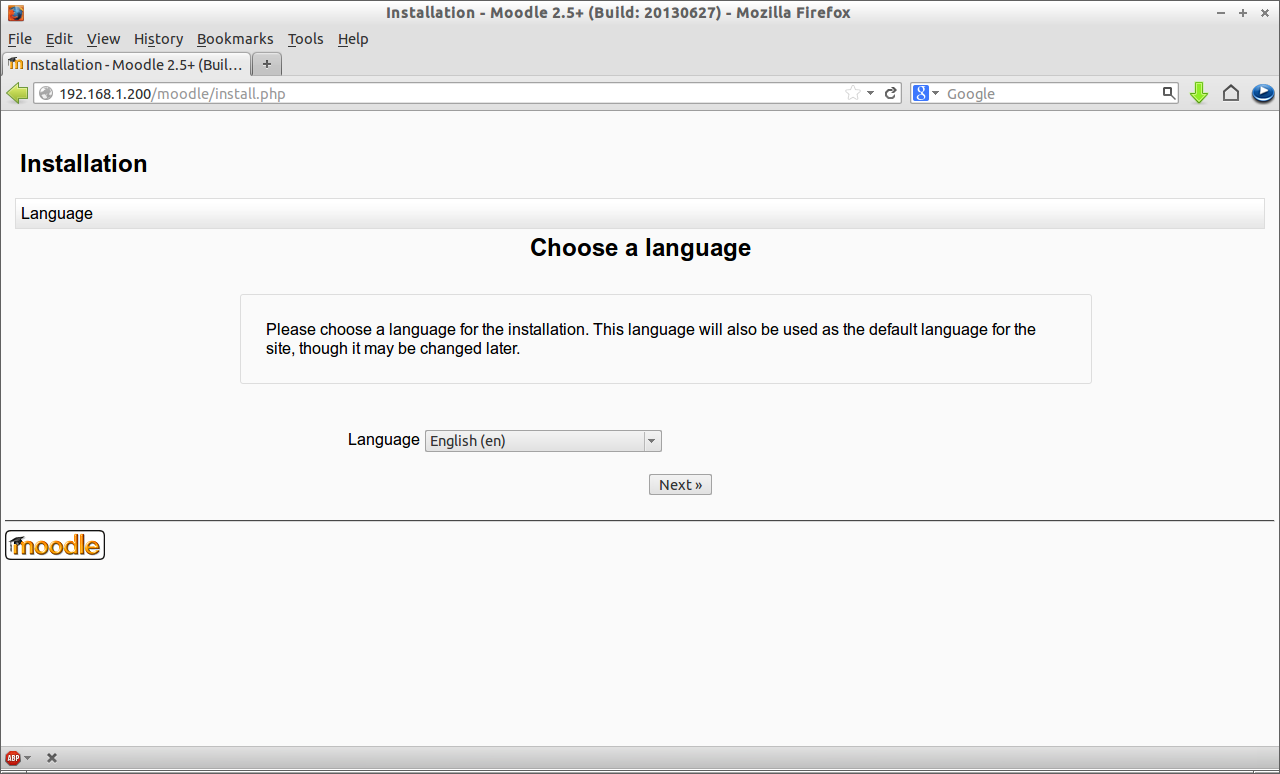
Choose your desired language and press Next.
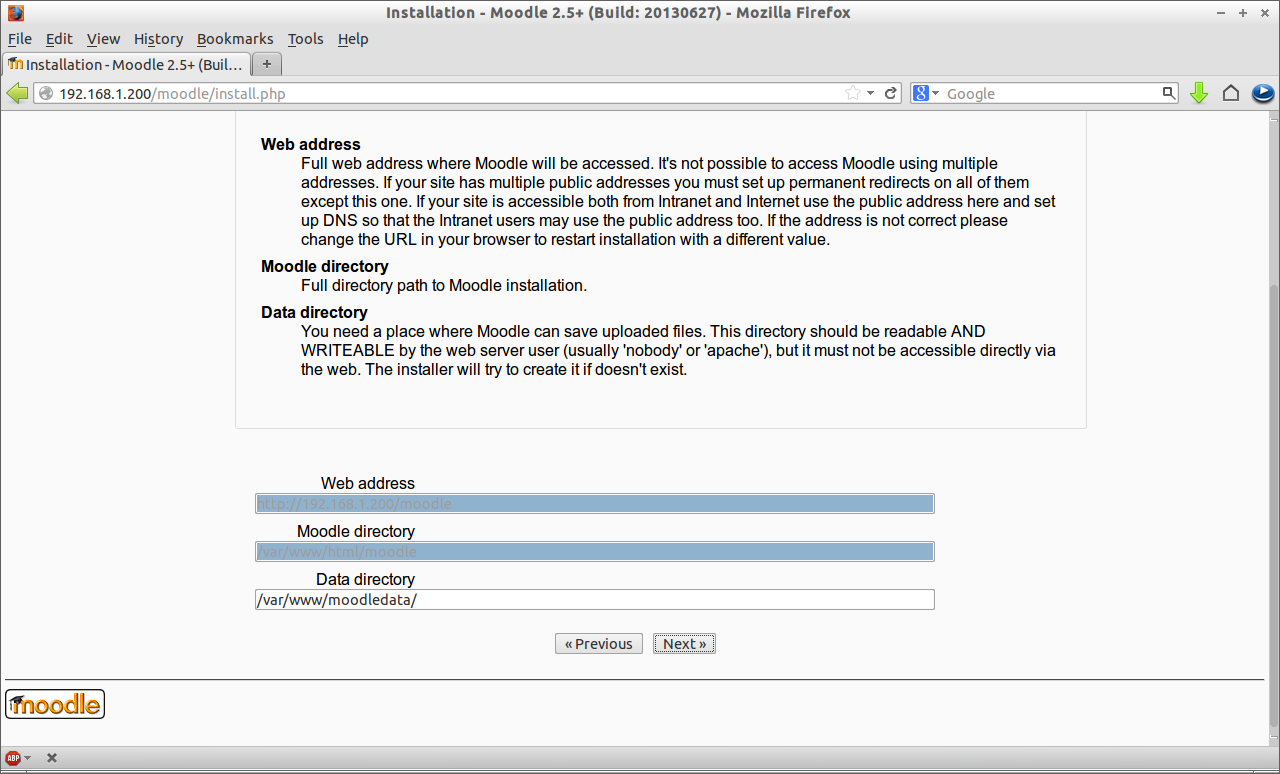
Installation - Moodle 2.5+ (Build: 20130627) - Mozilla Firefox_001Enter Moodle data directory path and press Next.
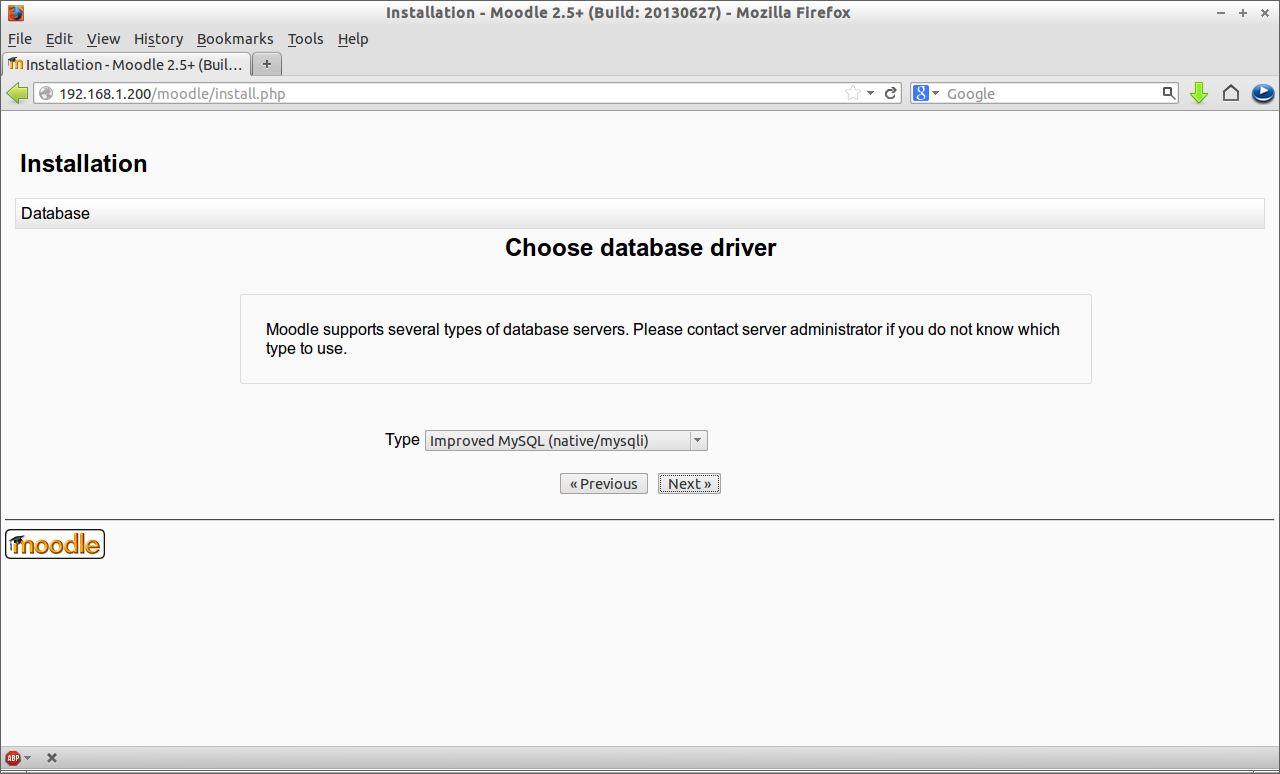
Installation - Moodle 2.5+ (Build: 20130627) - Mozilla Firefox_003Select the database driver. In my case it’s mysql. Press Next.
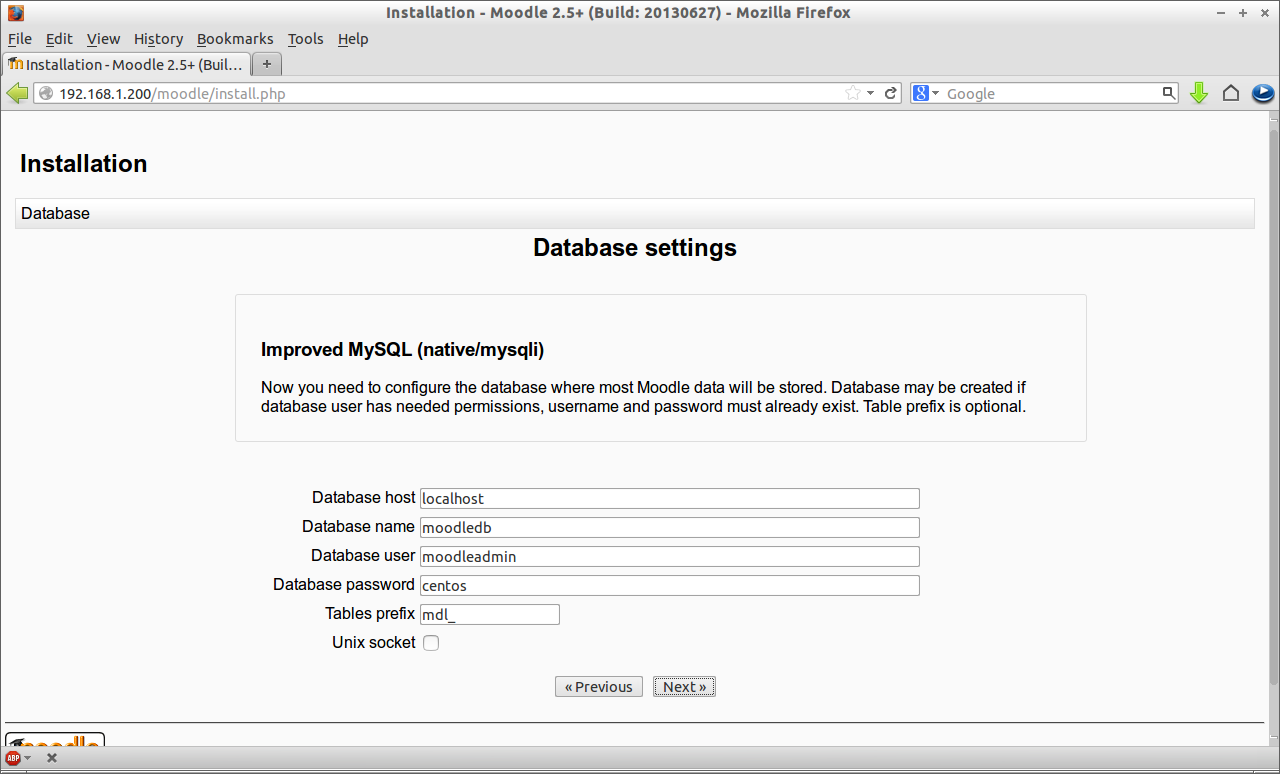
Installation - Moodle 2.5+ (Build: 20130627) - Mozilla Firefox_004Enter database name and database user details and press Next.

Installation - Moodle 2.5+ (Build: 20130627) - Mozilla Firefox_005You will be asked to save the settings. The installer will ask you to create a config.php file in your moodle root folder with the contents of below output.

Installation - Moodle 2.5+ (Build: 20130627) - Mozilla Firefox_006So let us create a config.php file with following command:

[root@server ~]# vi /var/www/html/moodle/config.php

Add the lines from the above output as shown below:

<?php  // Moodle configuration file

unset($CFG);
global $CFG;
$CFG = new stdClass();

$CFG->dbtype    = 'mysqli';
$CFG->dblibrary = 'native';
$CFG->dbhost    = 'localhost';
$CFG->dbname    = 'moodledb';
$CFG->dbuser    = 'moodleadmin';
$CFG->dbpass    = 'centos';
$CFG->prefix    = 'mdl_';
$CFG->dboptions = array (
  'dbpersist' => 0,
  'dbsocket' => 0,
);

$CFG->wwwroot   = 'http://192.168.1.200/moodle';
$CFG->dataroot  = '/var/www/moodledata/';
$CFG->admin     = 'admin';

$CFG->directorypermissions = 0777;

require_once(dirname(__FILE__) . '/lib/setup.php');

// There is no php closing tag in this file,
// it is intentional because it prevents trailing whitespace problems!

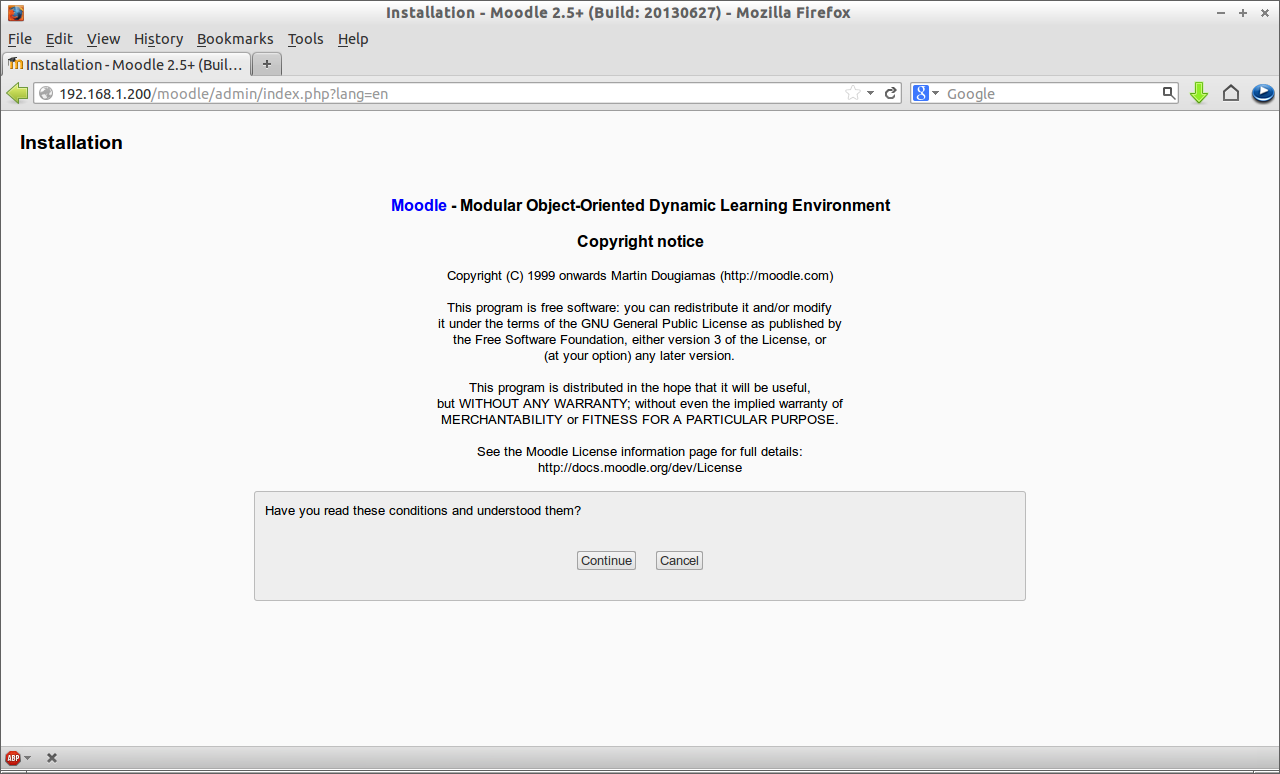
Now click Next. And click on Continue to accept the License Agreement.
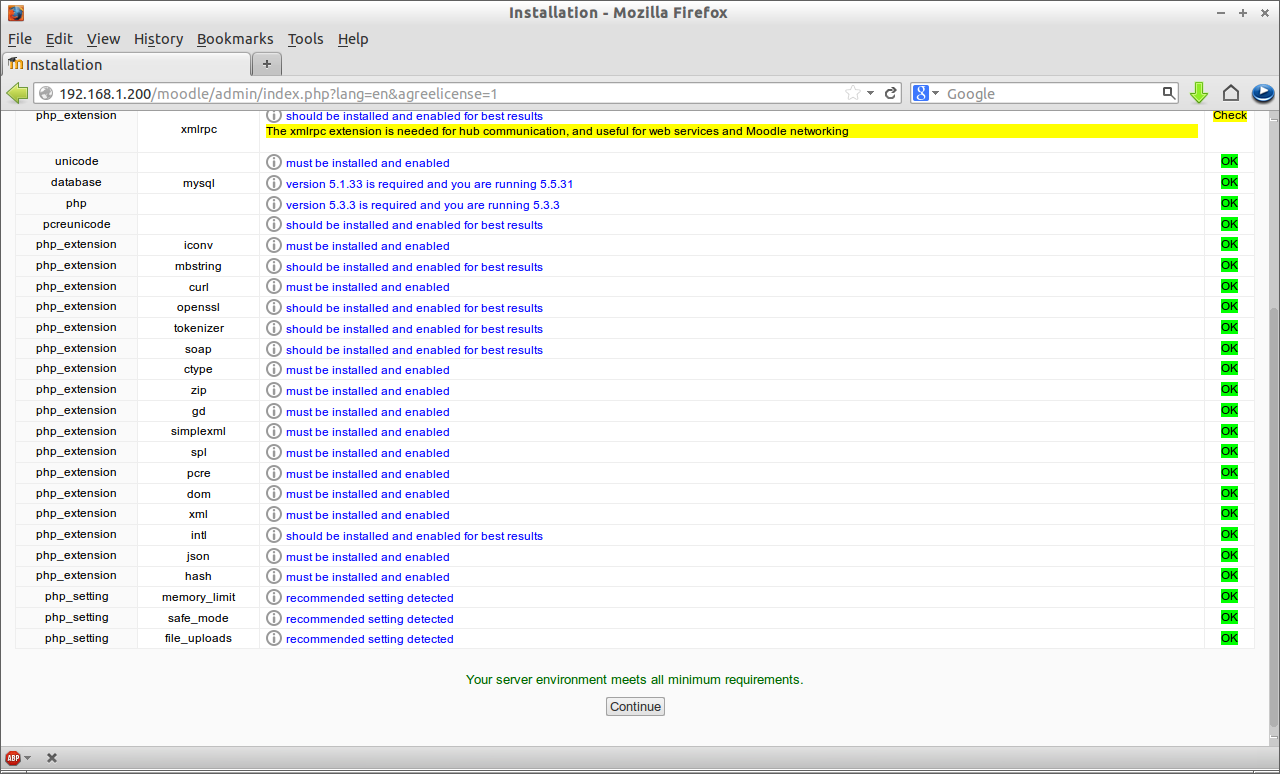
Installation - Moodle 2.5+ (Build: 20130627) - Mozilla Firefox_007Now the installer will check for all necessary modules are installed. If everything seems OK, press Continue.

Installation - Mozilla Firefox_008The moodle installer will create all necessary modules. This will take a while. After it completes everything, click Continue.

Installation - Moodle 2.5+ (Build: 20130627) - Mozilla Firefox_009 Create a Administrator account and click Update.

Installation - Mozilla Firefox_010Enter the Site name and click Save Changes button.
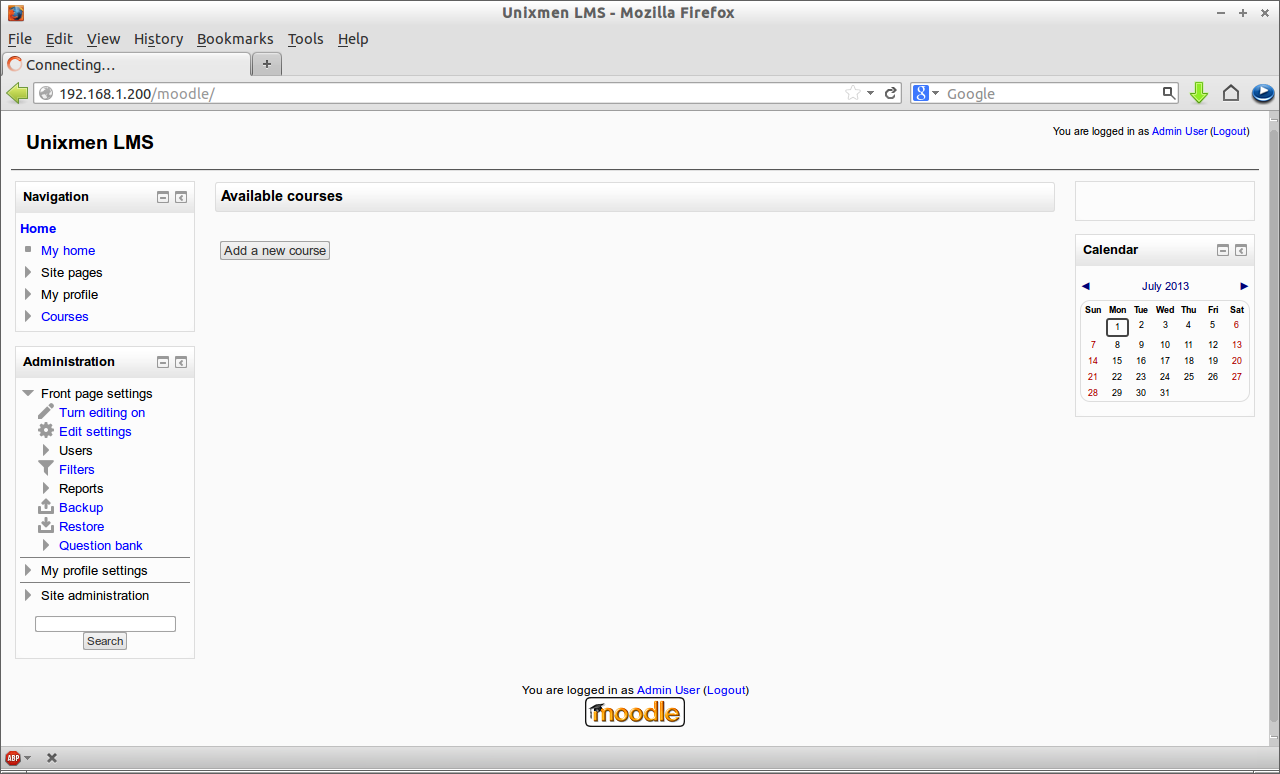
Unixmen LMS - Mozilla Firefox_012Now your moodle site has been successfully installed.

Setup cron for Moodle

It is very important to setup Cron. The Moodle ‘cron’ process is a PHP script that must be run regularly in the background. The Moodle cron script runs different tasks at differently scheduled intervals. The Moodle cron script runs tasks include sending mail, updating Moodle reports, RSS feeds, activity completions, posting forum messages and other tasks. Since different tasks have different schedules, not every task will run in Moodle when the cron script is triggered.

Install crontab package if it is not installed already:

[root@server ~]# yum install cronie

Now check which user is running the web server using the following command:

[root@server ~]# grep -i user /etc/httpd/conf/httpd.conf

This will display a result as shown below:

# User/Group: The name (or #number) of the user/group to run httpd as.
#  . On SCO (ODT 3) use "User nouser" and "Group nogroup".
#    suggested workaround is to create a user www and use that user.
User apache
# UserDir: The name of the directory that is appended onto a user's home
# directory if a ~user request is received.
# The path to the end user account 'public_html' directory must be
# accessible to the webserver userid.  This usually means that ~userid
# must have permissions of 711, ~userid/public_html must have permissions
<IfModule mod_userdir.c>
    # UserDir is disabled by default since it can confirm the presence
    # of a username on the system (depending on home directory
    UserDir disabled
    # To enable requests to /~user/ to serve the user's public_html
    # directory, remove the "UserDir disabled" line above, and uncomment
    #UserDir public_html
# Control access to UserDir directories.  The following is an example
LogFormat "%h %l %u %t \"%r\" %>s %b \"%{Referer}i\" \"%{User-Agent}i\"" combined
LogFormat "%{User-agent}i" agent
#LogFormat "%h %l %u %t \"%r\" %>s %b \"%{Referer}i\" \"%{User-Agent}i\" %I %O" combinedio

From the above result, apache user is running the web server. So let us set the cron job for apache user:

[root@server ~]# crontab -u apache -e

Add the followong line:

*/15 * * * *        /usr/bin/php /var/www/html/moodle/admin/cli/cron.php

The above command will run cron job every 15 minutes intervals on all day. Make sure that you have replaced with your own moodle path. Save and exit the file.

Go through the Moodle documentation page to know more about Moodle installation and administration.

--------------------------------------------------------------------- Install Moodle Learning Managment System on CentOS 6

How to Monitor Network Bandwidth with vnstat

$
0
0

There are many tools available to monitor our network bandwidth usage at a particular date and time. Those tools will collect and send the bandwidth usage to system or network admins to find out what’s going on in there network infrastructure. We have already shown you how to monitor network bandwidth using iftop tool. Well, today i have come back with a tool called vnstat.

vnStat is a console-based network traffic monitor for Linux and BSD that keeps a log of network traffic for the selected interface(s). It uses the network interface statistics provided by the kernel as information source. This means that vnstat won’t actually be sniffing any traffic and also ensures light use of system resources. However, in Linux at least a 2.2 series kernel is required.

It is very simple to install and use. It can monitor multiple network interfaces at the same time. It will display the output summary in hourly, daily, weekly and as well as monthly basis. And it can be used without root permissions.

Install vnstat

On Debian/Ubuntu:

sk@sk:~$ sudo apt-get install vnstat

On RHEL/CentOS:

vnstat will not be found in Official repositories, so add EPEL repository to install vnstat:

[root@server ~]# rpm -ivh http://dl.fedoraproject.org/pub/epel/6/i386/epel-release-6-8.noarch.rpm

Install vnstat with following command:

[root@server ~]# yum install vnstat -y

Usage

To view all network interfaces statistics, enter the following command:

sk@sk:~$ vnstat

This shows network bandwidth usage of all network interfaces:

rx      /      tx      /     total    /   estimated
eth1:
       Jul '13      4.77 MiB  /     204 KiB  /    4.97 MiB  /       0 KiB
       today      4.77 MiB  /     204 KiB  /    4.97 MiB  /      --    

 wlan0: Not enough data available yet.
 eth0: Not enough data available yet.

To view a particular interface bandwidth usage, enter the command:

sk@sk:~$ vnstat -i eth1

The above command will display the bandwidth usage of eth1:

Database updated: Thu Jul  4 13:26:10 2013
   eth1 since 07/04/13
          rx:  4.82 MiB      tx:  249 KiB      total:  5.07 MiB
   
monthly
                     rx      |     tx      |    total    |   avg. rate
     ------------------------+-------------+-------------+---------------
       Jul '13      4.82 MiB |     249 KiB |    5.07 MiB |    0.13 kbit/s
     ------------------------+-------------+-------------+---------------
     estimated        --     |      --     |      --     |

   daily
                     rx      |     tx      |    total    |   avg. rate
     ------------------------+-------------+-------------+---------------
         today      4.82 MiB |     249 KiB |    5.07 MiB |    0.86 kbit/s
     ------------------------+-------------+-------------+---------------
     estimated        --     |      --     |      --     |

To view the hourly usage, use the parameter “-h” without quotes:

sk@sk:~$ vnstat -i eth1 -h
 eth1                                                                  13:31 
  ^                                                                      r     
  |                                                                       r     
  |                                                                       r     
  |                                                                       r     
  |                                                                       r     
  |                                                                       r     
  |                                                                       r     
  |                                                                       r     
  |                                                                       r     
  |                                                                       r     
 -+---------------------------------------------------------------------------> 
  |  14 15 16 17 18 19 20 21 22 23 00 01 02 03 04 05 06 07 08 09 10 11 12 13
h  rx (KiB)   tx (KiB)      h  rx (KiB)   tx (KiB)      h  rx (KiB)   tx (KiB) 
14          0          0    22          0          0    06          0          0
15          0          0    23          0          0    07          0          0
16          0          0    00          0          0    08          0          0
17          0          0    01          0          0    09          0          0
18          0          0    02          0          0    10          0          0
19          0          0    03          0          0    11          0          0
20          0          0    04          0          0    12          0          0
21          0          0    05          0          0    13       4964        290

To view daily usage, use the parameter “-d”:

sk@sk:~$ vnstat -i eth1 -d 

eth1  /  daily
         day         rx      |     tx      |    total    |   avg. rate
     ------------------------+-------------+-------------+---------------
      07/04/13      4.82 MiB |     249 KiB |    5.07 MiB |    0.86 kbit/s
     ------------------------+-------------+-------------+---------------
     estimated        --     |      --     |      --     |

To view weekly usage, use the parameter “-w”:

sk@sk:~$ vnstat -i eth1 -w

 eth1  /  weekly
                      rx      |     tx      |    total    |   avg. rate
   ---------------------------+-------------+-------------+---------------
    last 7 days      4.85 MiB |     290 KiB |    5.13 MiB |    0.07 kbit/s
   current week      4.85 MiB |     290 KiB |    5.13 MiB |    0.14 kbit/s
   ---------------------------+-------------+-------------+---------------
      estimated        --     |      --     |      --     |

And to view monthly usage, use “-m”:

sk@sk:~$ vnstat -i eth1 -m

 eth1  /  monthly

       month        rx      |     tx      |    total    |   avg. rate
    ------------------------+-------------+-------------+---------------
      Jul '13      4.85 MiB |     290 KiB |    5.13 MiB |    0.14 kbit/s
    ------------------------+-------------+-------------+---------------
    estimated        --     |      --     |      --     |

To see top ten network bandwidth usage of eth1:

sk@sk:~$ vnstat -i eth1 -t

To view the bandwidth usage of 5 seconds, enter the following command:

sk@sk:~$ vnstat -i eth1 -tr

To view the usage of 10 seconds, enter the following command:

sk@sk:~$ vnstat -i eth1 -tr 10

Finally to see the real live bandwidth usage of eth1:

sk@sk:~$ vnstat -i eth1 -l

This command will collect the network bandwidth usage of eth1. You can stop the process by pressing CTRL+C at any time.

Sample Output:

Monitoring eth1...    (press CTRL-C to stop)

   rx:        0 kbit/s     0 p/s          tx:        0 kbit/s     0 p/s
   rx:        0 kbit/s     0 p/s          tx:        0 kbit/s     0 p/s^C

 eth1  /  traffic statistics

                           rx         |       tx
--------------------------------------+------------------
  bytes                    17.96 MiB  |        4.48 MiB
--------------------------------------+------------------
          max            3.78 Mbit/s  |      420 kbit/s
      average           31.62 kbit/s  |     7.90 kbit/s
          min               0 kbit/s  |        0 kbit/s
--------------------------------------+------------------
  packets                      22511  |           21780
--------------------------------------+------------------
          max                336 p/s  |         206 p/s
      average                  4 p/s  |           4 p/s
          min                  0 p/s  |           0 p/s
--------------------------------------+------------------
  time                 77.55 minutes

Hope you have a basic idea about vnstat. You may wish to view graphs in cool graphical mode, well then check our article about vnStat PHP frontend tool.

Happy Monitoring!

--------------------------------------------------------------------- How to Monitor Network Bandwidth with vnstat

How to Administer Your Databases with Adminer

$
0
0

Adminer, formerly known as phpMinAdmin, is a full-featured database management tool written in PHP. It is available for MySQL, PostgreSQL, SQLite, MS SQL and Oracle.

Why Adminer instead of phpMyAdmin?

Though phpMyAdmin is one of the famous tool for managing MySQL databases, Adminer has many significant features than phpMyAdmin such as user experience, performance and security. A detailed comparison between Adminer and phpMyAdmin is found here.

Install Adminer on Debian/Ubuntu

Adminer is available on Ubuntu/Debian PPA. So we don’t have to add any extra PPA:

sk@server1:~$ sudo apt-get install adminer

Once you installed Adminer, navigate to http://ip-address/adminer from your browser. You should see a screen something like below. Enter the MySQL username and password.

Login - Adminer - Mozilla Firefox_007Now you will able to connect to Adminer console.

Select database - Adminer - Mozilla Firefox_008

Install Adminer on CentOS/RHEL

Download it using the following command:

[root@server ~]# wget http://sourceforge.net/projects/adminer/files/Adminer/Adminer%203.7.1/adminer-3.7.1.zip

Extract it using command:

[root@server ~]# unzip adminer-3.7.1.zip

Copy the adminer folder to webserver (Apache) root document folder:

[root@server ~]# cp -R adminer-3.7.1/ /var/www/html/adminer

Now restart Apache service:

[root@server ~]# service httpd restart

Once you have installed Adminer, navigate to http://ip-address/adminer/adminer from your browser. You should see a screen something like below. Enter the MySQL username and password.

Login - Adminer - Mozilla Firefox_009That’s it. Now you’re connected to Adminer.

Select database - Adminer - Mozilla Firefox_010From here you can create, modify, delete databases/users etc. You don’t have to memorize too many MySQL commands. All the operations can be done in this helpful graphical interface.

--------------------------------------------------------------------- How to Administer Your Databases with Adminer

Viewing all 62 articles
Browse latest View live